53
Manual heating block
NANOCOLOR
®
VARIO C2
/
VARIO 4
EN, 08.2021
14. Quality Control
Each institution must establish its own QC policy.
To check the performance of the device, we recommend measuring the temperature with a
thermocouple. The temperature accuracy can be checked with the
NANOCOLOR
®
USB T Set
(REF 919921) or
NANOCOLOR
®
T Set (REF 919917) provided by MACHEREY‑NAGEL. These
temperature probes are suitable for checking the device in case of a deviation and for adjusting
the device.
Pressing
in Settings
takes you to test equipment monitoring with (USB) T‑Set.
Press the
key to open the test menu. In the test menu all programmed temperatures are
checked. In this menu the calibration of the device is not changed.
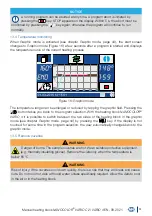
Press the
button to open the calibration menu (Figure 18). In the calibration menu, all
programmed temperatures are readjusted using the base calibration stored in the (USB) T‑Set.
After finishing a calibration, the acceptance of the new values must be confirmed with
.
Figure 18: Menu for device adjustment
Pressing the
button in the calibration menu will restore the device calibration to factory
default. With the heating block
NANOCOLOR
®
VARIO 4
, the block to be tested (left or right)
can be selected in the two menus
and
with the keys
and
.
Press the
key to start the selected program. The determined temperature deviations are
displayed in different colors depending on the deviation.
Deviation
Color
< 1 °C
Green
1 < x < 2 °C
Yellow
> 2 °C
Red
A report is stored in the device for both temperature testing and calibration. This report can be
output using the software supplied (see Data Export).
Summary of Contents for Nanocolor Vario C2
Page 2: ......

