background image

2. Installation:

This section provides complete instructions for mounting the DV-2000 MTS/LR. Before you install
the DV-2000 MTS/LR system, make sure you have:

-A message or music on hold input on your phone system or line level input to your public

address system.

-A non-switchable 110VAC electrical outlet near the location where the unit is to be installed.

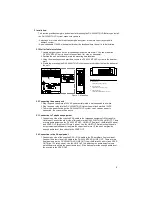
2.1 Wall or Table Installation:

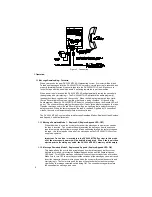
1. Locate a proper space on the telephone equipment board or wall.  You can mount the

DV-2000 MTS/LR unit in one of three positions: flat, side, or horizontal.

2. Position the unit on the board; mark the mounting hole locations.
3. Using the mounting screws provided, secure the DV-2000 MTS/LR system to the board or

wall.

4. If table top mounting the DV-2000 MTS/LR, stick the enclosed rubber feet on the bottom of

the unit.

DIGITAL AUTOLOAD STORECASTER

 & MUSIC THRU SYSTEM

APPEND
REPLACE

AU DIO

+

12VDC

_

REC

EJECT

LEVEL
BGM IN

LEVEL

SPKR OUT

APHEX

LINE OUT

BGM FADE

13

SPEAKER

DOWN

ON

OFF

11

12

UP

LOCAL

RECORD

14

15

17

16

18

DV-2000 MTS/LR SERIES

APPEND
REPLACE

EJECT

REC STOP

ON

OFF

1

2

MESSAGE SELECTION

3

4

5

7

6

8

MIN

HANDSET

INPUT

MESSAGE ONLY

MUSIC & MESSAGE

MODE

19

20

MUSIC ONLY

PLAY MODE

SEC

MUSIC INTERVAL

9

10

TENS

ONES

R

Mounting Options:

A. Back of unit
     against wall - flat ( 10" x 8" )

B. Left side of unit

     against wall - side ( 2.2" x 8" )

C. Left side of unit
     against wall horizontally ( 8" x 2.2" )

A

B

C

Figure 1 - Mounting

2.2 Connecting the power pack

1. Plug the power pack into a 120VAC power outlet which is not connected to a switch.
2. Plug the power plug into the DV-2000 MTS/LR system’s power jack marked 12VDC.
3. There is no power switch on the DV-2000 MTS/LR system, so as soon as power is

connected, the system will be active.

2.3 Connection to Telephone equipment

1. Connect one side of the supplied RCA cable to the telephone equipment's Message-On-

Hold input. Connect the other side of this cable to the DV-2000 MTS/LR's LINE OUT. There
are two audio outputs on the DV-2000 MTS/LR, LINE OUT (low level, +4dB into 600 ohms),
and SPKR OUT (high level, 1W into 8 ohms). Use the LINE OUT first adjusting the audio
output volume potentiometer to obtain the correct audio level. If this does not provide
enough audio level, then switch to the SPKR OUT.

2.4 Connection to the PA equipment

1. Connect one side of the supplied RCA – RCA cable to the PA amplifier’s line level input.

Connect the other side of this cable to the DV-2000 MTS/LR’s LINE OUT.  There are two
Audio outputs on the DV-2000 MTS/LR, LINE OUT(Low, +4dB into 600 ohms), and SPKR
OUT(High, 1W into 8 ohms). Use the LINE OUT first adjusting the audio output volume
potentiometer to obtain the correct audio level. If this does not provide enough audio level,
then switch to the SPKR OUT.

5

Summary of Contents for DV-2000

Page 1: ...Music Thru System with Local Record User s Manual Version 1 0 Revised 2 23 2004 Doc 99 20 180 25 00 MACKENZIE LABORATORIES INC 1163 Nicole Court Glendora CA 91740 USA Tel 909 394 9007 Fax 909 394 9411 Email info macklabs com Web www macklabs com ...

Page 2: ...he unit must be securely attached to a wall board rack or table mounted 15 Use correct power source Use only the power pack supplied CAUTION If any wiring from the system leaves the premises you must use proper electrical protectors Regulations FCC Part 15 Radio Frequency Interference The DV 2000 MTS LR generates and uses radio frequency energy and if not installed and used in strict accordance wi...

Page 3: ...ng Diodes descriptions 10 3 6 Audio adjustments 11 3 7 Slide Switch descriptions 11 3 8 Connections 12 4 Power failure recovery 12 5 Troubleshooting guide 12 6 Audio Tape Production Format 13 7 WARRANTY SERVICE RETURNS 14 7 1 Warranty Coverage 14 7 2 What we ask you to do 14 7 3 What this warranty does not cover 14 Shipping Container Contents The following items should be found in the container of...

Page 4: ...non volatile FLASH memory that protects them from loss during power outage The DV 2000 MTS LR supports up to 20 individual messages Each message has an enable switch that allows the user to manually select which messages will be played for a particular application The Background Music BGM input is for combining messages with an external music source such as CD or satellite A built in timer lets th...

Page 5: ...all flat 10 x 8 B Left side of unit against wall side 2 2 x 8 C Left side of unit against wall horizontally 8 x 2 2 A B C Figure 1 Mounting 2 2 Connecting the power pack 1 Plug the power pack into a 120VAC power outlet which is not connected to a switch 2 Plug the power plug into the DV 2000 MTS LR system s power jack marked 12VDC 3 There is no power switch on the DV 2000 MTS LR system so as soon ...

Page 6: ...ssage is being recorded When the last message on the tape is recorded signified by 15 seconds of silence the system will automatically rewind the cassette tape The DV 2000 MTS LR system offers two Message Download Modes Replace All and Replace and Append See below for details 3 1 1 Message Download Mode 1 Replace All Replace Append LED OFF When this mode is used the system will erase all the messa...

Page 7: ... Downloading Local Record Handset You may also create messages for the DV 2000 MTS LR by recording them directly to the unit using the optional LR HSET handset This feature allows you to make a custom recording to any of the 20 message locations on the unit These messages may be updated at any time for maximum flexibility 1 Plug the LR HSET sold separately into the Local Record Input 2 Press the L...

Page 8: ...g is not saved when power is removed and reapplied to the unit Operation of the unit in Replace Append mode is described in the Message Download section 3 1 Speaker pushbutton Black locking A monitor speaker on the front side of the unit allows the local user to hear the Audio being output by the DV 2000 MTS LR Pressing this button will activate the monitor speaker Releasing the button will deacti...

Page 9: ... is attenuated or lowered BGM Fade Down pushbutton Black momentary Pressing this button will increase the ducking amount or in other words lower the BGM audio being mixed in with the audio output when a pre recorded message is played Pressing the button one time will attenuate the BGM audio approximately 1dB If the button is pressed and held the BGM level will be lowered approximately 8dB per seco...

Page 10: ...ng can be performed while the unit is playing messages 3 8 Connections 12VDC 2 5mm Barrel connector The system is powered by 12VDC Use only the AC DC power adapter supplied by the manufacturer to guarantee proper operation BGM IN RCA connector A 10K ohm transformer isolated audio input When installing the DV 2000 MTS LR system connect this input to the output of the background music source LINE OU...

Page 11: ...evel Use the 8 ohm output instead of the line level output Can t hear anything through the monitor speaker If both Record and M O H are off there are no recorded messages on the system Press the Speaker button so that it locks in the depressed position If the audio output is adjusted low the level from the monitor speaker will also be low The system didn t record all the messages on the tape If th...

Page 12: ...pated profits consequential damages loss of item or other operation or use of this product and MACKENZIE S maximum liability shall not ever be greater than the price paid for the equipment This warranty gives you specific legal right Your rights may vary from state to state Inquiries regarding use repair and service should be made to MACKENZIE LABORATORIES INC 1163 Nicole Court Glendora CA 91740 U...

Page 13: ...___ State ______ Zip ____________ Phone __________________ Fax __________ Email ____________ Return warranty card via FAX 909 394 9411 MAIL Address on reverse side ONLINE www macklabs com registration html NOTES ____________________________________________________________________ ____________________________________________________________________ __________________________________________________...

Page 14: ...ced for their compatibility ease of use and value Included are input output controllers speakers amplifiers motion sensors and pushbuttons among others Transit Mackenzie is making a difference in transit applications with innovative solutions for ADA compliance and Passenger Information Systems These products address a variety of audio and text messaging requirements and support both in vehicle an...

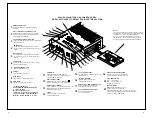
Page 15: ... to 1W into 8 ohm Use this output if more drive is needed to reach a more comfortable listening level LEVEL Adjusts the volume to the line level or power audio outputs MONITOR SPEAKER Allows user to preview message recording and play back BGM INPUT Connect to external source of music BGM LEVEL Adjusts level of external music source APPEND REPLACE PUSH BUTTON Toggles the Append Replace mode as disp...

Reviews: