


70
Compact Mixer Reference Guide
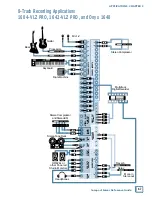
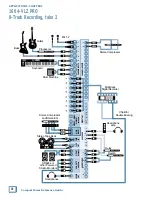
APPLICATIONS: CHAPTER 2
will prevent feedback in the monitor speakers, it will
also kill the cue mix to the musicians in the studio. If
the live mic is in another room (like the studio), or
quite far away from the speakers, you’re safe.
Set the recorder to Input Monitor mode (or Auto
Input Monitor with all of its Record Ready buttons
pressed) and you should see the recorder’s meters
move as you play.
If you’re using a computer as your recorder, you’ll
have to locate those virtual buttons yourself. Check
the manual – there may be an “input monitor” button
on the track portion of the screen, or it may be in
a separate control panel. Some newer DAW pro-
grams come closer to emulating the behavior of a
multitrack recorder and actually have a “multitrack
recorder monitor” mode, which accurately mimics
the monitor switching of a multitrack recorder.
If the record levels on all channels look about right
when you’re wailin’, you’re good to go. But what if
they aren’t?
Used to be that all recorders had input level
controls, but today many (and this includes most
sound cards) don’t. If your recorder has input level
controls, use them to adjust the record level accord-
ing to the recorder’s instructions. If not, you’ll need
to make adjustments from the mixer.
If the recording level is much too high, this is
because the recorder is expecting a semi-pro level
signal and your Mackie is sending to it at pro level.
You can lower the faders on channels 1-8 to adjust
the level going to the recorder.
If you need to raise the record level, as you may
with a less sensitive sound card, listen carefully for
distortion. When you push the faders up past unity
gain, you’ll be running closer to the clipping point
of the mixer channel. Remember, particularly with
digital recorders, it’s better to set the record level
conservatively than to risk distortion. See the meter-
ing discussion in the Tips section for some hints on
setting levels and why you need not worry if you can’t
turn on all the meter lights all the time.
There’s one more set of TRIMS to adjust, and those
are on Channels 9-16, the Recorder Return channels.
With the band playing and the recorder still set for
Input monitoring, perform the Level-Setting Proce-
dure on channels 9-16. You can cheat a little here
– set one TRIM using the SOLO button, then set all
the rest of the Recorder Return TRIMs to the same
position as the one you set using the offi cial method.
You can get away with this if you set the record level
properly, because all the recorder returns will be
coming in at the same level relative to their inputs.
Once all your tracks are recorded, you’ll want to re-
check the TRIMs individually before doing the fi nal
mixdown.
This sounds complicated, but in reality, once you
get the hang of it, the procedure it takes less time to
do it than to read about it.
Go......!
Now for the easy part. Start the recorder and play
like you’ve never played before. Then rewind, press
Play, and be amazed at your musical talent.
If you’re a one-person band, you’ll be recording
tracks in multiple passes (which is probably why you
wanted to get into multitrack recording in the fi rst
place).
Keep your wits about you. Once you’ve recorded a
track, don’t forget to switch the recorder out of Re-
cord Ready, so you don’t erase the track on the next
pass. And if you’re recording successive passes with
the same mic, remember to assign it to the next track
using the mixer’s PAN and ASSIGN.
When recording the second pass, if you did every-
thing correctly, you should hear your fi rst pass play-
ing back. This gives you something to play along to.
Pretty soon you’ll be overdubbing just like a pro. Use
Channels 9-16 to adjust the mix that you’re listening
to while overdubbing.
Don’t forget the warning about mics getting too
close to speakers. You can record keyboards, drum
machines, and electric instruments while listening
to the control room monitor speakers, but when it
comes time to record the vocals or acoustic guitar
tracks, kill the control room speakers and plug in the
headphones.
Mixdown
A really cool thing about this setup is that you’re
ready to mix at any time. No cables to patch, no but-
tons to press. In fact, you were probably doing some
panning, level adjustments, and maybe some EQing
of the recorder return channels as you were tracking.
These are all elements of mixing and the more you
do it, the better you get. For now, the most important
thing is to learn how to use the tools.
If it sounds great just the way it is, mixdown is as
simple as checking the record level and pressing the
Record button on the 2-track recorder.


