74
Compact Mixer Reference Guide
APPLICATIONS: CHAPTER 2
in stereo, but it wouldn’t illustrate the next point, so
give us a break while we’re in teaching mode.
It’s time for some housekeeping. We’re done with
the drums, bass, and guitar for a while, so un-as-
sign them from Busses1-2 and 3-4. We’ll need those
outputs for other things and we don’t want stray
electronic noise creeping in.
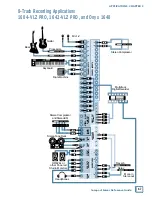
Now, let’s send the keyboard to a recorder track:
Channel
Source
Assign
Pan
Track
5
Keys L
1-2
L
5
6
Keys R
1-2
L
5
Note that we’ve panned both keyboard outputs to
the left, sending them to SUB OUT 1. Since that’s
wired to Track 5 as well as Track 1, the keyboard
signal will get to the desired track.
Put Track 5 into Record, and tickle the ivories
while listening to the guitar, bass, and drums. Start-
ing to sound like a band? Good!
Listen closely to the keyboard sound
when combining stereo outputs to mono.
Patches that rely on phase shifting
between the stereo channels, lose something when
collapsed to mono. You may want to use a different
patch, or fi re the producer and record the keyboard
in stereo.
Bounce Time
Let’s take inventory of our recording so far:
Track 1 – Drums L
Track 2 – Drums R
Track 3 – Rhythm Guitar
Track 4 – Bass
Track 5 – Background Keyboard
Play through the rhythm tracks a few times, and
work up a good mix using the levels, pans, EQ, and
effects if they’re called for. Give it plenty of thought
since, after the next step, you’ll have to live with this
mix for the rest of the project. You’ll probably want
to pan the drums fully left and right, put the bass in
the center, and pan the rhythm guitar and keyboard
fairly far off center on opposite sides to leave room
for the leads.
Note that Track 6 is still available,
You could have used that if you chose to
record the keyboard in stereo. But there’s
another reason why we left Track 6 open. On a nar-
row format analog recorder (1/2" or 1/4" 8-track for
example), it’s possible to get feedback when bounc-
ing to an adjacent track due to coupling between
tracks right at the record head. This is never a
problem with a digital recorder or DAW, and almost
never a problem with a standard track width analog
recorder (1" 8-track) but it’s something you should
be aware of if you’re using a semi-pro analog tape
deck.
When you’re happy with your rhythm section mix,
it’s time to record it. We’ll put it on Tracks 7-8. Un-
assign all the input channels (1-8). Now, switch the
assignment of the rhythm channels (9-13) from L-R
to busses 3-4.
Put Tracks 7-8 into Record Ready and roll the tape.
You should hear your rhythm mix coming in on Chan-
nels 15-16. Check the record level on Tracks 7-8 and
use the SUB 3-4 faders to adjust if necessary.
When the level looks good and the mix sounds
good, rewind, press the Record button, and see if you
can dance to it.
Now, rewind and play back your rhythm mix a
couple of times to be sure it’s what you want. You’ll be
erasing the tracks that made up that mix, so there’s
no turning back.
Pass N
The good news is that you now have a rhythm
section recorded and six more tracks available for
other parts. What you do with them and the order
in which you record further passes depends on your
song and your creativity. A basic demo might only
require a lead guitar or keyboard, a lead vocal, and
maybe a background vocal. Plenty of room for that.
Simply continue the procedure of assigning an input
to a track, recording that track, and moving on until
you’ve fi lled all the tracks and recorded all the parts
you wanted.
You can continue the bounce process, though, if
you need to record more parts than you have remain-
ing tracks. Want a fi ve-layer guitar solo? Record the
parts on tracks 1, 2, 3, 4, and 5, then bounce them to
Track 6. Want a four part backup chorus? Record on
Tracks 2, 3, 4, and 5, then mix and bounce them to
Track 1. It’s up to you.
Studio Headphone Monitoring
The mixer’s headphone output follows the control
room source, which, most of the time, is the L-R
MAIN MIX. When tracking, you may want to hear
something different in the headphones. This hookup
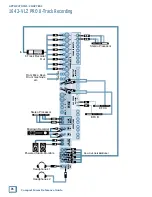
diagram shows an external Headphone Amplifi er
connected to the AUX 2 OUTPUT.

