


SP260 2x6 Spe
ak
er Pr
oc
es
sor
16
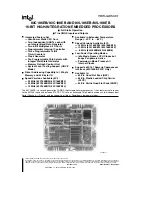
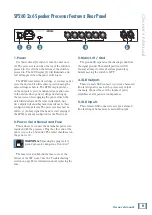
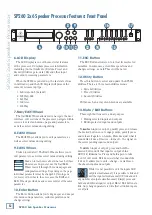
SP260 2x6 Speaker Processor
Security Utilities
This is where to lock the SP260 to prevent anyone
from accidentally (or intentionally) changing the
settings. You also have control over some of the
behaviors after it’s been locked.
As discussed earlier, the way to get here from the
main menu is by pressing the Utility Button [12]. Once
inside the Utility Menu, scroll the Nav/Edit1 Wheel [7]
clockwise to Security Utilities. Two clicks should do the
trick. Now press the Enter Button [10] again to reach
the sub-menus as listed below.
• Show Parameter
• Lock Unit
• User Password
• Enable Password
We will go through each of these sub-menus, one-by-
one (and in order), but know that...
(1) The Nav/Edit1 Wheel [7] is used to navigate
between the four Security Utilities.
(2) The ESC button [11] is used to return to the
Security Utilities menu.
(3) The Enter Button [10] is used to enter and edit
the chosen Security Utility.
Without further ado, press the Enter Button [10] to
enter Show Parameter.
Show Parameter
Once an SP260 has been locked, you have the option
of allowing the various processing parameter values to
be shown or not.
Turn the Edit2 [8] or Edit3 [9] Wheel to scroll
between
Parameter will be shown
[default] and
Parameter will not be shown
. If changing, press the
Enter Button [10] only once here. The processor will
return to the Show Parameter splash screen.
Lock Unit
Locking a SP260 prevents accidental changes to its
settings.
Turn the Edit2 [8] or Edit3 [9] Wheel to scroll
between
Lock : Off
[default] and
Lock : On
. If changing,
press the Enter Button [10] only once here.
When locked, a symbol resembling a key will
appear in the lower-right hand area of the
LCD Display [6]. Pressing the Utility Button [12]
here returns you directly to the Lock Unit splash screen.
When unlocked, the key symbol disappears and the
processor will return to the Security Utilities splash
screen.
User Password
For the ultimate protection from accidental and
intentional parameter adjustments, set up a user
password here. Only those with the password will
be allowed access to edit processor settings.
The Nav/Edit1 Wheel [7] moves the cursor left and
right while the Edit2 [8] and Edit3 [9] Wheels change
the text.
In order to change the password, the
current password needs to be entered.
The default / factory password is: 000000
Enter the current password and press the Enter
Button [10]. It will now prompt you for a new
password. Use as few as one (and up to a maximum
of six) characters, using any combination of letters,
numbers and symbols. Enter a new password and
press the Enter Button [10]. It will now prompt
you to confirm the new password. Enter it and press
the Enter Button again to confirm. The processor will
return to the User Password splash screen.
If the entered password is wrong, the splash screen
will display “Password Wrong!” and the processor will
return to the User Password splash screen without
changing the password.
The password has been updated, but it is still
disabled. This leads us to the fourth – and final –
sub-menu:
Enable Password
Here is where the user password is enabled.
The Nav/Edit1 Wheel [7] moves the cursor left
and right while the Edit2 [8] and Edit3 [9] Wheels
change the text.
Enter the correct password and press the Enter
Button [10]. Turn the Edit2 [8] or Edit3 [9] Wheel
to scroll between
Password : Disable
[default] and
Password : Enable
. If changing, press the Enter
Button [10] only once here.
When enabling, a symbol resembling a padlock will
appear in the lower-right area of the LCD Display [6].
Pressing the Utility Button [12] here returns you
directly to the User Password splash screen.
When disabling, the padlock symbol disappears
and the processor will return to the Security
Utilities splash screen.
The password will need to be entered to make
any changes once the SP260 has been locked
and password enabled. Therefore,
write it down
or tell a friend
!
If the password is gone forever, you will have to perform a
factory reset to restore the unit’s default settings
[see page 13].