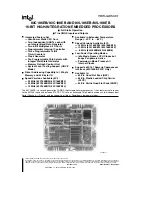


Owner’
s Manual
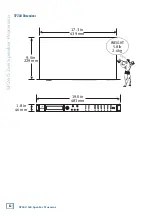
17
Owner’s Manual
Editing
Each input and output has an assortment of
powerful tools used to optimize the PA. Like we
did in the ‘Utility’ section of the manual, here we
will dissect each sub-menu of the inputs and outputs,
how to get there, how to edit and change settings and
what each wheel and button does in each situation.
Changes made in Editing mode occur in
real time.
As a reminder...
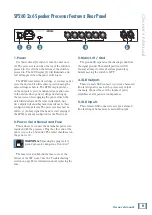
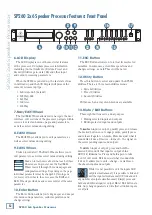
To edit an input or output, press and hold the
desired Edit Button [13] until that input or output’s
blue LED [14] illuminates. Press and hold again to
take it out of edit mode.
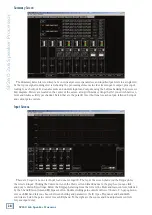
Inputs A / B:
Engaging Edit on Input A, Input B, or both
simultaneously allows you the opportunity to
edit the following:
• Gain
• Delay
• EQ Bypass
• 5-Band EQ
We will go through each of these sub-menus, one-by-
one (and in order), but know that...
(1) The Nav/Edit1 Wheel [7] is used to navigate
between Gain, Delay, EQ Bypass and 5-Band EQ. The
SP260 recalls where you are, so scroll the Nav/Edit1
Wheel [7] until you see the parameter you want to edit.
(2) The ESC button [11] is used to disengage Editing
and return to the previous menu.
(3) The Enter Button [10] is used to enter and edit
the chosen feature.
Without further ado, press the Enter Button [10]
to enter the currently selected input processing
parameter. An arrow –> will appear next to whatever
setting is ready to be edited: Gain, Delay, EQ Bypass or
EQ Bands 1 – 5.
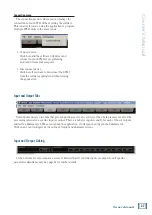
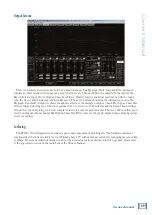
Gain
The input gain allows you to adjust the entire PA
levels up and down. This is where to calibrate the
signal level coming in from the mixer.
Press the Enter button [10] to enter and edit the
gain. An arrow –> will appear next to “Gain” indicating
that it is ready to be edited.
Use the Edit2 [8] or Edit3 [9] Wheels to change
the gain by ±0.1 dB per click. Turning these wheels
clockwise increases gain, while turning them counter-
clockwise decreases gain. The gain ranges from
–15.0 dB to +15.0 dB.
Press the ESC button [11] to exit the gain editing
mode.
Delay
Setting up input delays on the SP260 is useful for
aligning PA loudspeakers to the live instruments or
as a dedicated processor for delay stacks.
Press the Enter button [10] to enter and edit
the delay. An arrow –> will appear next to “Delay”
indicating that it is ready to be edited.
As stated on page 14, Delay may be represented in one
of three ways:
• Time(ms), or
• Distance(m) [default], or
• Distance(feet)
Use the Edit2 Wheel [8] to change the delay by:
• ±1.000 ms per click, or
• ~±0.340 m per click, or
• ~±1.115 feet per click
Use the Edit3 Wheel [9] to make fine adjustments.
The Edit3 Wheel changes the delay by:
• ±0.0208 ms per click, or
• ~±0.007 m per click, or
• ~±0.023 feet per click
Turning these wheels clockwise increases the delay
time, while turning them counter-clockwise decreases
the delay time.
The minimum and maximum delay ranges from:
• 0.0000 ms – 600.9984 ms
• 0.000 m – 204.339 m
• 0.000 feet – 670.233 feet
Press the ESC button [11] to disengage Editing.