background image


999562 – Revision A 


P a g e


17 of 28


9.2


Inspection 

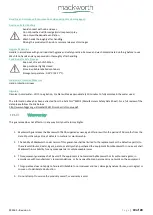
Inspection is to be completed prior to each use by the user of the Transfer Aid. 


Should any of the components in the table below fail the inspection, DO NOT use the Transfer Aid. 

Contact your local authorised dealer for service – contact details are on the last page of this manual. 


Ensure all component inspections in the Table below are completed prior to each use of the Transfer Aid.  


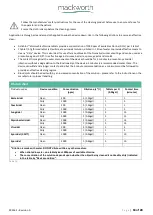
Check List before Use 

Component 

Service/Inspection required 

Generic 

Visual inspection of the external of the Transfer Aid. Significant damage that may 

affect the function of the Transfer Aid along with a clear safety hazard is 

unacceptable. 


Check the Labelling on the Transfer Aid  to ensure they are all still legible, this 

includes the Serial Number and other important markings. If labels are not legible, 

then contact your local authorised dealer immediately.


Check all main nuts and bolts to see if they are loose, If they are not tight or you 

have concerns, then contact your local authorised dealer immediately. 

Examine the sling clips on the handle bar for excessive wear and sharp edges. 

Knee Pad 

Inspect the Knee Pad for damage including cuts and breaks. 

Seat Pads 

Ensure seat pads swivel smoothly and there are no signs of damage such as 

permanent deformation and/or cracks, breaks. Both Pads should align when in 

closed position. 

Brakes 

Ensure the Brakes function when activated.


Ensure the Transfer Aid can move freely when the Brakes are deactivated. (Ensure 

they aren’t rubbing on the Wheels). 

Castors and Wheels 

Examine the products Wheels and Castors for signs of damage or wear, ensure they 

run freely and are not cracked. 


Check to see all castors are flat on the floor and Transfer Aid is stable.


Ensure the product is able to rotate freely with ease. 


Foot Tray 

Ensure the Foot Grips are still applied and undamaged.  Check Foot Tray for 

permanent deformation. 

Leg Pivot Points 

Check the smooth opening and closing of the legs. 

Belts  

Examine belts for fraying or other damage. DO NOT use belts with fraying or 

damage to the suspension straps or tears in the body of the sling. 


9.3


Cleaning 

Please follow the cleaning guidelines below on cleaning and disinfecting the Transfer Aid. 


9.3.1


General Cleaning 


It is recommended to clean the Mackworth TA400 and accessories before use by a different person, reducing the risk 

of cross–contamination. 


The exterior of the Mackworth TA400 can be cleaned using a damp soapy cloth for general cleaning duties. Please ensure the 

cloth is damp and not wet. Ensure the exterior of the device is dry after cleaning. Dry using a clean dry cloth. 


9.3.2


Disinfecting (if necessary) 

Should the Transfer Aid require a more thorough clean, the use of the Actichlor™ disinfectant product (which is widely available 

in tablet form and used throughout the health care industry) is recommended. 

Table 9


Summary of Contents for TA400

Page 1: ...Doc No 999562 Revision of document A Revision Date 24 08 21 TA400 Transfer Aid User Manual...

Page 2: ...sitioning 9 4 2 To Alter the Leg Width 10 4 3 Operating Seat Pads 11 4 4 Applying the Brakes 11 4 5 Slings 12 4 5 1 Compatible Belt Types 12 Technical Specification 13 5 1 TA180 Dimensions 13 5 2 Spec...

Page 3: ...port it to the manufacturer and to your national authority Store this manual with the documents included with the Transfer Aid Contents of this manual are subject to change without prior written notic...

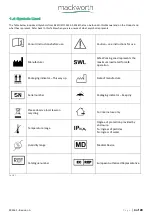
Page 4: ...ons before use Caution see instructions for use Manufacturer Safe Working Load represents the maximum load rated for safe operation Packaging indicator This way up Date of manufacture Serial number Pa...

Page 5: ...erformed before using any other manufactured Transfer Aid to ensure safe use can be established The safety belt is a specially designed fabric accessory that attaches to the Transfer Aid by means of b...

Page 6: ...way Protecting the people present visually monitor the clipped connection points during transfer stages so the belt remains firmly attached to the connection pins To reduce the risk of unintended use...

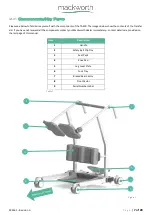
Page 7: ...s of the Transfer aid If you have not received all the components contact your Mackworth dealer immediately contact details are provided on the last page of this manual Item Description 1 Handle 2 Saf...

Page 8: ...a of the Transfer Aid The environment in which the Transfer Aid is situated in whilst carrying out a transfer is required to be on a flat surface with no steep inclines 3 2 Unboxing Transfer Aid When...

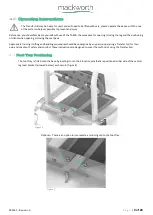
Page 9: ...ening or closing the seat pads Appropriate training in lifting and handling procedures should be undergone by any person operating a Transfer Aid for their own and the client s safety and comfort Thes...

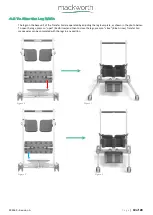
Page 10: ...the Transfer Aid are operated by adjusting the leg lever plate as shown in the photo below To open the legs press on open Red Arrow and then to close the legs press on close Blue Arrow Transfer Aid ma...

Page 11: ...repositioning the Seat Pads 3 Using your hands grab the Seat Pads shown in Figure 12 and rotate them around until they reach the closed position Make sure the seat pads are position in the correct po...

Page 12: ...pport 6 While the patient is being lifted once possible attach the Safety Belt to the second Clip Pin on the Transfer Aid 7 Safety Belt operation complete To remove the sling simply reverse the proces...

Page 13: ...999562 Revision A P a g e 13 of 28 Technical Specification 5 1 TA400 Dimensions All dimensions below are shown in millimetres Figure 16 Figure 17 Figure 18 Figure 19...

Page 14: ...Foot Tray 5 5 kg 12 1 lb Table 5 Operational Forces Operating Force with 180 kg 400 lb 57 N 12 8 lbf Operating Force with 0 kg 0 lb 20 N 4 5 lbf Brakes 35 N 7 9 lbf Seat Pads 18 N 4 0 lbf Table 6 5 3...

Page 15: ...ycle and can no longer perform to its intended use safely the Aid must be decommissioned by an approved Service Engineer The following specifies the importance of correct disposal procedure including...

Page 16: ...nd If this does not correct the fault then contact your local authorised dealer immediately so the Transfer Aid can be checked to ensure proper continued operation General Inspection and Maintenance 9...

Page 17: ...Pads should align when in closed position Brakes Ensure the Brakes function when activated Ensure the Transfer Aid can move freely when the Brakes are deactivated Ensure they aren t rubbing on the Whe...

Page 18: ...onality of the device 5 minutes is a recommended contact time The device can withstand a longer contact period but the 5 minute recommendation as a minimum must be followed to provide an effective cle...

Page 19: ...turers Safety Data Sheet For a full review of the data please follow the link below http www nhsggc org uk media 236215 msds actichlor plus pdf Warranty This guarantee does not affect or in any way li...

Page 20: ...999562 Revision A P a g e 20 of 28 Service Record History Complete this section after each service repair inspection and or maintenance...

Page 21: ...999562 Revision A P a g e 21 of 28...

Page 22: ...999562 Revision A P a g e 22 of 28...

Page 23: ...999562 Revision A P a g e 23 of 28...

Page 24: ...999562 Revision A P a g e 24 of 28...

Page 25: ...999562 Revision A P a g e 25 of 28 User notes...

Page 26: ...999562 Revision A P a g e 26 of 28 User notes...

Page 27: ...999562 Revision A P a g e 27 of 28 User notes...

Page 28: ...or omissions Mackworth operates a policy of continuous improvement Specifications and other data are subject to change without notice Dealer service contact details Manufacturer contact details Prism...

Reviews: