background image

6

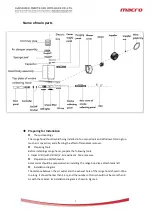
4. Installation Instructions

Installation precautions

Special note: Macro products must be installed and maintained by our authorized installation

and maintenance service providers, otherwise we will not be responsible for the accidents
caused by installation and maintenance.

If your kitchen is under renovation, do not expose the range hood, because construction
materials, dust, paint, coatings and the gas they volatilize will corrode the surface of the
range hood, and thus make the surface tarnish. Therefore, it is recommended that you
install the range hood after the decoration is completed.

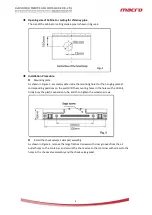
Install the range hood on a non-flammable wall with sufficient supporting strength that can
bear more than three times the weight of the range hood.

To ensure the safety and smooth installation, please use the accessories delivered with the
installation (especially plastic expansion tube and wood screw); When installing an
expansion tube, ensure that the expansion tube is closely matched with the wall holes. Do
not drill too large holes to prevent the expansion tube from loosening and causing
accidental fall.

Do not install the range hood in the bathroom or a place with high humidity. It may cause
electric shock.

When installing the lampblack machine, do not contact the steel bars in the building with
wood screws.

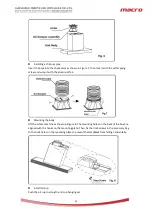
If the range hood is installed above the gas range, the distance must be at least 650mm. For
details, see the procedure for installing a range hood.

The width of the stove should not be larger than that of the range hood.

The range hood is a household appliance, not suitable for industrial and commercial use,
avoid use in special environment.

In case of gas leakage, do not use the range hood; otherwise, there is a risk of fire.

If you do not use the lampblack machine for a long time, unplug the power or turn off the
switch on the socket.

If you need to connect the smoke pipe directly to the public flue, do not insert the smoke
pipe too deep into the public flue to avoid affecting the smoke exhaust effect.

If you connect the pipe directly to the outside, extend the pipe at least 30mm out of the wall,
and the outlet should be slightly downward to avoid rainwater backpouring.

The relevant laws on emissions must be observed

Summary of Contents for CXW-300-T2C

Page 1: ...ards GB 4706 1 2005 GB 4706 28 2008 GB 29539 2013 GB T 17713 2011 Content 1 Safety Precautions Safety precautions 2 2 Important Information 4 3 Product Information 4 4 Installation Instructions 6 5 In...

Page 2: ...rofessional personnel Non professional maintenance personnel are absolutely prohibited to change the internal wiring of range hood without permission Do not touch the power plug electrical parts and p...

Page 3: ...tion The range hood should use a special power socket and the special power socket should be reliably grounded The ambient temperature of the range hood cannot exceed 40 C Exterior parts such as decor...

Page 4: ...contain reusable materials Please help to dispose or recycle them to make a contribution to environmental protection Before using a new range hood If the range hood is obviously damaged do not install...

Page 5: ...kg Gross weight 21 5 kg Product size 895mm x 450mm x 600mm Product package size 1010mm x 670mm x 553mm Note 1 In the clean mode the maximum air volume is 20m min 2 The allowable difference between th...

Page 6: ...too large holes to prevent the expansion tube from loosening and causing accidental fall Do not install the range hood in the bathroom or a place with high humidity It may cause electric shock When in...

Page 7: ...od prepare the following tools 1 Impact drill with drill bit 2 Screwdriver 3 Tape measure Preparation of attachments Accessories should be prepared when installing the range hood see attachment list I...

Page 8: ...8 Mounting size drawing Installation dimensions are shown in Figure 3...

Page 9: ...rresponding positions on the wall drill the mounting holes in the holes with a drill bit firmly bury the plastic expansion tube and then tighten the wooden screws Install the check valve air damper as...

Page 10: ...il Mounting the body Lift the whole machine as shown in Figure 8 The mounting holes on the back of the box are aligned with the hooks on the mounting plate Then fix the limit screws in the accessory b...

Page 11: ...ed shutdown state the default low speed 90s the countdown ends the shutdown of the whole machine Cleaning function open concern change button The cleaning function runs for 3 minutes After cumulative...

Page 12: ...of the range hood immediately after using it 2 Please wipe the outer surface of the lampblack machine with a soft wet towel or a towel stained with neutral detergent and then wipe the body with a soft...

Page 13: ...The power module or control panel is faulty Call supplier for more information Violent body vibration Increase in noise Check whether the range hood is firmly suspended There is too much oil on the im...

Page 14: ...y please contact the special maintenance department designated by the company or the service center in each region of the company We will serve you warmly Thank you for your cooperation Attached Elect...

Reviews: