background image

© 2018 MacroAir Technologies          Toll Free: 866 668 3247          Fax: 909 890 2313          www.macroairfans.com          15

Rev. Date 040218

1. All Universal Mounts 
 

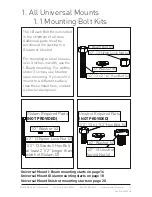
1.1 Mounting Bolt Kits

1/2"-13 Grade 5 Hex Bolt
at least 2 1/2" longer than
width of Glulam (2)

1/2" Washer (4)

1/2"-13 Nylon Lock Nut (2)

Glulam Required Parts

(NOT PROVIDED)

1/2"-13 x 2 1/2" Hex Bolt (4)

1/2"-13 Nylon Lock Nut (4)

1/2" Washer (8)

I-Beam Bolt Kit

1/2"-13 x 1 1/2" Hex Bolt (4)

1/2"-13 Unistrut
Spring Nut (4)

Unistrut Required Parts

(NOT PROVIDED)

1/2" Washer (4)

The I-Beam Bolt Kit is included 
in the shipment of all fans.  
Additional parts must be 
purchased if mounting to a 
Glulam or Unistrut.  

For mounting to steel trusses 
over 3 inches in width, use the 
I-Beam mounting.  For widths 
under 3 inches, use Unistrut 
span mounting.  If you wish to 
mount to a different surface 
than these listed here, contact 
a structural engineer. 

Universal Mount I-Beam mounting starts on page 16
Universal Mount Glulam mounting starts on page 18
Universal Mount Unistrut mounting starts on page 20

Summary of Contents for AirVolution D3-430

Page 1: ...2018 MacroAir Technologies Toll Free 866 668 3247 Fax 909 890 2313 www macroairfans com i Rev Date 040218...

Page 2: ...Truss Mounting 31 2 1 2 Rapid Mount Industrial Glulam 33 2 1 3 Rapid Mount Industrial Unistrut 35 2 2 Rapid Mount Industrial Extension Tube 37 2 3 Rapid Mount Industrial Motor Unit 39 2 4 Safety Cable...

Page 3: ...ts of the Natural Electric Code NEC and local codes Refer to appropriate portions of this manual for other important requirements Failure to follow these guidelines will void the manufacturer s warran...

Page 4: ...an result in death serious injury or equipment damage SERVICE If the fan does not operate properly using the procedures in this manual BE CERTAIN TO REMOVE ALL POWER TO THE UNIT and contact our techni...

Page 5: ...odel 780 is 213 lbs 97 kg If there is any uncertainty in the strength of the building structure a professional structural engineer should perform a thorough evaluation of the building prior to purchas...

Page 6: ...e 1 9A 4 2 9A 4 2 9A 4 2 9A 4 3 6A 6 3 2A 4 480 VAC 3 Phase 1 5A 4 2 3A 4 2 3A 4 2 3A 4 2 9A 4 2 5A 4 600 VAC 3 Phase 1 2A 4 1 8A 4 1 8A 4 1 8A 4 2 3A 4 2A 4 MODEL 780 Voltage and Phase 20ft 24ft 208...

Page 7: ...g airfoils Note a large fan 20 24 feet in diameter performs best at 20 to 30 feet above the floor but acceptable performance has been demonstrated as low as 10 feet and as high as 50 feet 24 foot fans...

Page 8: ...w UNDER fan HVAC Diffuser with airflow ABOVE fan Fan Placement Clearance space from diffuser space from diffuser at least 1 5 x diameter away from intake discharge at least 2 x diameter away from inta...

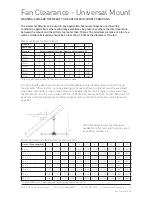
Page 9: ...mum recommendations only based solely on roof pitch and fan diameter Other factors such as allowing for proper airflow into the fan must be evaluated when determining drop length requirements In addit...

Page 10: ...ed from the fan to obstructions such as lighting conduit etc Minimum Clearance Horizontal Vertical inches Airfoil Drop Length ft 2 3 4 5 6 7 8 9 10 8 feet 9 14 11 14 13 14 15 15 17 15 19 16 22 17 25 1...

Page 11: ...is the minimum allowed clearance for this fan model Refer to the Fan Clearance Placement charts on pages 6 9 for required fan clearance and mounting conditions Model 780 The Model 780 has a standard...

Page 12: ...rsal Mount Guy Wire Elastic Band 1 Elastic Band Clip 1 Glulam Bracket 2 Optional Noise Dampening Pad 1 Optional 5 16 24 x 2 Hex Bolt 12 5 16 Washer 24 5 16 24 Nylon Lock Nut 12 6 Blade Bolt Kit 3 8 Wa...

Page 13: ...re all parts listed above are included if you purchased the Rapid Mount Industrial Read the entire manual before beginning the installation of the fan Additional parts may be required including but no...

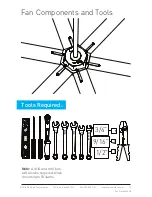
Page 14: ...e 866 668 3247 Fax 909 890 2313 www macroairfans com 13 Rev Date 040218 Fan Components and Tools 10 mm 3 4 9 16 1 2 9 16 1 2 3 4 3 8 3 4 9 16 1 2 Tools Required Note A drill and drill bits will also b...

Page 15: ...Noise Dampening Pad Place Noise Dampening Pad between mount and mounting surface for all mounts and mounting styles Universal Mount Turn to page 15 Rapid Mount Turn to page 30 WARNING Do not disassem...

Page 16: ...olt 4 1 2 13 Unistrut Spring Nut 4 Unistrut Required Parts NOT PROVIDED 1 2 Washer 4 The I Beam Bolt Kit is included in the shipment of all fans Additional parts must be purchased if mounting to a Glu...

Page 17: ...echnologies Toll Free 866 668 3247 Fax 909 890 2313 www macroairfans com 16 Rev Date 040218 Hand Tighten Use this method for steel trusses and I Beams over 3 in width 1 1 1 Universal Mount I Beam Stee...

Page 18: ...ogies Toll Free 866 668 3247 Fax 909 890 2313 www macroairfans com 17 Rev Date 040218 1 1 1 Universal Mount I Beam Center the Mount Hand Tighten 75 ft lbs 102 N m Complete I Beam mount installation an...

Page 19: ...learance Holes can be oversized for leveling the mount 1 2 bolt clearance 75 ft lbs 75 ft lbs 102 N m The bracket can be below the bottom of the glulam if necessary but is not recomended if it is avoi...

Page 20: ...oAir Technologies Toll Free 866 668 3247 Fax 909 890 2313 www macroairfans com 19 Rev Date 040218 75 ft lbs 75 ft lbs 102 N m 1 1 2 Universal Mount Glulam Complete Glulam mount installation and turn t...

Page 21: ...ntacting Unistrut so they can recommend the best method for attaching the Unistrut www unistrut us If the spanning distance is greater than 8 feet please consult a Structural Engineer Please refer to...

Page 22: ...ww macroairfans com 21 Rev Date 040218 1 1 3 Universal Mount Unistrut Loctite 243 recomended Loctite 243 recomended 50 ft lbs 50 ft lbs 68 N m Complete Unistrut mount installation and turn to page 22...

Page 23: ...ount Before Continuing 1 Run the power cable to the mounting location 2 Run the shielded CAT5e cable from the controller to the mount 3 The communications cable MUST be routed at least 1 foot away fro...

Page 24: ...2018 MacroAir Technologies Toll Free 866 668 3247 Fax 909 890 2313 www macroairfans com 23 Rev Date 040218 1 2 All Universal Mounts Extension Tube 30 ft lbs 41 N m Be careful of wires...

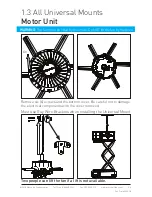
Page 25: ...s and the bottom cover Be careful not to damage the electrical components with the cover removed Two people can lift the fan if a lift is not available 1 3 All Universal Mounts Motor Unit WARNING The...

Page 26: ...909 890 2313 www macroairfans com 25 Rev Date 040218 Be careful of wires 30 ft lbs 30 ft lbs 41 N m Carefully guide the motor shaft into the extension tube CAUTION Do not put force onto the building...

Page 27: ...Do not bend rubber boot WARNING Do not put too much tension on the safety cable This will deform the rubber boot and hinder the proper cooling of the motor 1 3 All Universal Mounts Motor Unit Universa...

Page 28: ...4 1 Universal Mount I Beam Safety Cable Run safety cable around I Beam Tighten both nuts WARNING Do not put too much tension on the safety cable There needs to be a small amount of slack present in th...

Page 29: ...nt Glulam Safety Cable Tighten both nuts Tighten both nuts Run safety cable Run safety cable though hole WARNING Do not put too much tension on the safety cable There needs to be a small amount of sla...

Page 30: ...able The safety cable must be securely attached to the building structure and NOT the unistrut It can be attached to I beams steel trusses or Glulams as shown in sections 1 4 1 and 1 4 2 Avoid sharp e...

Page 31: ...ng Nut 4 Unistrut Required Parts NOT PROVIDED 1 2 Washer 4 The I Beam Bolt Kit is included in the shipment of all fans Additional parts must be purchased if mounting to a Glulam or Unistrut For mounti...

Page 32: ...ologies Toll Free 866 668 3247 Fax 909 890 2313 www macroairfans com 31 Rev Date 040218 2 1 1 Rapid Mount Industrial I Beam Steel Truss Mounting Hand Tighten Use this method for steel trusses and I be...

Page 33: ...l Free 866 668 3247 Fax 909 890 2313 www macroairfans com 32 Rev Date 040218 Hand Tighten 75 ft lbs 75 ft lbs 102 N m Center the Mount 2 1 1 Rapid Mount Industrial I Beam Complete Rapid Mount I Beam i...

Page 34: ...ance Holes can be oversized for leveling the mount 1 2 bolt clearance 75 ft lbs 75 ft lbs 102 N m The bracket can be below the bottom of the glulam if necessary but is not recomended if it is avoidabl...

Page 35: ...hnologies Toll Free 866 668 3247 Fax 909 890 2313 www macroairfans com 34 Rev Date 040218 75 ft lbs 75 ft lbs 102 N m Complete Rapid Mount Glulam installation and turn to page 37 2 1 2 Rapid Mount Ind...

Page 36: ...cting Unistrut so they can recommend the best method for attaching the Unistrut www unistrut us If the spanning distance is greater than 8 feet please consult a Structural Engineer Please refer to pag...

Page 37: ...acroairfans com 36 Rev Date 040218 2 1 3 Rapid Mount Industrial Unistrut 50 ft lbs 50 ft lbs 68 N m Loctite 243 recomended Loctite 243 recomended 12 7 8 Complete Rapid Mount Unistrut installation and...

Page 38: ...CAT5e Cable Power Cable Before Continuing 1 Run the power cable to the mounting location 2 Run the shielded CAT5e cable from the controller to the mount 3 The communications cable MUST be routed at le...

Page 39: ...18 MacroAir Technologies Toll Free 866 668 3247 Fax 909 890 2313 www macroairfans com 38 Rev Date 040218 30 ft lbs 30 ft lbs 41 N m Be careful of wires 9 16 2 2 All Rapid Mounts Industrial Extension T...

Page 40: ...040218 2 3 All Rapid Mounts Industrial Motor Unit 6x Remove six 6 screws and the bottom cover Be careful not to damage the electrical components with the cover removed Two people can lift the fan if a...

Page 41: ...Mounts Industrial Motor Unit Be careful of wires 30 ft lbs 30 ft lbs 41 N m Carefully guide the motor shaft into the extension tube CAUTION Do not put force onto the building with the lift 9 16 Note I...

Page 42: ...bottom bolts on both sides 2 3 All Rapid Mounts Industrial Motor Unit Do not bend rubber boot Do not bend rubber boot WARNING Do not put too much tension on the safety cable This will deform the rubb...

Page 43: ...Rapid Mount Industrial I Beam Safety Cable Tighten both nuts Run safety cable around I Beam WARNING Do not put too much tension on the safety cable There needs to be a small amount of slack present in...

Page 44: ...un safety cable though hole Run safety cable though hole 2 4 2 Rapid Mount Industrial Glulam Safety Cable WARNING Do not put too much tension on the safety cable There needs to be a small amount of sl...

Page 45: ...y Cable The safety cable must be securely attached to the building structure and NOT the unistrut It can be attached to I beams steel trusses or Glulams as shown in sections 2 4 1 and 2 4 2 Avoid shar...

Page 46: ...y Wire Rope 4 19ft A 23ft B or 33ft C Turn Buckle 4 1 4 Quicklink 4 Wire Rope Clamp 8 45 Required for the Universal Mount Optional for the Rapid Mount Industrial With the Rapid Mount Industrial use on...

Page 47: ...ev Date 040218 Note Guy wires need to be securely mounted to the building You can use generic beam clamps when mounting to I Beam or steel truss Lag I Bolts can be used when mounting to wood Glulams D...

Page 48: ...Rev Date 040218 Hand Tighten ONLY Tighten the jam nuts Note Make sure the fan remains level 3 Guy Wire Installation NOTE Do not use tools to tighten the turnbuckles only use tools to tighten the jam...

Page 49: ...Toll Free 866 668 3247 Fax 909 890 2313 www macroairfans com 48 Rev Date 040218 Bend Cord Through Clip Note The cord is cut to a predetermined length for proper tension DO NOT excessively stretch the...

Page 50: ...re ground wire is properly attached CAUTION RISK OF ELECTRIC SHOCK The bus capacitors discharge to a level below 50V DC in 1 minute Note Model numbers ending with an H are high voltage while model num...

Page 51: ...R WAIT ONE 1 MINUTE BEFORE TURNING THE POWER BACK ON Single Phase Low Voltage Three Phase Low Voltage Model 550 Low Voltage 120 240VAC Model 780 Low Voltage 208 240VAC Models 550 780 Low Voltage 208 2...

Page 52: ...ents CAUTION RISK OF ELECTRIC SHOCK The bus capacitors discharge to a level below 50V DC in 1 minute WARNING DO NOT RUN FANS WITHOUT AIRFOILS THE FANS ARE NOT CONFIGURED TO OPERATE WITHOUT AIRFOILS AT...

Page 53: ...equire network configuration to enable analog terminals Digital Control Wiring Use a flat head screwdriver to press the small button on top of the terminal block to securely attach the wires Orange Or...

Page 54: ...Installation 5 16 24 x 2 Hex Bolt 12 5 16 Washer 24 5 16 24 Nylon Lock Nut 12 6 Blade Bolt Kit WARNING To reduce the risk of personal injury do not bend the airfoils or airfoil struts when installing...

Page 55: ...Toll Free 866 668 3247 Fax 909 890 2313 www macroairfans com 54 Rev Date 040218 5 Airfoil and Retainer Link Installation Hand Tighten Hand Tighten Repeat the last three steps until all six blades and...

Page 56: ...2018 MacroAir Technologies Toll Free 866 668 3247 Fax 909 890 2313 www macroairfans com 55 Rev Date 040218 20 ft lbs 20 ft lbs 27 N m 1 2 5 Retainer Link and Cover Installation...

Page 57: ...2018 MacroAir Technologies Toll Free 866 668 3247 Fax 909 890 2313 www macroairfans com 56 Rev Date 040218 5 Airfoil Installation...

Page 58: ...o the bottom of the fuse block Then wire the incoming power source to the disconnect switch 6 1 3 In the diagram below a three phase system is shown For a single phase system phase 1 would be connecte...

Page 59: ...HNOLOGIES IS PROHIBITED 5 4 3 2 1 A B 6 2 Emergency Disconnect Schematic Remote Harness BLUE WHITE BLUE BROWN BROWN WHITE GREEN GREEN WHITE OPTIONAL ON OFF SWITCH Fire Disconnect Green Pair A 01 DO NO...

Page 60: ...l Free 866 668 3247 Fax 909 890 2313 www macroairfans com 59 Rev Date 040218 7 1 Touchpad Remote Mounting Place anchors into wall Flush Mounting is also available with a standard electrical box not pr...

Page 61: ...8 3247 Fax 909 890 2313 www macroairfans com 60 Rev Date 040218 7 1 Touchpad Remote Mounting Note 100 feet of shielded stranded CAT5e cable is provided standard Up to 400 feet of cable can be ordered...

Page 62: ...chnologies Toll Free 866 668 3247 Fax 909 890 2313 www macroairfans com 61 Rev Date 040218 7 1 Touchpad Remote Mounting The provided shielded stranded CAT5e cable from the fan is plugged into the top...

Page 63: ...Reverse Select fan rotational direction B Power Button Turn the fan on or off forward or reverse must be chosen to start the fan C Speed Up Speed Down Increase or decrease the speed of the fan D Speed...

Page 64: ...he left arrows in the footer to navigate to the home screen 6 2 2 Once on the home screen test your fan by setting the speed to 100 in forward operation by increasing the speed and then clicking the f...

Page 65: ...r sponge using hot water or regular cleaning solutions Please do not use chlorine or any chemicals containing chlorine Safety Cable Check Each MacroAir fan comes with a safety cable Depending on the f...

Page 66: ...2018 MacroAir Technologies Toll Free 866 668 3247 Fax 909 890 2313 www macroairfans com 65 Rev Date 040218 Mounting Plate Dimensions Universal Mount Rapid Mount...

Page 67: ...2018 MacroAir Technologies Toll Free 866 668 3247 Fax 909 890 2313 www macroairfans com 66 Rev Date 040218 Mounting Bracket Dimensions I Beam Bracket Glulam Bracket...

Page 68: ...2018 MacroAir Technologies Toll Free 866 668 3247 Fax 909 890 2313 www macroairfans com 67 Rev Date 040218 Touchpad Remote Dimensions Remote Enclosure Remote LCD Display...

Page 69: ...monitors the bus voltage to verify it s above the threshold Fan Slow Intermittent No Operation 1 Turn incoming power off for two minutes turn back on 2 Confirm incoming power is within fan s specifica...

Page 70: ...ty cable is not pulling the rubber boot closed 4 Confirm that the ambient temperature is below 60C 5 Start the fan earlier in the day before the ambient temperature rises 1008 Motor Temperature High F...

Page 71: ...ubber boot closed 4 Confirm that the ambient temperature is below 60C 5 Start the fan earlier in the day before the ambient temperature rises 1012 PCB Temperature High Fault Auto Reset 80C Fan Stoppin...

Page 72: ...Exceeded Auto Reset 5 Fan Wobbles Fan Stops Running Fan Will Not Start 1 Confirm that the tilt is below 5 degrees 2 Confirm that fan or structure is not wobbling 3 Confirm that locking hardware on mou...

Page 73: ...eed Fan Runs Irregularly 1 Ensure that blade length is properly set 2 Ensure that blades are installed 3 Perform a drive calibration 4 Confirm incoming power is within fan s specifications 5 Confirm m...

Page 74: ...disable switch is in the correct position Verify that green and green white wires are installed properly in switch 1029 Drive Calibration Error Fault A power calibration was attempted while the fan is...

Page 75: ...You do NOT need to pay shipping removal and installation costs if your AirVolution D needs to be repaired or replaced due to a manufacturing defect within one year of the original purchase and you wi...

Page 76: ...2018 MacroAir Technologies Toll Free 866 668 3247 Fax 909 890 2313 www macroairfans com 75 Rev Date 040218...

Reviews: