background image

Troubleshooting

7 - 2 Basic Hints and Tips

7

Basic Hints and Tips

Many of the following may seem obvious but they are often the so-
lution to a problem when your computer appears not to be working. 

•Power:

Is the computer actually plugged into a work-

ing electrical outlet? If plugged into a 

power 

strip

, make sure it is actually working.

•Connections:

Check all the 

cables

 to make sure that there are 

no 

loose connections

 anywhere.

•Power Savings:

Make sure that the system is not in 

Hibernate


or 

Standby

 mode by pressing the power button 

for less than 4 seconds (the LED 

 will flash 

green while in 

Standby

 mode, in Hibernate 

mode it will be off).

•Connections:

Check the brightness of the screen by pressing 

the 

Fn + F9 or F10

 keys to adjust the bright-

ness (

see Chapter 3:“Opening the LCD” on 

page 3-2

).

Summary of Contents for M270S viperM

Page 1: ......

Page 2: ...e resulting from the use or misuse of this publication This publication and any accompanying software may not in whole or in part be reproduced translated transmitted or reduced to any machine readabl...

Page 3: ...d other rights owners Use of this copyright protection technology must be authorized by Macrovision Corporation and is intended for home or other limited viewing uses only unless otherwise authorized...

Page 4: ...f this equipment does cause harmful interference to radio or televi sion reception which can be determined by turning the equipment off and on the user is encouraged to try to correct the interference...

Page 5: ...hone other than a cordless type during an electrical storm There may be a remote risk of electrical shock from lightning 3 Do not use the telephone to report a gas leak in the vicinity of the leak 4 U...

Page 6: ...auf s il s agit d un appareil sans fil pen dant un orage lectrique Ceci peut pr senter un risque de choc lec trique caus par la foudre 3 Ne pas utiliser l appareil t l phonique pour signaler une fuite...

Page 7: ...from any kind of heating element Keep the computer out of direct sunlight Don t store or use the computer in a humid envi ronment Do not place the computer on any surface which will block the vents 3...

Page 8: ...n the computer is on Do not disassemble the computer by yourself Remember to periodically save your data as data may be lost if the battery is depleted Perform routine maintenance on your computer 6 T...

Page 9: ...he third prong is an important safety feature do not defeat its purpose If you do not have access to a compatible outlet have a quali fied electrician install one When you want to unplug the power cor...

Page 10: ...discarded Keep the battery away from metal appliances Affix tape to the battery contacts before disposing of the battery Do not touch the battery contacts with your hands or metal objects Battery Dis...

Page 11: ...cing to authorized service personnel Unplug the computer from the power supply Then refer servicing to quali fied service personnel under any of the following conditions When the power cord or AC DC a...

Page 12: ...es from 100 to 240 volts so you won t need a second voltage adapter However check with your travel agent to see if you need any socket adapters 6 Put the notebook in its carrying bag and secure it wit...

Page 13: ...t check it with normal luggage Baggage handlers may not be sufficiently careful Avoid knocking the computer against hard ob jects Beware of Electromagnetic fields Metal detectors X ray machines These...

Page 14: ...verhead compartment make sure it s secure Contents may shift and or fall out when the compartment is opened Get power where you can If an electrical outlet is available use the AC adapter and keep you...

Page 15: ...height of the chair and or desk so that the keyboard is at or slightly below the level of your elbow Keep your forearms wrists and hands in a relaxed position Your knees should be slightly higher tha...

Page 16: ...Alter your posture frequently Stretch and exercise your body several times a day Take periodic breaks when you work at the computer for long periods of time Frequent and short breaks are better than f...

Page 17: ...the display to avoid glare or reflections from overhead light ing or outside sources of light Keep the display screen clean and set the brightness and contrast to levels that allow you to see the scr...

Page 18: ...for Care and Operation VI Power Safety VIII Battery Precautions IX Cleaning X Servicing X Travel Considerations XI Introduction 1 1 Overview 1 1 The Manual 1 2 Advanced Users 1 2 Beginners and Not So...

Page 19: ...10 Microphone 1 10 Close Cover Switch 1 10 LED Status Indicators 1 10 Hot Key Buttons 1 11 Power Button 1 11 Keyboard 1 12 Stereo Speakers 1 12 TouchPad Buttons 1 12 LED Power Indicators 1 12 Left Si...

Page 20: ...llel Port 1 19 RJ 11 Phone Jack 1 19 External Monitor CRT Port 1 19 Dual USB Ports 1 20 S Video Port 1 20 IEEE 1394 Port 1 20 RJ 45 LAN Jack 1 21 Bottom View 1 22 Using The Computer 2 1 Overview 2 1 T...

Page 21: ...Floppy Disks 2 10 The CD Device 2 11 Loading Discs 2 11 Handling CDs or DVDs 2 12 DVD Regional Codes 2 13 Changing the DVD Regional Codes 2 14 The PC Card Slot 2 15 Inserting and Removing PC Cards 2 1...

Page 22: ...ideo Controls 3 2 Opening the LCD 3 2 Video Driver Controls 3 3 Making Adjustments for the Display 3 4 Display Properties 3 5 SiS Utility Tray Manager 3 6 Video Memory 3 8 Display Devices 3 9 Display...

Page 23: ...19 Hard Disk Standby 3 19 Conserving Power Throughout the System 3 20 Hibernate Mode vs Shutdown 3 20 Standby Mode vs Hibernate Mode 3 20 Standby 3 21 Hibernate 3 22 Configuring the Power Button 3 23...

Page 24: ...e 4 3 Version Conflict Message 4 3 Windows 2000 Professional 4 4 Audio Win2000 4 4 Modem Win2000 4 5 LAN Win2000 4 6 Video Win2000 4 6 TouchPad Win2000 4 7 Hot Key Win2000 4 7 Windows XP 4 8 Audio Win...

Page 25: ...5 4 Failing the POST 5 5 Fatal Errors 5 5 Non Fatal Errors 5 5 The Setup Program 5 6 Entering Setup 5 6 Setup Screens 5 7 Choosing the Boot Device Before OS Startup 5 8 Main Menu 5 9 Advanced Menu 5...

Page 26: ...Memory Module 6 8 Troubleshooting 7 1 Overview 7 1 Basic Hints and Tips 7 2 Backup and General Maintenance 7 4 Viruses 7 5 Upgrading and Adding New Hardware Software 7 6 Power 7 8 Display 7 13 Hard D...

Page 27: ...Processor A 1 Core Logic A 2 Structure A 2 Security A 2 Memory A 2 BIOS A 3 Display A 3 LCD A 4 Storage A 4 Audio A 4 Interface A 5 Communication A 6 Power Management A 6 Power A 7 Indicators A 7 Env...

Page 28: ...Introduction Overview 1 1 1 Chapter 1 Introduction Overview What this chapter covers The Manual how to use it Quick Start Guide the minimum you need to know System Map navigating around your computer...

Page 29: ...ities on page 5 1 and Upgrading The Computer on page 6 1 You may also find the notes marked with a of interest to you Beginners and Not So Advanced Users If you are new to computers or do not have an...

Page 30: ...al 1 3 1 Warning Boxes No matter what your level please pay careful attention to the warning and safety information indicated by the symbol Also please note the safety and handling instructions as ind...

Page 31: ...ams If you have questions about the operating systems or programs then please consult the ap propriate manuals System Software Your computer may already come with system software pre in stalled Where...

Page 32: ...y to work right out of the box Before you begin please follow the safety instructions in the Preface 1 Remove all packing materials CDs DVDs floppy disks and any PC Cards 2 Securely attach any periphe...

Page 33: ...ts of your computer Mobile or Desktop CPU The computer designs incorporate both mobile and desktop CPUs To tell if you have a mobile or desktop CPU model look at the DC output rating on the bottom of...

Page 34: ...fferences Figure 1 1 Design Differences Design Differences This manual refers to two notebook models pictured on this page The designs vary slightly in external de sign Photographs used throughout thi...

Page 35: ...1 Place the computer on a stable surface 2 Move the cover latch to the right and hold it to release the top cover 3 Lift the top cover to reveal the LCD panel and keyboard 4 Adjust the LCD panel to a...

Page 36: ...el Open Figure 1 3 Top View with LCD Panel Open 1 LCD Panel 2 Microphone built in 3 Close Cover Switch 4 LED Status Indicators 5 Hot Key Buttons 6 Power Button 7 Keyboard 8 Speakers 9 TouchPad and But...

Page 37: ...in microphone Close Cover Switch This switch acts as a sensor to tell when the LCD Panel is closed When this LCD cover sensor is activated the default setting of your operating system s power scheme s...

Page 38: ...5 This button may also be used as a suspend resume key once configured as such in the power management control panel of your operating system see Configuring the Power Button on page 3 23 Shutdown Ple...

Page 39: ...t in speakers provide rich stereo sound TouchPad Buttons The pointing device features a sensitive glide pad for precise move ments It functions the same way as a two button mouse The right TouchPad bu...

Page 40: ...external microphone The S PDIF Out Port allows you to connect your DVD capable PC to a Dolby AC 3 compatible receiver for 5 1 or dts surround sound You must use the Y cable provided to enable these f...

Page 41: ...io volume can also be adjusted in the operating system Sound Volume Adjustment How high the sound volume can be set using the volume control knob de pends on the setting of the volume control within W...

Page 42: ...er information please re fer to the manual of the device you wish to connect 3 5 FDD Floppy Disk Drive Your computer comes with a fixed 1 44 MB 3 5 floppy disk drive module see Left Side View on page...

Page 43: ...ttached to this slot Locks can be purchased at any computer store Vent This enables airflow to prevent the notebook from overheating 3 2 1 Figure 1 5 Right Side View 1 Security Lock Slot 2 Vent 3 CD D...

Page 44: ...efer to The CD Device on page 2 11 1 CD ROM or DVD label to indicate which type 2 Open button 3 Busy Indicator 4 Emergency eject hole CD Emergency Eject If you need to manually eject a CD DVD e g due...

Page 45: ...ure 1 7 Rear View 1 DC In Jack 2 PS 2 Type Port 3 Parallel Port 4 RJ 11 Phone Jack 5 Vent 6 External Monitor CRT Port 7 Dual USB Ports 8 S Video Port 9 IEEE 1394 Port 10 RJ 45 LAN Jack 2 3 4 5 9 8 1 6...

Page 46: ...and EPP En hanced Parallel Port 1 7 1 9 modes RJ 11 Phone Jack This port connects to the built in modem You may plug the tele phone line directly into this RJ 11 telephone connection Note Broadband e...

Page 47: ...the system off S Video Port Connect your television to your computer and view DVD s VCD s or anything else your computer can display You will need an S Vid eo cable to make the connection Enable this...

Page 48: ...Introduction System Map 1 21 1 RJ 45 LAN Jack This port supports LAN Network functions Note Broadband e g ADSL modems usually connect to the LAN port...

Page 49: ...em Map 1 Bottom View 1 3 2 Overheating To prevent your com puter from overheating make sure nothing blocks the vent fan outlets while the com puter is in use Figure 1 8 Bottom View 1 RAM Cover 2 Vents...

Page 50: ...me office or on the road To learn more about your computer please read this chapter This chapter includes The Power Sources Turning on the Computer The LED Indicators The Hard Disk Drive The Floppy Di...

Page 51: ...he rear of the computer 2 Plug the AC power cord into an outlet and then connect the AC power cord to the AC adapter 3 Raise the lid LCD to a comfortable viewing angle 4 Press the power button to turn...

Page 52: ...unavailable Battery life varies depending on the applications and the configuration you re using To increase battery life let the battery discharge completely before re charging We recommend leaving t...

Page 53: ...of the Battery Pack DO NOT disassemble the battery pack under any circumstances DO NOT expose the battery to fire or high temperatures it may explode DO NOT connect the metal terminals to each other f...

Page 54: ...ton if pressed for less than 4 seconds pressing and holding the power button for longer than this will shut the computer down and is appropriately config ured in the OS Control Panel Power Options For...

Page 55: ...There are two sets of LED indicators LED Status Indicators and LED Power Indicators on your computer These display helpful information about the current status of the computer 1 LED Status Indicators...

Page 56: ...ppy Disk Drive is being accessed Green The Hard Drive CD device is being accessed Green Number Lock is activated Green Caps Lock is activated Green Scroll Lock is activated Num Lock For more informati...

Page 57: ...ed on Blinking Green The system has entered the configured suspend mode Yellow AC power is plugged in or battery power is full Blinking Yellow The battery is being charged No Light AC power is being u...

Page 58: ...de 4 ATA 33 66 100 The hard disk is accessible from the keyboard of your computer Fur ther details on removing and inserting the hard disk are available in Upgrading the Hard Disk Drive on page 6 3 Po...

Page 59: ...erly set in the BIOS For more information refer to Boot Menu on page 5 18 Inserting Removing Floppy Disks When using the floppy drive always insert your floppy diskette with the label side facing up T...

Page 60: ...bel side facing up use just enough force for the disc to click onto the tray s spindle Gently push the CD DVD tray in until its lock clicks The Busy Indicator will light up while data is being accesse...

Page 61: ...e surface of the disc Do not store or place the CD or DVD in high temperature areas Do not use benzene thinner or other cleaners to clean the CD or DVD Do not bend the CD or DVD Do not drop or subject...

Page 62: ...tion is permanent This cannot be altered even if you change your operating system or you use the module in another computer Figure 2 4 DVD Regional Codes Windows XP Multiple Display Modes DVD Playback...

Page 63: ...the Properties menu and select the DVD Region tab to bring up the control panel as seen in DVD Regional Codes Windows XP on page 2 13 DVD Regional Coding Region Geographical Location 1 USA Canada 2 W...

Page 64: ...card slot previously referred to as PCMCIA The slot can support type II 3 3V 5V PC card Inserting and Removing PC Cards Align the PC card with the slot and push the card in until it locks into place T...

Page 65: ...uter has three Hot Key buttons for quick one button access to e mail the Internet or a user defined application To make full use of the Hot Key features you must install the Hot Key driver see What to...

Page 66: ...eys Function Activate the default e mail program Activate the default Internet browser Activate the user specified application e g Microsoft Word or Excel Non Default E Mail and Browser Programs It is...

Page 67: ...y where the desired application exe see the sidebar program exists 5 Double Click on the program file or choose Open 6 The Hot Key is now set to execute that program Application exe You will need to l...

Page 68: ...re 2 7 Function Keys on page 2 20 Keys Description Fn Esc Toggle between Suspend Resume mode Fn F3 Expand LCD display Fn F5 Mute Toggle Fn F6 Toggle Display between CRT LCD LCD and CRT Fn F9 Decrease...

Page 69: ...Function Keys 2 Function Keys Figure 2 7 Function Keys 2 4 5 3 1 7 6 1 Fn Key 2 Suspend Resume State Toggle 3 Expand LCD display 4 Mute Toggle 5 CRT LCD LCD and CRT Toggle 6 LCD Brightness Decrease 7...

Page 70: ...d You may check if Num Lock is enabled or not by looking at the LED status indicators see LED Status Indicators on page 2 7 You may type the numbers directly from the embedded keypad as long as Num Lo...

Page 71: ...d Buttons The pointing device features a sensitive glide pad for precise move ments It functions the same way as a two button mouse The right TouchPad button is the same as the right mouse button the...

Page 72: ...TouchPad driver see What to Install on page 4 2 you can configure the functions by double clicking the TouchPad driver icon on the taskbar to bring up the Mouse Properties control panel Figure 2 9 Yo...

Page 73: ...use a mouse through either the PS 2 interface or through one of the USB ports Mouse Driver If you are using an ex ternal mouse your op erating system may be able to auto configure your mouse during it...

Page 74: ...USB interface connection There are two USB ports on your notebook computer and you may use either one of the ports to connect the printer Install Instructions 1 Set up the printer according to its in...

Page 75: ...packing paper tray toner ink cartridge etc 2 Attach the parallel cable to the printer 3 Connect the printer s parallel cable to the parallel port at the rear of the computer see Rear View on page 1 18...

Page 76: ...ttery management features Drivers You are unable to use most advanced con trols until the neces sary drivers and utilities are properly in stalled If your system hasn t been properly configured your s...

Page 77: ...the lid adjust it so you can look at the screen straight on without any glare If necessary adjust the brightness controls Fn F9 F10 Protecting the LCD Do not allow any for eign objects i e paper or pl...

Page 78: ...he Display Properties control panel in Windows as long as the video driver is installed What to Install on page 4 2 Depending on the configuration purchased the LCD is capable of supporting the follow...

Page 79: ...rol panel 1 Click Start point to Settings and click Control Panel if you are in Category View choose Appearance and Themes 2 Double click Display icon 3 In the Display Properties dialog box click Sett...

Page 80: ...play Properties When the Display Properties control panel is open click the Ad vanced button to bring up the options tabs Clicking through these tabs allows you to make any video adjustments you requi...

Page 81: ...el if you are in Category View choose Appearance and Themes 2 Double click Display icon 3 In the Display Properties dialog box click Settings tab 4 Click Advanced button and click SiS Utility Manager...

Page 82: ...hanges to the Driver Mode Setting Video Settings Gamma Correction Settings for CRT monitors and General Infor mation by clicking the appropriate tab and adjusting the setting Some screen examples are...

Page 83: ...Chipset Control on page 5 13 Bear in mind that the more overall memory is used as video memory the less is available as system memory This memory is allocated from your system memory e g if your compu...

Page 84: ...at the rear of the compu ter Single 4 The built in LCD and a CRT showing the same image Mir ror 5 The built in LCD and a TV showing the same image Mirror 6 The built in LCD and a CRT showing different...

Page 85: ...isplay device Mirror The LCD CRT or TV outputting the same view Multimonitor The LCD CRT or TV outputting a different view Win dows XP only Multiple Display Modes DVD Playback In Mirror mode DVD movie...

Page 86: ...ugh the options to display the LCD only the LCD and the external display together and the external display alone make sure you allow time for the screens to refresh as you toggle through Note If you o...

Page 87: ...eo driver refer to see What to Install on page 4 2 for setup instructions To use the display options from the video driver control panel do the follow ing 1 Plug the CRT or TV into the appropriate por...

Page 88: ...be Display_2 the VGA option for the external montor may only be set to Display_2 8 Click OK Yes to restart your computer 9 Upon restart the displays will be configured for you 10 You can reconfigure t...

Page 89: ...te of your CRT is impor tant If it is too low and or you re using fluores cent lighting the screen will appear to flicker To reduce flickering on a CRT use faster refresh rates we recommend a refresh...

Page 90: ...match the physical arrangement you wish to use Multimonitor Use the Display Prop erties control panel to drag the monitors to match the physical ar rangement you wish to use In the example shown in Fi...

Page 91: ...Displays Driver Controls on page 3 12 The TV system format may be switched between PAL and NTSC in the BIOS see TV Sys tem Advanced Menu Advanced Chipset Control on page 5 14 You can also adjust the T...

Page 92: ...e computer with enhanced power saving techniques and gives the operating system OS direct control over the power and thermal states of devices and processors For ex ample it enables the OS to set devi...

Page 93: ...nabled through the control panel in your Windows system With other operating systems you may also have some form of power management available so check your documen tation You may conserve power throu...

Page 94: ...speci fied time Hard Disk Standby The computer s hard disk motor will be turned off if the hard disk drive has not been accessed for a specified period of time If the sys tem reads or writes data the...

Page 95: ...it on The main difference between them is When you come back from hibernation you can return to where you last left off what was on your desktop without reopening the appli cation s and file s you la...

Page 96: ...the Power Button if configured to do so see Configuring the Power Button on page 3 23 An alarm resume that is enabled and expires Pressing the Suspend Resume key combination on the built in key board...

Page 97: ...er it takes the longest time to return to full operation You can set your notebook to automatically enter Hibernate mode when the bat tery power is almost depleted You will need to enable Hibernate mo...

Page 98: ...t to save power through individual components e g hard disk monitor the LED will remain green Suspend Resume Keys You may also config ure the Suspend Resume key combina tion Fn Esc from the menu illus...

Page 99: ...g and peripheral devices attached Power Management settings in the OS will help prolong the battery life if configured appropriately Battery life may be shortened through improper maintenance To op ti...

Page 100: ...k on any critical files How do I fully charge the battery When charging the battery don t stop until the LED charging indi cator light turns green How do I maintain the battery Completely discharge an...

Page 101: ...vices Different applications and external devices consume battery power even when they are not being used To conserve battery power we recommend Closing modem or communication applications when they a...

Page 102: ...e and extend your battery life on the preceding pages your battery should last a long time However there may be times when you are required to remove swap or replace the battery To do so follow these...

Page 103: ...ry Cover 4 Disconnect the battery connector from the computer in Fig ure 3 14 5 Slide the battery out as indicated by the arrow 6 Just reverse the removal procedure to install the the new bat tery 1 2...

Page 104: ...ome of the system components won t be auto configured with an appropriate driver or utility during operating system installation Instead you need to manually install some system required drivers and u...

Page 105: ...will notice that many of the instructions for driver installation require you to Navigate Browse to D In this case D is the drive specified for your CD device Not all computers are setup the same way...

Page 106: ...dure You will receive this message in cases where the driver has been released after the version of Windows you are currently using All the drivers provided will have already received certification fo...

Page 107: ...lick Finish to restart your computer 5 Go to the Sounds and Multimedia Con trol Panel Start Menu and point to Set tings and click Control Panel then double click the Sounds and Multime dia icon 6 Clic...

Page 108: ...Install Hardware Device Drivers appears select Search for a suitable driver for my device recommended and click Next 6 When Locate Driver Files appears select ONLY Specify a location and click Next 7...

Page 109: ...ice Drivers appears select Search for a suitable driver for my device recommended and click Next 7 When Locate Driver Files appears select ONLY Specify a location and click Next 8 Navigate Browse to D...

Page 110: ...click Next 7 When Locate Driver Files appears select ONLY Specify a location and click Next 8 Navigate Browse to D DRIVERS TOUCHPAD WIN2000 and select the visible file by clicking it 9 Click Open butt...

Page 111: ...he Sounds Audio Devices con trol panel Start Menu and point to Set tings and click Control Panel then double click the Sounds Audio Devices icon Note If you are in the Category View choose Sounds Spee...

Page 112: ...3 Click the Hardware tab then click Device Manager button 4 Click next to Other Devices if its sub items are not shown 5 Double click PCI Modem and click Reinstall Driver button 6 When the Hardware Up...

Page 113: ...Proper ties go to step 3 and click on it 3 Click the Hardware tab then click Device Manager button 4 Click next to Network Adapters if its sub items are not shown 5 Double click Realtek RTL8139 Family...

Page 114: ...it My Com puter Right click it to make the sub menu appear and scroll down to Proper ties go to step 3 and click on it 3 Click the Hardware tab then click Device Manager button 4 Click next to Mice a...

Page 115: ...Start menu Run 2 Navigate Browse to D DRIVERS HOTKEY CNK001 exe and click OK 3 Choose the language you prefer and click OK 4 Click Next 5 Click Finish to restart your computer 6 You may then configure...

Page 116: ...ngs found in Setup Even if you are a beginner keep a record of the settings you find and any changes you make This information could be useful if your system ever needs servicing There is one general...

Page 117: ...t some point Option Page Purpose Installed OS 5 13 Tells the computer which type of operating system you are using Embedded Shared Memory 5 13 Specify s the amount of total memory to be allocated to v...

Page 118: ...t of the on board RAM As the POST proceeds the computer will tell you if there is anything wrong If there is a problem which prevents the system from booting it will display a system summary and promp...

Page 119: ...OST Phoenix Bios 4 0 Release 6 0 Copyright 1985 2001 Phoenix Technologies Ltd All Rights Reserved BIOS Revision 1 00 E07 KBC EC Firmware Revision 1 00 E7 CPU Intel R Pentium R 4 CPU 1 80GHz 636K Syste...

Page 120: ...u to boot You will get a message identifying the problem make a note of this message followed by the prompt Press F1 to resume F2 to enter Setup Press F1 to see if the boot process can continue It may...

Page 121: ...r Setup turn on the computer and press F2 during the POST The prompt Press F2 to Enter Setup seen in Figure 5 1 is usu ally present for a few seconds after you turn on the system If you get a Keyboard...

Page 122: ...bottom of the screen If these tools are confusing press F1 to call up a General Help screen Then use the arrow keys to scroll up or down this page The Item Specific Help on the right side of each scr...

Page 123: ...ft F10 to enter the Boot Menu immediately af ter you start the sys tem Use K L to highlight your preference and press Space to change the value see Boot Menu on page 18 Press F4 to save and quit or pr...

Page 124: ...reflect these changes Figure 5 3 Main Menu PhoenixBIOS Setup Utility Main Advanced Security Boot Exit F1 Help Select Item Change Values F9 Setup Defaults Esc Exit Select Menu Enter Select Sub Menu F1...

Page 125: ...HDD which fits into the computer s HDD bay These items are configured automatically for you Secondary Master Main Menu Pressing Enter under opens the sub menu to show the configuration of the secondar...

Page 126: ...Select the operating system installed on your system which you will use most commonly Note An incorrect setting can cause some operating systems to display unexpected behavior Setup Warning Setting it...

Page 127: ...erating system installed on your system which you will use most commonly Note An incorrect setting can cause some operating systems to display unexpected behavior Setup Warning Setting itmes on this m...

Page 128: ...ear in mind that the more overall memory is used as video memory the less is available as system memory This memory is al located from your system memory e g if you computer has 128MB of memory RAM th...

Page 129: ...ced Menu The sub menus under this line include options to configure the Par allel Printer port and Serial Port B Infrared These can be left to the default settings however you may wish to use certain...

Page 130: ...etting the CPU clock to run only part of the time you can set the percentage of time the clock will run Refer to Ad vanced Menu Desktop CPU model on page 5 11 Mobile CPU SpeedStep Advanced Menu Mobile...

Page 131: ...r machine or network passwords which will be set in your software OS Figure 5 6 Security Menu PhoenixBIOS Setup Utility Main Advanced Security Boot Exit F1 Help Select Item Change Values F9 Setup Defa...

Page 132: ...to set a password the supervisor password as set above for booting the computer Only users who enter a correct password can boot the system see Warning in the sidebar Password Warning If you set a boo...

Page 133: ...ot Menu PhoenixBIOS Setup Utility Main Advanced Security Boot Exit F1 Help Select Item Change Values F9 Setup Defaults Esc Exit Select Menu Enter Select Sub Menu F10 Save and Exit Item Specific Help K...

Page 134: ...t home computers come with an operating system already installed on hard drive C If you wish to boot from a CD ROM you will need to add it to the boot order As a general rule the order below is recomm...

Page 135: ...s original state and erase any previous changes you have made in a previous session Figure 5 8 Exit Menu PhoenixBIOS Setup Utility Main Advanced Security Boot Exit F1 Help Select Item Change Values F9...

Page 136: ...d or Phillips screwdriver A small regular screw driver An antistatic wrist strap Before working with or repairing the internal components you will need to wear an antistatic wrist strap to ground your...

Page 137: ...e necessary equipment you re not in the correct environment you doubt your abilities Under any of these conditions contact your service representative to purchase or replace the component s Power Safe...

Page 138: ...rive 6 3 6 Upgrading the Hard Disk Drive The hard disk drive is used to store your data internally in the com puter It can be taken out to accommodate other 3 5 IDE hard disk drives The system support...

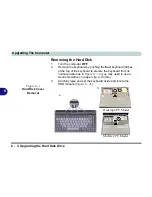
Page 139: ...he four keyboard latches at the top of the keyboard to elevate the keyboard from its normal position as in Figure 6 1a you may need to use a small screwdriver or paper clip to do this 3 Carefully rais...

Page 140: ...mputer 5 Lift the HDD module out of the computer by pulling on the HDD tab Figure 6 2b 6 Remove screws Figure 6 2c and separate the HDD from the cover and disconnect the HDD connector board 7 Just rev...

Page 141: ...stall on page 4 2 HDD System Warning New HDDs are blank Before you begin make sure You have backed up any data you want to keep from your old HDD You have all the CD ROMs and FDDs re quired to install...

Page 142: ...are DDR266 compliant The main memory can be expanded up to 1024MB and accepts 128 256 512MB modules The total memory size is automatically detected by the POST routine once you turn on your computer T...

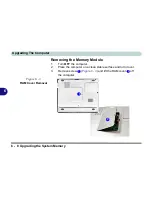
Page 143: ...the System Memory 6 Removing the Memory Module 1 Turn OFF the computer 2 Place the computer on a clean stable surface and turn it over 3 Remove screw Figure 6 3 and lift the RAM cover off the computer...

Page 144: ...aced remove it 6 Gently pull the latches and on the memory socket toward the sides of the computer as indicated in Figure 6 4 1 2 1 2 4 3 Warranty The CPU is not a user serviceable part Open ing the C...

Page 145: ...by its pin align ment Make sure the module is seated as far into the slot as it will go DO NOT FORCE IT it should fit without much pres sure 10 Press the module down towards the mainboard until the sl...

Page 146: ...he Computer Upgrading the System Memory 6 11 6 11 Replace the RAM cover and screw Figure 6 3 on page 6 8 12 Restart the computer 13 During the startup process the BIOS will register the new memory con...

Page 147: ...Upgrading The Computer 6 12 6...

Page 148: ...s make sure you have followed the instructions carefully and observed the safety precautions in the preface If all else fails talk to your ser vice center You should also make a record of what happene...

Page 149: ...r strip make sure it is actually working Connections Check all the cables to make sure that there are no loose connections anywhere Power Savings Make sure that the system is not in Hibernate or Stand...

Page 150: ...s not set to external only display see Chapter 3 Switching Enabling Displays Keyboard Toggle on page 3 11 Boot Drive Make sure there are no floppy disks in the drive when you start up your machine thi...

Page 151: ...r hard disk and OS as often as you can You may schedule these programs to run at times when you are not using your computer You can use those which are provided free with your OS or buy the more power...

Page 152: ...urces you don t know Viruses are often triggered from within e mail attachments so take care when opening any attached file You can configure most Anti Virus pro grams to check all e mail attachments...

Page 153: ...uter s manual but what about any new peripheral devices you have just purchased Many problems are caused by the installation of new hardware and or software Always refer to the documentation of any ne...

Page 154: ...ge you just made and see if the problem still occurs Don t over complicate things The less you have to deal with then the easier the source of the problem may be found Example if your com puter has ma...

Page 155: ...icator The various LED s light up but no picture appears solution Press Fn Esc Suspend or other configured key combination Wait a few moments before trying this control again Battery Critically Low Sl...

Page 156: ...g a lot of power The notebook feels too hot possible cause The system is using too much power or is not properly ventilated indicator The computer feels uncomfortably warm solution Reduce the computer...

Page 157: ...replaced contact your service center for more details The battery pack will not charge and the charge indicator light is off possible cause The battery is already fully charged and the indicator light...

Page 158: ...e The battery is exposed to excessively high or low temperature solution Suitable operating conditions are between 5 C and 35 C possible cause The battery has not been fully discharged before being re...

Page 159: ...l Panel in Windows and re enable the options possible cause A peripheral device is consuming a lot of power solution Turn off the unused device to save power possible cause Previously the battery was...

Page 160: ...mbinations Fn F9 and F10 see Chapter 3 Opening the LCD on page 3 2 If you re connected to an external monitor make sure it s plugged in and turned on You should also check the monitor s own brightness...

Page 161: ...t on possible cause The screen saver is activated solution Press any key or touch the TouchPad to return to your display The screen is flickering possible cause The vertical refresh rate is insufficie...

Page 162: ...or too dim solution Adjust the position of the LCD LCD s are designed to be viewed straight on If the angle is wrong you may see glare from the screen s backlight possible cause The screen is dirty i...

Page 163: ...cator The screen has ghost images even when it s off solution This problem is usually associated with exter nal CRT monitors Use power saving options see Chapter 3 Monitor Standby on page 3 19 to turn...

Page 164: ...e computer is waking up from Hibernate mode Boot Password You forget the boot password solution If you forget the password you may have to discharge the battery of the CMOS Contact your service repres...

Page 165: ...never intended for long term data storage and have a finite lifespan Do not store important files you wish to keep for a long time on floppy disks As a general rule it is worth reformatting floppy dis...

Page 166: ...uter Audio The sound cannot be heard or the volume is very low possible cause The volume might be set too low solution 1 Check the volume control in the Sound Con trol Panel in the Windows Toolbar 2 T...

Page 167: ...act disc is not correctly placed in the tray solution Gently try to remove the disc using the eject hole Loading Discs on page 2 11 I can no longer change region codes using the DVD utility possible c...

Page 168: ...nd make sure you have the correct software installed for running video compact discs DVDs If the proper software is properly installed and a problem still exists contact your service repre sentative a...

Page 169: ...CD ROM drive properly installed and configured 2 The CD ROM drive is dirty Clean it with a CD ROM cleaner kit 3 There may be a problem with the disc hard ware or software Refer to your operating sys...

Page 170: ...talled the driver to enable any extra functions solution Make sure you read the documentation which comes with any new external device and make sure you install the driver for it as this will allow yo...

Page 171: ...olution Check all connections and cables and then try to reinstall the driver possible cause The printer is not turned on or has an internal problem solution Make sure the printer is on You may refer...

Page 172: ...use The printer driver is not installed or is config ured incorrectly solution Check that the printer is properly installed and configured correct port etc Also check that you have installed the lates...

Page 173: ...llel port ECP is backward compatible with other operation modes used by older printers and will usually not need to be changed However some very old printers may require specific settings Please check...

Page 174: ...ED s are lit possible cause A software conflict made the system crash solution Consult your OS manual As a last resort since you will lose any unsaved data try to reboot the system or if that doesn t...

Page 175: ...is between your system s Infrared transceiver and the destination s trans ceiver Note The Infrared transceiver operates on a Line of Sight possible cause Support for IrDA AskIR FIR types infrared dev...

Page 176: ...or 478 pin FC PGA2 package 0 13 0 13 Micron Process Technology 512K L2 Cache 400MHz FSB 2 0 2 2 GHz Mobile Model Mobile Intel Pentium 4 Processor 478 pin Micro FCPGA package 0 13 0 13 Micron Process T...

Page 177: ...ntiate between the desktop and mobile CPU models Core Logic SIS650 Structure Fully PC99 Compliant ACPI 1 0B Compliant PC2001 Compliant Security Kensington Lock Memory Two 200 pin DDR SODIMM sockets su...

Page 178: ...otion compensation and IDCT accelerator for DVD content playback Fully DirectX8 compliant graphic engine CRT resolution up to 1920 x 1200 x 16M Video Memory Note The system allocates or shares a porti...

Page 179: ...12 7mmH 24X speed CD ROM CD RW Combo Drive DVD ROM CD RW One changeable 2 5 9 5mm HDD supporting DMA mode 2 PIO mode 4 ATA 33 ATA 66 ATA 100 Audio AC 97 2 1 compliant interface Compatible with Sound...

Page 180: ...B1 1 One IEEE 1394 port S Video jack for TV output One parallel port LPT1 supporting ECP EPP 1 7 and 1 9 Infrared transceiver supporting IrDA 1 1 FIR ASKIR One external CRT monitor port One external k...

Page 181: ...dem V 90 compliant V 92 upgradeable by S W Driver Wireless Infrared transfer IrDA 1 1 1cm 1M operating distance 4Mbps FIR Power Management Supports ACPI v1 0B Support APM v1 2 Soft Off by system power...

Page 182: ...ts smart Lithium Ion battery Indicators LED indicators HDD Power status FDD status Num Lock Caps Lock Scroll Lock AC Battery Icon Environmental Spec Temperature Relative Humidity Operating 5 C 35 C Op...

Page 183: ...sical Dimensions 308 w x 254 d x 37 5 h mm Weight 2 9 kg 3 25 kg with battery Optional DVD ROM Drive 12 7mmH CD RW Drive 12 7mmH Combination Drive DVD ROM and CD RW 12 7mmH Software DVD player Smart L...

Reviews: