background image


17 

6.0 HomePod Setup 

There are two ways to connect the HomePod to your network, 

wired


(with an Ethernet cable) or 

wirelessly

 (through Wi-Fi). The two methods 

are mutually exclusive at startup time, i.e. when one is enabled the 
other will become disabled. When HomePod is first powered up, it will 
try to detect if an Ethernet cable is attached. If it is, the Ethernet 
connectivity will have priority over wireless connectivity. If an Ethernet 
cable is not connected to the HomePod at startup, the HomePod’s 
wireless connection will be activated. For most users, HomePod will be 
used in a wireless environment so the Ethernet port need not be used. 
Follow the instruction below for each connection setup. 

6.1 Wired Setup 

Before turning on the HomePod, connect it to your network with the 
enclosed Ethernet cable. HomePod can be connected to a wireless 
router or a switching hub. Next, plug in HomePod and turn it on. The 
boot up process will take about 20 seconds, after which HomePod 
should discover any Audio Servers that have been activated. 

6.2 Wireless Setup 

Make sure that you have already set up a wireless router or access 
point (base station) to form your wireless 802.11 b/g network. Your 
computers and HomePod must be in the same domain as the router 
(e.g. all must be in 192.168.1.x). Confirm that the DHCP server on the 
access point is running so that your computers and HomePod can 
automatically obtain IP addresses automatically (this is usually on by 
default). If you have WEP encryption enabled in the access point, turn it 
off for now; you can turn it back on later after the HomePod is running 
smoothly. Next, plug in the power adapter and turn on the HomePod. 
The boot up process will take about 20 seconds, after which HomePod 
should discover any Audio Servers that have been activated.   

If the HomePod is unable to find any Audio Servers even though they 
are running, try the following: Turn off HomePod. Connect the HomePod 
to the router by a wired Ethernet cable, and then turn on the HomePod 
again. When HomePod reaches the main screen, go to Network 
Settings and locate its IP Address. Once the IP is known (say 
192.168.1.3), open a browser on any computer on the network and log 
into HomePod, e.g. type http://192.168.1.3/ in the browser. Once you 
are at the configuration screen, go to the Wireless Settings tab and look 
for the SSID field. Change the SSID from the default value of “ANY” to 
the exact name of your access point (you can get the SSID of your 
access point by logging into your access point). Click Save and then 
disconnect the Ethernet cable and reboot HomePod. In a multi-access 
point environment, setting the SSID to match your access point will help 
HomePod connect to it much more easily. 

If you still have trouble finding an Audio Server, refer to the 
Troubleshooting section in the Appendix section of this manual. Also 

Summary of Contents for HomePod

Page 1: ...HomePod User Manual...

Page 2: ......

Page 3: ...idential area is likely to cause interference in which case the user at his own expense will be required to take whatever measures are necessary to correct the interference Safety Precautions Follow a...

Page 4: ......

Page 5: ...Pod On and Off 19 7 2 Resetting HomePod 19 7 3 HomePod Display Menus 19 7 4 HomePod Controls 21 7 4 1 Content Navigational Buttons 21 7 4 2 Functional Buttons 22 7 4 3 Shuffle Loop Mode Buttons 22 7 4...

Page 6: ......

Page 7: ...1 1 0 Welcome Thank you for purchasing a Macsense HomePod Your HomePod gives you access to digital audio files stored on your computer from anywhere in the house or office...

Page 8: ...2...

Page 9: ...ge includes the following items HomePod Unit Power Adapter Remote Control Ethernet Cable Stereo Audio Cable HomePod CD Quick Start Guide User Manual 2 2 System and Other Requirements Wi Fi 802 11b or...

Page 10: ...4...

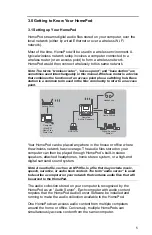
Page 11: ...peakers Headphone Home Stereo Digital Surround System HomePod System Diagram Your HomePod can be placed anywhere in the house or office where the wireless network has coverage The audio files stored o...

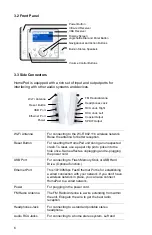
Page 12: ...bps Fast Ethernet Port is for establishing a wired connection with your network If you don t have a wireless network in place you can also connect HomePod to a wired network Power For plugging in the...

Page 13: ...7 Right jacks need to used at the same time Coaxial Output SPDIF Output For connecting to high end digital surround sound system Only one of the other is used...

Page 14: ...8...

Page 15: ...is based on Java For Windows PC s 98 Me 2000 XP the installer will alert you to install or upgrade Java JRE if you haven t already Message alerting JRE installation Click Yes to install Java Runtime...

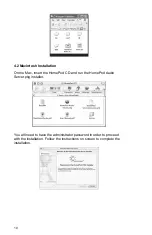
Page 16: ...the Mac insert the HomePod CD and run the HomePod Audio Server pkg installer Contents of the HomePod CD You will need to have the administrator password in order to proceed with the installation Foll...

Page 17: ...11 When the installation is complete you should see a new HomePod folder in the Applications folder HomePod Audio Server folder content for Mac...

Page 18: ...12...

Page 19: ...reen shots will be used interchangeably in this manual The HomePod Audio Server Configuration application allows you to set up and control your audio collection From this application you can define th...

Page 20: ...ic way of configuring the Audio Server to locate your audio files By specifying an Audio Folder all the audio files in that directory including any subdirectories will become part of your collection Y...

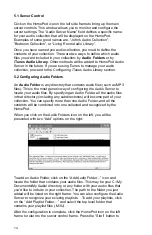
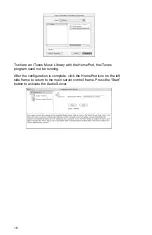
Page 21: ...ring your audio collection so that the HomePod shares the iTunes song and playlist information When you click on the iTunes Audio Library icon on the left side frame you will see a Select icon on the...

Page 22: ...ry with the HomePod the iTunes program need not be running After the configuration is complete click the HomePod icon on the left side frame to return to the main server control frame Press the Start...

Page 23: ...e access point is running so that your computers and HomePod can automatically obtain IP addresses automatically this is usually on by default If you have WEP encryption enabled in the access point tu...

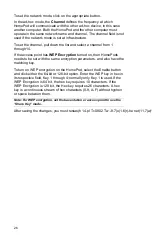
Page 24: ...18 review the Wireless Settings Page details in the Web Configuration section of this manual...

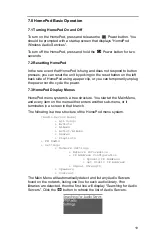
Page 25: ...ePod Display Menus HomePod menu system is a tree structure You start at the Main Menu and every item on the menu either enters another sub menu or it terminates in a screen in that branch The followin...

Page 26: ...ecific song album artists or playlist depending on the category Listing Menu The Play Screen is displayed when a song is being played by HomePod This screen gives additional information about the song...

Page 27: ...On and Off with each press of the key The Contrast item controls the brightness of the LCD Rotate the center dial to turn the contrast value up or down Settings Menu The Network Settings Menu opens u...

Page 28: ...aker or the headphones port to increase the volume press the button to decrease the volume press the button 7 4 3 Shuffle Loop Mode Buttons To shuffle a list of songs while a list of songs is playing...

Page 29: ...iguration page Launch your browser and type in the IP address of the HomePod e g if your HomePod s IP address is 192 168 1 3 then type http 192 168 1 3 in your browser to obtain HomePod s IP address n...

Page 30: ...assigned to HomePod automatically whenever the HomePod is connected to the network This is the default and preferred way for HomePod to join a network because everything is plug and play If you networ...

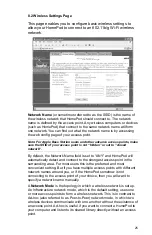
Page 31: ...ame field is set to ANY and HomePod will automatically detect and connect to the strongest access point in the surrounding area For most users this is the preferred and most convenient setting But if...

Page 32: ...omePods needs to be set with the same encryption parameters and also have the matching key To turn on WEP encryption on the HomePod select the Enable button and click either the 64 bit or 128 bit opti...

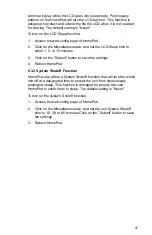
Page 33: ...inutes 3 Click on the Submit button to save the settings 4 Reboot HomePod 8 3 2 System Shutoff Function HomePod also offers a System Shutoff function that will turn the whole unit off at a designated...

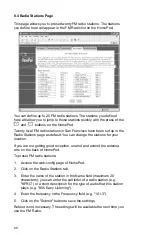
Page 34: ...the stations for your location If you are not getting good reception unwind and extend the antenna wire on the back of HomePod To preset FM radio stations 1 Access the web config page of HomePod 2 Cl...

Page 35: ...7 Tue Jan 27 12 00 32 CST 2004 From time to time Macsense offers upgrades to HomePod firmware to add new features and fix bugs The HomePod firmware will be distributed as a compressed encrypted file n...

Page 36: ...30...

Page 37: ...to Sun s Official Java site to download and install the latest Java runtime Environment JRE release http www java com en download For Macintosh Java VM is built in into the Mac OS X and therefore nee...

Page 38: ...ers with no attached monitor and remotely managed by Macs and PCs To get this version of the HomePod Audio Server please write to Tech Support 9 3 Remote Control Utility in Java A Java remote control...

Page 39: ...etwork Select one from the list that you wish to control The Libraries field on top of the window is a pull down menu listing the available Audio Server on the network Use the buttons to navigate the...

Page 40: ...34...

Page 41: ...teps General troubleshooting guidelines Make sure all connectors are properly attached Make sure the power adaptor is firmly connected Try the basic setup first before attempting complex ones Involve...

Page 42: ...n on the HomePod again When HomePod reaches the main screen go to Network Settings and locate its IP Address Once the IP is known say 192 168 1 3 open a browser on any computer on the network and log...

Page 43: ...art it HomePod is getting an IP address but it still can not find any audio servers Make sure the audio server is running If it is not start it If it is stop and restart it Make sure that all software...

Page 44: ...control on the HomePod and make sure that the volume is turned up Maker sure mute button on the remote control unit is not activated Press the mute button again to deactivate mute Audio sound is dist...

Page 45: ...f the HomePod by holding down the power button for two seconds insert a paper clip in the reset hole on the side of the HomePod or unplug and re plug the power cord Hold a few seconds and restart the...

Page 46: ...4926 200MHz CPU 16MB Flash RAM 32MB SDRAM 124x64 pixel graphical back lit blue LCD display Jog shuttle rotating dial 802 11b 11Mbps mini PCI Card with external antenna RJ 45 10 100Base T Ethernet Port...

Page 47: ...iscovery request transfer and control of audio content on HomePod FM radio tuner with 20 preset stations Station name and frequency can be defined by user through web interface Unicode Support for Eng...

Page 48: ...csense will as its sole obligation under this warranty replace or repair at its option any Product that does not conform to this warranty Under no circumstances will Macsense be liable for any inciden...

Page 49: ...rnish a sales receipt proof of purchase indicating the date of purchase amount paid and place of purchase Customers who fail to provide such proof of purchase will be charged for the repair of any Pro...

Reviews: