6
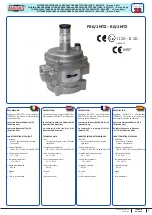
FRG/2MTZ
RG/2MTZ
FILTROREGOLATORI GAS e REGOLATORI GAS TIPO FRG/2MTZ - RG/2MTZ (P. max 5 bar)
CLOSING GAS PRESSURE FILTER REGULATORS and REGULATORS TYPE FRG/2MTZ - RG/2MTZ (P. max 5 bar)
FILTREREGULATEURS DE GAZ ET REGULATEURS DE GAZ DE TYPE FRG/2MTZ - RG/2MTZ (P. max 5 bar)
FILTROREGULADORES y REGULADORES DE GAS SERIE FRG/2MTZ - RG/2MTZ (P. max 5 bar)
Capitolo - Chapter
Chapìtre - Capitulo
23
Madas Technical Manual
October 2011
INSTALLAZIONE
ATTENZIONE:
le
operazioni
di
installazione/manutenzione
devono
essere eseguite da personale qualificato.
• E'necessario chiudere il gas prima
dell’installazione.
• Verificare che la pressione di linea
NON
SIA SUPERIORE
alla pressione
massima dichiarata sull’etichetta del
prodotto.
• Il regolatore è normalmente posizionato
prima dell’utenza. Deve essere installato
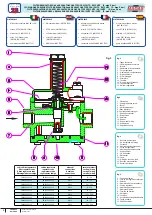
con la freccia (in rilievo sul corpo (
5
))
rivolta verso l’utenza.
• Può essere installato in qualsiasi posizione
anche se è preferibile l’installazione con
la molla (
13
) in verticale (come in fig. 1).
• Durante l’installazione evitare che detriti
o residui metallici penetrino all’interno
dell’apparecchio.
• Verificare che la lunghezza del filetto della
tubazione non sia eccessiva per non
danneggiare il corpo dell’apparecchio in
fase di avvitamento.
• Non usare il contenitore della molla come
leva per l’avvitamento ma servirsi
dell’apposito utensile.
• In ogni caso dopo l’installazione verificare
la tenuta dell’impianto.
TARATURA
Prima di avviare l’impianto, assicurarsi che
la molla (
13
) in dotazione al regolatore
sia adeguata alla pressione di regolazione
voluta. Dopo aver tolto il tappo (
1
),
posizionare il regolatore di pressione (
2
) al
minimo di taratura (completamente svitato),
quindi avviare l’impianto e controllando la
pressione di regolazione avvitare il regolatore
(
2
) stesso fino alla pressione voluta.
MESSA FUORI SERVIZIO
Svitare il tappo (
1
) ed avvitare il regolatore
(
2
) fino a fine corsa.
INSTALLATION
WARNING:
all
installation/
maintenance work must be carried out
by skilled staff.
• The gas supply must be shut off before
installation.
• Check that the line pressure
DOES NOT
EXCEED
the maximum pressure stated
on the product label.
• The regulator is normally installed before
the user. It must be installed with the
arrow (on the body (
5
)) towards the user.
• It can be installed in any position but it is
preferable the installation with the spring
(
13
) in vertical position (see fig. 1).
• During installation take care not to allow
debris or scraps of metal to enter the
device.
• Check that the pipeline thread is not too
long; overlong threads may damage the
body of the device when screwed into
place.
• Do not use the spring casing for leverage
when screwing into place; use the
appropriate tool.
• Always check that the system is gas-tight
after installation.
CALIBRATION
Before starting the system, pay attention
that the standard regulation spring (
13
)
is suitable with the needed regulation
pressure. After removing the cap (
1
),
calibrate the regulator (
2
) at the minimum
setting (completely unscrewed), then start
the system and checking the regulation
pressure, screw the regulator (
2
) up to the
needed pressure.
OFF SERVICE
Unscrew the cap (
1
) and screw the regulator
(
2
) to its end.
INSTALLATION
ATTENTION:
les
opérations
d’installation/entretien doivent être
exécutées par du personnel qualifié.
• Fermer le gaz avant l’installation.
• Vérifier que la pression de ligne
NE SOIT
PAS SUPÉRIEURE
à la pression
maximum déclarée sur l’étiquette du
produit.
• Le régulateur est normalement positionné
avant le point d’utilisation. La flèche (en
relief sur le corps (
5
)) doit être tournée
vers le point d’utilisation.
• Il peut être installé en n’importe quelle
position, même s’il est préférable que
l’installation soit faite avec le ressort
(
13
) à la verticale (voir fig. 1).
• Pendant l’installation, éviter que des
détritus ou des résidus métalliques
pénètrent dans l’appareil.
• Vérifier que le filet de la tuyauterie ne soit
pas trop long pour ne pas endommager
le corps de l’appareil lors du vissage.
• Ne pas utiliser la protection du ressort
comme levier pour le vissage mais se
servir de l’outil approprié.
• De toute façon, après l’installation vérifier
l’étanchéité de l’installation.
TARAGE
Avant de visser l’installation, s’assurer que
le ressort (
13
) du régulateur soit adéquat
à la pression de réglage voulue. Après
avoir enlevé le bouchon (
1
), positionner la
vis de réglage (
2
) au minimum du tarage
(complètement dévissée), ensuite visser
l’installation et en controlant la pression de
réglage visser la vis de réglage (
2
) jusqu’à la
pression voulue.
MISE HORS SERVICE
Dévisser le bouchon (
1
) et visser le régulateur
(
2
) jusqu’à la fin de course.
INSTALACIÓN
ATENCIÓN.
Las
operaciones
de
instalación y mantenimiento deben ser
efectuadas por personal cualificado.
• Antes de iniciar las operaciones de
instalación es necesario cerrar el gas.
• Verificar que la presión de la línea
NO
SEA SUPERIOR
a la presión máxima
indicada en la etiqueta del producto.
• El regulador suele estar situado antes del
aparato. Ha de instalarse con la flecha
(en relieve en el cuerpo (
5
)) apuntando
hacia el aparato.
• Se puede instalar en cualquier posición,
pero es preferible la instalación con el
muelle (
13
) en vertical (tal como se
ilustra en las figs. 1).
• Durante la instalación prestar atención
a fin de evitar que detritos o residuos
metálicos se introduzcan en el aparato.
• Verificar que la longitud de la rosca de
la tubería no sea excesiva dado que,
durante el enroscado, podría provocar
daños en el cuerpo del aparato mismo.
• El contenedor del resorte no debe utilizarse
como palanca para efectuar el enroscado;
utilizar para ello la respectiva herramienta.
• De todas formas, verificar la estanqueidad
del sistema una vez efectuada la
instalación.
TARADO
Antes de poner en marcha la instalación,
asegurarse que el muelle (
13
) en dotación
al regulador es adecuado a la presión de
regulación deseada. Después de haber
quitado el tapón (
1
), poner el tornillo
de regulación (
2
) a lo mínimo de tarado
(totalmente destornillado), entonces poner
en marcha la instalción controlando la
presión de regulación atornillar el tornillo
de regulación (
2
) misma hasta la presión
deseada.
FUERA DE SERVICIO
Destornillar el tapón (
1
) y atornillar el
regulador (
2
) de final de carrera.
Si raccomanda di leggere
attentamente il foglio di istruzioni
a corredo di ogni prodotto.
It is always important to read
carefully the instruction sheet
of each product.
Lire
attentivement
les
instructions
pour
chaque
produit.
Se recomienda leer atentamente
la
hoja
de
instrucciones
adjuntas con el producto.

