background image

ES

FR

EN

IT

18

Madas Technical Manual

 - 5|5.2a - REV. 0 of 

th

 Apr 2019

RG/2MCS - RG/2MBZ

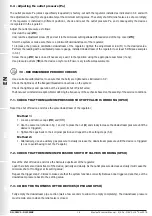
6.4 - Adjusting the outlet pressure (Pa)

The outlet pressure Pa (unless specifically requested) is factory-set with the regulator installed as indicated in 3.4 and with 

the adjustment screw (

1

) set approximately at the minimum setting value. The safety shut offs/relief valve are set accordingly; 

If  the  regulator  is  installed  in  different  positions,  check  and  reset  the  outlet  pressure  Pa,  and  consequently  the  devices 

incorporated in the regulator;
Adjust the outlet pressure as follows:
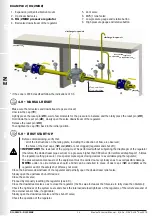
• Unscrew the cap (

26

);

• Unscrew the adjustment screw (

1

) and set it to the minimum setting allowed (threaded end of the top cover (

25

));

• Start the system or make sure there is a minimum flow downstream of the regulator;
• To increase the pressure calibration downstream of the regulator, tighten the adjustment screw (

1

) to the desired value. 

Perform the reading with a calibrated pressure gauge, installed downstream of the regulator to at least 5 DN (see examples 

in 3.4);

• Screw the cap (

26

) back on and if necessary, seal it in that position using the appropriate seal holes (if any);

• Use pressure outlets (

19

)on the device only for zero flow or very low flow measurements. 

  7.0 - RECOMMENDED PERIODIC CHECKS

• Use a suitable calibrated tool to ensure that the bolts are tightened as indicated in 3.2;
• Check the tightness of the flanged/threaded connections on the system;
• Check the tightness and operation of the regulator/shut off/relief valve;

The final user or installer is responsible for defining the frequency of these checks based on the severity of the service conditions.

7.1 - CHECK THAT THE MAXIMUM PRESSURE SHUT OFF VALVE IS WORKING (OPSO)

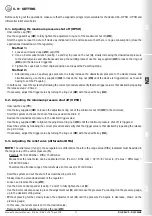
Reset the shut off device and close the valve downstream of the regulator; 

Method 1:

1. Loosen and remove caps (

26

) and (

11

);

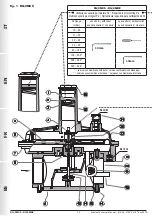
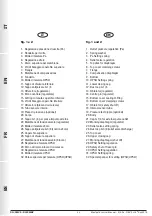
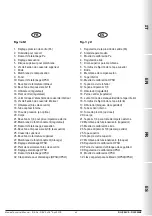
2. Use the same tool (shown in fig. 1 and 2) to press the nut (

4

) and slowly increase the downstream pressure until the 

device is triggered;

3. Tighten the caps back to their original position and repeat the Pa setting steps (6.4);

Method 2:

1. Alternatively, use an auxiliary gas pressure to slowly increase the downstream pressure until the device is triggered 

(so as to avoid having to set the Pa again).

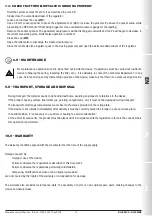
7.2 - CHECK THAT THE MINIMUM PRESSURE SHUT OFF VALVE IS WORKING (UPSO)

• Reset the shut off device and close the ball valve upstream of the regulator;
• open the relief valve, downstream of the device, partially and slowly. As the outlet pressure decreases slowly it will cause the 

minimum shut off to trigger at its setting value;

• Repeat the trigger step 2-3 times to make sure that the system functions correctly. Between one trigger and another, set the 

downstream pressure back to the setting value.

7.3 - CHECK THE TIGHTNESS OF THE DEVICES (OPSO AND UPSO)

• Fully empty the downstream pipe section (wait a few seconds to allow it to empty completely). The downstream pressure 

must remain at zero when the relief valve is closed.

Summary of Contents for RG/2MCS

Page 1: ...sure range Plage de pression de fonctionnement Rango de la presi n de funcionamiento Pe 0 5 5 bar Attacchi filettati Threaded connections Raccords filet s Conexiones roscadas DN 32 DN 40 DN 50 Attacch...

Page 2: ...teurs tableau 1 Caudal de los reguladores tabla 1 Disegni Drawings Dessins Dise os 40 Caratteristiche molle di regolazione tabella 2 44 Regulation spring data table 2 Caracteristiques des ressorts de...

Page 3: ...he device It also intervenes in the event of an upstream power failure They can also be supplied without the UPSO device relief valve discharges small gas flows outwards if overpressure occurs downstr...

Page 4: ...IDENTIFICATION for configurations see page 45 50 RG 2MCS Pressure regulator without safety shut offs RG 2MBZ Pressure regulator with safety shut offs 3 0 COMMISSIONING THE DEVICE 3 1 OPERATIONS PRIOR...

Page 5: ...plication Insert the relative washers inside the bolts in order to prevent damage to the flanges during tightening When tightening be careful not to pinch or damage the gasket Tighten the nuts or bolt...

Page 6: ...ted relief valve is triggered or if the working diaphragm 22 or the blocking diaphragm 27 fails If the diaphragm fails the regulator becomes a source of explosive atmosphere emission of continuous deg...

Page 7: ...performed without subjecting the diaphragm of the regulator therefore the downstream pipe section to a pressure higher than 300 mbar for reinforced diaphragm 1 5 times the regulator setting pressure U...

Page 8: ...the minimum pressure shut off UPSO Unscrew the cap 11 Use the key supplied 32 to loosen the adjustment ring nut of the minimum shut off 30 to the minimum Start the system and reset the shut off device...

Page 9: ...ss of the flanged threaded connections on the system Check the tightness and operation of the regulator shut off relief valve The final user or installer is responsible for defining the frequency of t...

Page 10: ...y dismantling operation on the device make sure that there is no pressurised gas inside 9 0 TRANSPORT STORAGE AND DISPOSAL During transport the material needs to be handled with care avoiding any impa...

Page 11: ...e that can be achieved with the spring provided without replacing any part DfRv Differential relief valve range with respect to Pa year Year of manufacture Lot Product serial number see explanation be...

Page 12: ...0 1500 600 260 680 970 1280 1500 800 240 620 960 1260 1500 DN 50 20 300 460 750 990 1290 1500 30 300 460 750 1000 1300 1500 50 300 460 750 1000 1300 1500 100 280 450 740 1000 1300 1500 200 220 370 660...

Page 13: ...re pour r gler Pa Herramienta requerida para calibraci n de Pa Pa Range mbar con sfioro with relief avec vacuation con alivio senza sfioro without relief sans vacuation sin alivio 10 22 13mm 17 32 32...

Page 14: ...with relief valve Version avec vacuation Versi n con alivio G 3 8 G 1 4 8mm Per taratura sfioro For relief valve setting Pour talonnage vacuation Para calibraci n alivio Per taratura OPSO For OPSO set...

Page 15: ...eriore 27 Membrana di funzionamento blocco 28 Regolazione taratura OPSO 29 Perno di riarmo blocco di sicurezza 30 Regolazione taratura UPSO 31 Molla di taratura UPSO 32 Chiave speciale per taratura OP...

Page 16: ...ivot de r armement bloc de s curit 30 R glage talonnage UPSO 31 Ressort d talonnage UPSO 32 Cl sp ciale pour talonnage OPSO UPSO fig 1 y 2 1 Regulaci n de la presi n de salida Pa 2 Arandela para muell...

Page 17: ...00 MO 2580 4 6x29 4x95x9 Molle di taratura OPSO OPSO Setting springs Ressorts d talonnage OPSO Muelles de calibraci n OPSO 30 90 MO 0650 2x35x20x4 70 140 MO 0780 2 2x35x23 5x3 5 90 260 MO 0880 2 2x35x...

Page 18: ...tion or configuration to get the sealing washer compensation diaphragm and working diaphragm in FKM Ajouter la lettre V apr s la lettre indiquant les connexions ou configuration pour obtenir rondelle...

Page 19: ...pr sents donc ressorts n 2 et n 3 toujours indiqu s avec X il est possible d exclure l vacuation en marquant avec un X le champ ressort correspondant n 4 Code raccords filet s 05 DN 32 06 DN 40 07 DN...

Page 20: ...10 20 RCS070000 1XX1 RCS500000 1XX1 2 17 32 2 15 40 RCS070000 2XX2 RCS500000 2XX2 3 32 60 2 15 40 RCS070000 3XX2 RCS500000 3XX2 4 50 95 3 40 80 RCS070000 4XX3 RCS500000 4XX3 5 85 180 3 40 80 RCS070000...

Page 21: ...h X the relief valve can be omitted indicate spring no 4 with X Threaded connections code 05 DN 32 06 DN 40 07 DN 50 Flanged connections code 32 DN 32 FL 40 DN 40 FL 50 DN 50 FL Not all combinations a...

Page 22: ...0 90 1 7 20 2 15 40 RB07Z 2112 3 32 60 2 70 140 2 10 30 2 15 40 RB07Z 3222 4 50 95 2 70 140 2 10 30 3 40 80 RB07Z 4223 5 85 180 3 90 260 3 30 50 3 40 80 RB07Z 5333 6 150 350 4 200 550 4 50 110 4 50 12...

Page 23: ...0 90 1 7 20 2 15 40 RB50Z 2112 3 32 60 2 70 140 2 10 30 2 15 40 RB50Z 3222 4 50 95 2 70 140 2 10 30 3 40 80 RB50Z 4223 5 85 180 3 90 260 3 30 50 3 40 80 RB50Z 5333 6 150 350 4 200 550 4 50 110 4 50 12...

Page 24: ...nes embridadas A B C D E DN 32 DN 40 DN 50 160 242 225 48 5 193 5 DN 32 DN 40 DN 50 230 285 225 67 5 217 5 RG 2MBZ Attacchi filettati Threaded connections Raccords filet s Conexiones roscadas Attacchi...

Page 25: ...ons le droit de toute modification technique et constructive Nos reservamos el derecho de realizar cualquier cambio t cnico y estructural Sede legale Via V Moratello 5 6 7 37045 Z A I Legnago VR Italy...

Reviews: