background image

11

care and maintenance instructions for
your product

Make sure I'm cold and unplugged form the power supply before cleaning
me. I must be kept clean at all times, and it will be enough to use a soft
sponge or a damp cloth. If you want, you may use soap or a degreaser
cleaner. You must rinse me frequently with clear water to avoid leaving soap
residues.

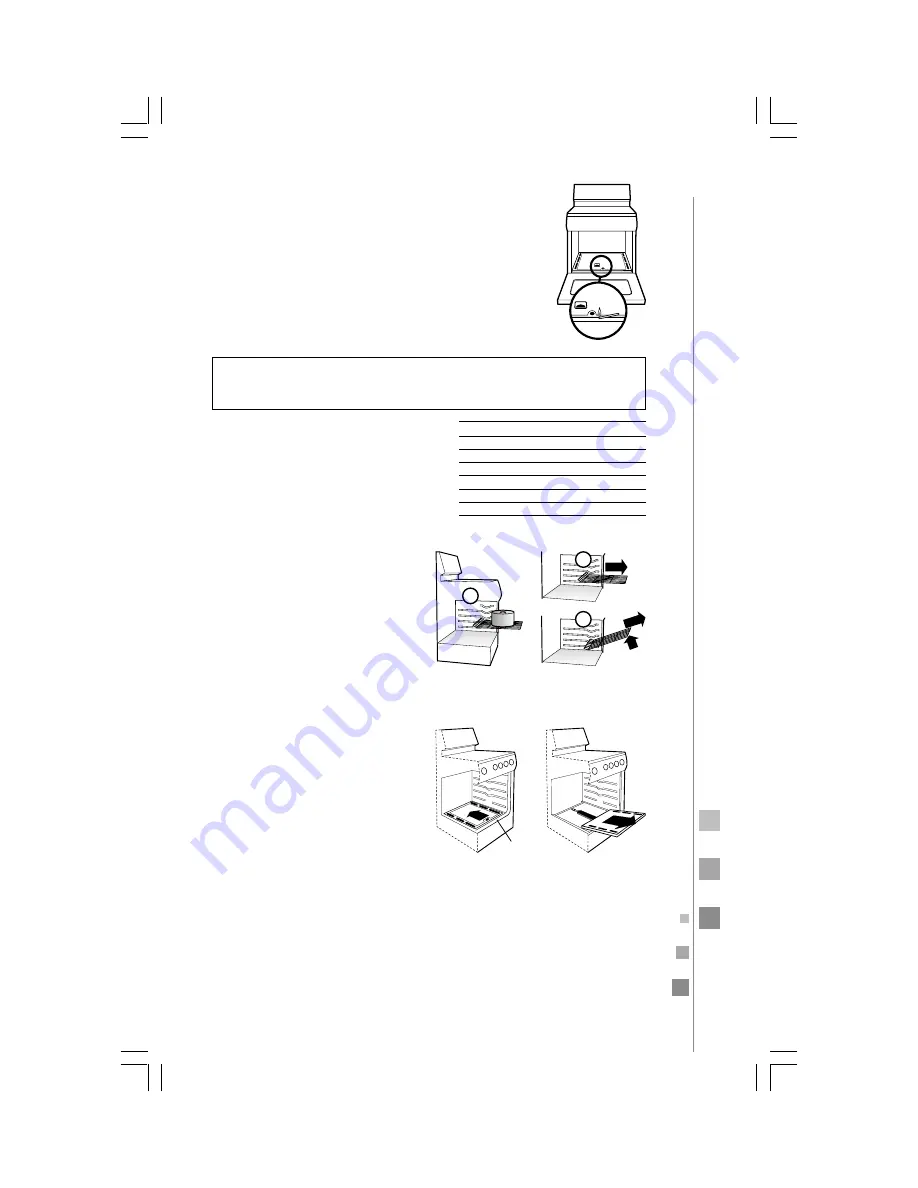
Oven

frame

oven bottom

If you want to clean my oven bot-
tom, you can remove it this way:
Grasp the bottom's front end insert-
ing your hands into the slots.
1. Push in to the back to release it

from the frame.

2. Lift up the front end a little bit,

and then pull the oven bottom
out.

2

1

3

oven shelf

My oven shelf was designed so that it
won’t come out completely when us-
ing it “1”, it stops and doesn’t tilt,
providing you more security and ease
of use when placing in and taking
out food.
To remove it completely slide it to-
wards you “2” and when you feel the stop lift it up and pull it out “3”.
To replace it: Revert the operation above.

turn on my oven

1. Make sure my control knob is in the OFF position and

place a lighted match next to the hole on the oven bot-
tom.

2. If I’m equipped with a thermostat: Push in my control

knob and turn it to the “min” setting. When burner ig-
nites, turn my control knob to the desired setting. I’ll al-
ways keep even the selected temperature.

3. If I’m equipped with a “thermocontrol”: Push in my con-

trol knob and turn it to the “5” position. Turn again my
knob to the desired setting.

• 

As my oven starts heating up you may

notice the formation of small water
drops on the oven window, THIS IS NOR-
MAL and they will disappear.

• The first time you use me, you may no-

tice a “strange” odor coming from my
oven, THIS IS NORMAL THE FEW FIRST
TIMES.

important!

 For all ignition systems, make sure the burner has lit, take a

look through the oven’s peephole; you must open oven door to com-
plete this step. Use potholders.

Conversion chart (thermocontrol)

Setting

1
2
3
4
5

Approximate temperature

140 ºC
160 ºC
200 ºC
230 ºC
260 ºC

Summary of Contents for EM5110BE

Page 1: ...110LLE LEM5110TBBE modelos models LEM5110TLLE PREM200BBE PREM200LLE PREM200NNE No de parte Part Number 183D9489P152 Rev 58 PRECAUCI N EVITE RIESGOS INSTALE SU APARATO DE ACUERDO CON LAS INDICACIONES D...

Page 2: ...2...

Page 3: ...os ver directorio Quemador Paso de esprea Gas LP 66 0 033 63 0 037 69 0 029 65 0 035 Gas Natural 56 0 046 55 0 052 57 0 043 51 0 066 Capacidad kJ h 8 440 11 077 5 7 385 10 022 5 65 246 cm 2 28 Est nda...

Page 4: ...en 2 copetes que se instalan de manera diferente dependiendo del modelo de la es tufa Puedes diferenciarlos ya que la Opci n 1 trae 4 perforaciones en la ceja inferior trasera y la Opci n 2 trae 4 2 p...

Page 5: ...al ndolo en l nea recta hacia arriba 2 Desliza el anillo del tubo regulador hacia arriba o abajo hasta lograr la flama deseada flamas con puntas amarillas mi funcionamiento quemadores superiores encen...

Page 6: ...e agua en el cristal de la puerta lo cual es normal y desaparece r Al utilizarme por primera vez probable mente percibas un olor extra o que proviene de mi horno ESTE OLOR ES NORMAL LAS PRIMERAS VECES...

Page 7: ...e las manchas Salpicaduras grandes Usando un traste con agua y un cepillo de nylon limpia la superficie manchada Cambia el agua frecuentemente para mantenerla lo m s limpia posible y seca la superfici...

Page 8: ...pressure Not included with product Burner Spud number LP Gas 66 0 033 63 0 037 69 0 029 65 0 035 Natural Gas 56 0 046 55 0 052 57 0 043 51 0 066 Capacity kJ h 8 440 11 077 5 7 385 10 022 5 65 246 cm...

Page 9: ...re installed in a different way depending on the model of your range Option 1 has 4 perforations in the rear bottom flange and Op tion 2 has 4 or 2 perforations depending also on the model on the fron...

Page 10: ...burner is off and cool then re move my grates and the burner pulling it straight up 2 Slide up or down the shutter on the regulator tube until achieving the desired flame yellow tipped flames my oper...

Page 11: ...when you feel the stop lift it up and pull it out 3 To replace it Revert the operation above turn on my oven 1 Make sure my control knob is in the OFF position and place a lighted match next to the ho...

Page 12: ...ramic material that absorbs spat ters To clean heavy soil Clean the soiled surface using a small amount of water and a stiff bristle nylon brush Change water frequently to keep it as clean as possible...

Page 13: ...ascalientes Ags 01 449 978 8870 y 8871 Canc n Av Miguel Hidalgo Reg 92 Manzana 47 Lote 10 77516 Canc n Quintana Roo 01 998 880 0760 0820 y 0965 Cd Ju rez Porfirio D az 852 ExHip dromo 32330 Cd Ju rez...

Page 14: ...uando el producto se hubiese utilizado en condiciones distintas a los normales b Cuando el producto no hubiese sido operado de acuerdo con el instructivo de uso que se le acompa a c Cuando el producto...

Page 15: ...15...

Page 16: ...16 www serviplus com mx P lizas de extensi n de garant a 0155 5329 1322 Lada sin costo 01 800 9029 900...

Reviews: