background image

Clean

The product after use or whenever deemed necessary must be cleaned with mild soap and water, using a soft 
cloth. Simply wipe the cloth gently over the surface of the game.

-Do not use abrasive or corrosive solvents or detergents. 
-Do not use scrapers or abrasive papers.
-Do not use alcohol or other stain removers.

When not in use, store the product away from direct sunlight, weather, heat sources, dust, liquids and moisture. 
When not in use for a long period of time, we recommend covering it with a cloth to prevent dust and/or other dirt 
from settling.

Warranty

The guarantee only applies to product-related defects and in the event of a claim only the product or its compo-
nents will be replaced.  Failure to comply with the methods of use of the product described in this documentation 
will result in the warranty terms being invalidated.
The guarantee does not cover any damage caused by negligent use of the product, natural wear of its materials 
or characteristics, or breakage caused by an unfavourable environment. MADOTI shall not be liable for any injury 
or death resulting from improper assembly, maintenance or use of this product. MADOTI's warranty is limited to 
the repair or replacement of a defective product

We do our best to provide spare parts for BAITA even after the warranty period has expired. In case you need 
spare parts, please contact us at hello@madoti.it

Assembly instruction

Before using the product, read this document and follow the assembly instructions carefully.

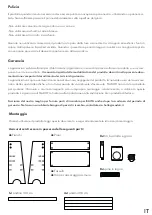
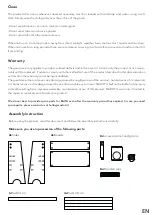
Make sure you are in possession of the following parts:

2xSides

2xBoards

8xScrews, barrel and grains

8xWooden pins

1xRod 93 cm

4xRods  98 cm

EN

Summary of Contents for BAITA

Page 1: ...D e s i g n p e r b a m b i n i USER S MAINTENANCE AND ASSEMBLY MANUAL Say hello to your new favourite product BAITA Waldorf playstand...

Page 2: ...ccia di urti dovuti al trasporto datene comunicazione al fabbricante prima di procedere alle operazioni successive Non lasciare il prodotto vicino a fonti di calore Non sottoporre l arredo a amme libe...

Page 3: ...odotto descritti nella presente docu mentazione comporta il decadimento dei termini di garanzia La garanzia non copre eventuali danni causati da un uso negligente del prodotto la naturale usura dei su...

Page 4: ...ntaggio Organizzate tutti i passaggi in anticipo e assicuratevi di avere tutte le parti necessarie a disposizione Tenete sempre gli utensili di ferramenta fuori dalla portata dei bambini Passo 1 Passo...

Page 5: ...nte Inserire i piani in corrispondenza di spine e viti a barilotto e successivamente il secondo anco Passo 4 Dopo esservi assicurati che ogni piano e i pioli siano correttamente inseriti mantenendo se...

Page 6: ...Passo 4 Mettere il prodotto in verticale come da immagine IT Passo 5 Inserire i tondini rimanenti come da gura...

Page 7: ...sso 6 Inserire il tetto di BAITA come da immagine Passo 7 Se avete acquistato la struttura singola o desiderate collocarla a muro abbiate cura di inserire i tasselli per anco rare la struttura alla pa...

Page 8: ...olose Veri care che il gioco sia pulito ed in caso procedere ad una sua pulizia vedi Pulizia e conservazione IL FABBRICANTE NON PUO ESSERE RITENUTO IN ALCUN CASO RESPONSABILE DI INCIDENTI O DANNI CONS...

Page 9: ...nce with both the procedures indicated and the general safety regulations Different countries may have diffe rent safety regulations It should therefore be noted that in all cases in which the regulat...

Page 10: ...with the methods of use of the product described in this documentation will result in the warranty terms being invalidated The guarantee does not cover any damage caused by negligent use of the produc...

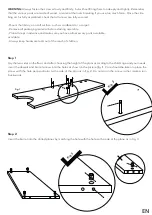
Page 11: ...ance and make sure you have all necessary parts available available Always keep hardware tools out of the reach of children EN Step 1 Step 2 Insert the barrel into the drilled planes by matching the h...

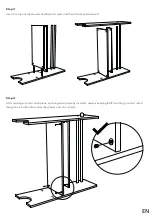
Page 12: ...wels and barrel screws and then the second sidewall Step 4 After making sure that each plane and rungs are properly inserted always keeping BAITA resting on a mat insert the grains into the holes unde...

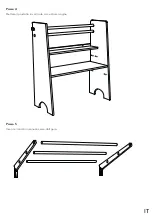
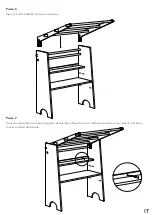
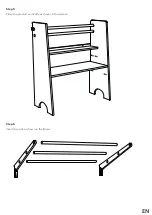
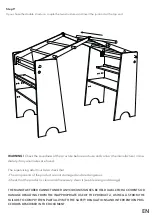
Page 13: ...EN Step 5 Place the product vertically as shown in the picture Step 6 Insert the rods as shown in the gure...

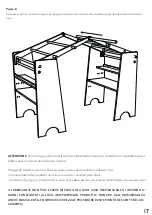
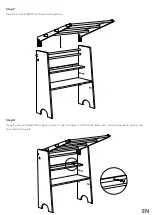
Page 14: ...ep 7 Insert the roof of BAITA as shown in the picture Step 8 If you have purchased the single structure or wish to place it on the wall take care to insert dowels to anchor the structure to the wall E...

Page 15: ...e product is clean and if necessary clean it see Cleaning and storage THE MANUFACTURER CANNOT UNDER ANY CIRCUMSTANCES BE HELD LIABLE FOR ACCIDENTS OR DAMAGE RESULTING FROM THE INAPPROPRIATE USE OF THE...

Page 16: ...a Provinciale 4 b 12030 Gambasca CN P IVA 03827150040 Tel 39 3400825185 Mail hello madoti it IT The product complies with the technical requirements of the European Directive 2009 48 EC Made in ITALY...

Reviews: