background image

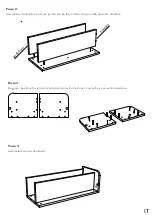
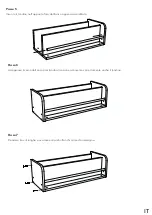
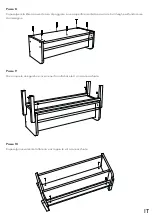
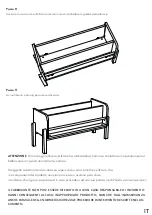
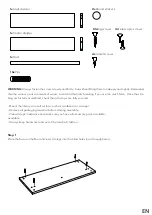
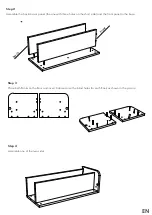
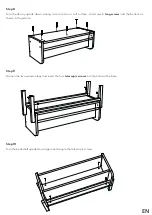
Passo 3

Poggiare i due fianchi a terra e inserire 6 spine nei fori ciechi per ciascun fianco come da immagine.

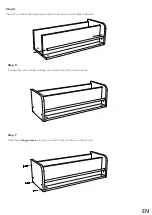
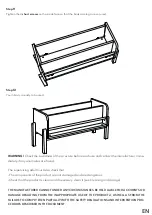
Passo 4

Assemblare uno dei due fianchi

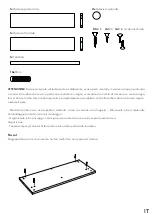
Passo 2

Assemblare il pannello posteriore (quello con tre fori sul lato corto) e quello anteriore alla base.

IT

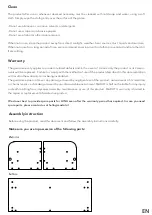
fro

nt

ale

po

ste

rio

re

Summary of Contents for FIORE

Page 1: ...D e s i g n p e r b a m b i n i USER S MAINTENANCE AND ASSEMBLY MANUAL Say hello to your new favourite product FIORE...

Page 2: ...traccia di urti dovuti al trasporto datene comunicazione al fabbricante prima di procedere alle operazioni successive Non lasciare il prodotto vicino a fonti di calore Non sottoporre il gioco a amme...

Page 3: ...no sostituiti Il mancato rispetto delle modalit d uso del prodotto descritti nella presente docu mentazione comporta il decadimento dei termini di garanzia La garanzia non copre eventuali danni causat...

Page 4: ...ate Montate la libreria su una super cie morbida come un cartone o un tappeto Rimuovete tutto il materiale d imballaggio prima di iniziare il montaggio Organizzate tutti i passaggi in anticipo e assic...

Page 5: ...ire 6 spine nei fori ciechi per ciascun anco come da immagine Passo 4 Assemblare uno dei due anchi Passo 2 Assemblare il pannello posteriore quello con tre fori sul lato corto e quello anteriore alla...

Page 6: ...do anco prestando attenzione ad inserire correttamente anche il tondino Passo 5 Inserire il tondino nell apposito foro del anco appena assemblato Passo 7 Prendere tre viti lunghe e avvitare entrambi i...

Page 7: ...poggiarsi su una super cie morbida e avvitare 6 viti lunghe sul fondo come da immagine Passo 9 Posizionare le due gambe e inserire nei fori alla base le 4 viti a cannocchiale Passo 10 Capovolgi nuovam...

Page 8: ...i care che il gioco sia pulito ed in caso procedere ad una sua pulizia vedi Pulizia e conservazione IL FABBRICANTE NON PUO ESSERE RITENUTO IN ALCUN CASO RESPONSABILE DI INCIDENTI O DANNI CONSEGUENTI A...

Page 9: ...h both the procedures indicated and the general safety regulations Different countries may have diffe rent safety regulations It should therefore be noted that in all cases in which the regulations of...

Page 10: ...ill be replaced Failure to comply with the methods of use of the product described in this documentation will result in the warranty terms being invalidated The guarantee does not cover any damage cau...

Page 11: ...cured Mount the library on a soft surface such as cardboard or a carpet Remove all packaging material before starting assembly Plan all steps in advance and make sure you have all necessary parts avai...

Page 12: ...rt 6 dowels into the blind holes for each ank as shown in the picture Step 4 Assemble one of the two sides Step 2 Assemble the back divisor panel the one with three holes on the short side and the fro...

Page 13: ...second side taking care to also insert the rod correctly Step 5 Insert the rod into the appropriate hole in the newly assembled sidewall Step 7 Take three long screws and screw in both sides as shown...

Page 14: ...soft surface and screw 6 long screws into the bottom as shown in the picture Step 9 Position the two wooden legs and insert the four telescopic screws into the holes at the base Step 10 Turn the book...

Page 15: ...The supervising adult must also check that The components of the product are not damaged and are dangerous Check that the product is clean and if necessary clean it see Cleaning and storage THE MANUFA...

Page 16: ...a Provinciale 4 b 12030 Gambasca CN P IVA 03827150040 Tel 39 3400825185 Mail hello madoti it IT The product complies with the technical requirements of the European Directive 2009 48 EC Made in ITALY...

Reviews: