3-83
2.22 CRANE STOWING OPERATION
•The hook stowing switch cancels the auto stop function of the over hoist detector.
Operate the winch lever carefully not to let the hook block hit the boom when stowing the hook
block.
• Use this hook stowing switch only for the purpose to stow the hook.
• When fastening the hook block to its holder, be careful so that your hands are not trapped.
•When the hook block is stowed in the hook block holder and the wire rope slacking is
eliminated, turn OFF the hook stowing switch without delay. Otherwise, the wire rope will be
over-wound which causes it to wedge into the winch drum.
CAUTION
• Stop the swing of the hook block before stowing the hook block.
• When stowing the hook block, do not topple the entire hook block sideways on the ground by
loosening the wire rope too much. This will cause irregular winding on the winch drum.
• The boom “retracting” operation will lower the hook block. The hook block also lowers with
the boom “lowering” operation. Raise the hook at the same time so that the hook block will not
touch the ground or interefere with the machine.
• When fastening the hook block, be careful not to give excessive tension to the wire rope. That
may damage the wire rope or the hook holder to fasten the hook block. On the other hand,
when the wire rope is loose, the hook block may swing which cause it to hit components
around and damage them.
• When fastening the hook block, use hook stowing switch to wind up the wire rope. Since this
switch enables slower winding than the normal operation by winch lever, it facilitates inching.
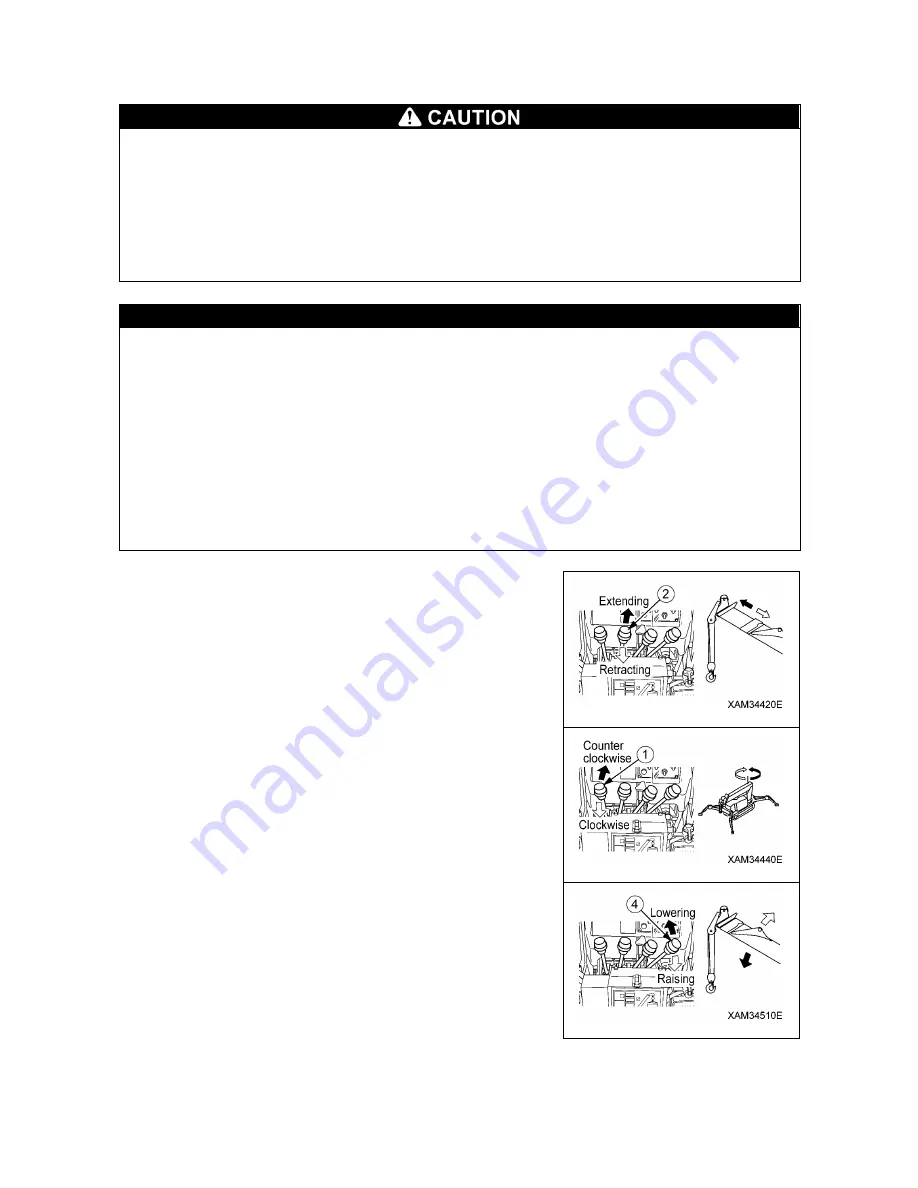
1. Operate the boom telescoping lever (2)
to the “RETRACT” (pull
toward you) side to fully retract the boom.
2. Operate the slewing lever (1)
to the “LEFT” or “RIGHT” side so
that the boom slews to the centre of the machine.
3. Operate the boom derricking lever (4)
to the “LOWER” (push
forward) side and lower the boom until it automatically stops.
Summary of Contents for MC-174CRM
Page 2: ......
Page 8: ...0 6...
Page 60: ...2 38 31 Precautions for use portable card 101 2141000...
Page 62: ...2 40...
Page 77: ...3 15...
Page 117: ...3 55 5 Push the choke knob forward to return the original position...
Page 195: ...4 23...
Page 197: ...4 25...
Page 214: ...5 4 2 OVERALL DIMENSIONS...
Page 215: ...5 5 3 OUTRIGGER SPREAD DIMENSIONS...
Page 219: ...5 9 5 WORKING RANGE...
Page 220: ...5 10...


