background image

7

turn clipper on for a few moments, turn off and unplug. 
Loosen screws slightly and adjust. Tighten the screws after 
blade is aligned.

Oil

- To maintain your clipper in peak condition, the blades should be 
oiled every few haircuts.
- Do not use hair oil, grease oil mixed with kerosene or any solvent, 
as the solvent will evaporate and leave the thick oil which may slow 
down the blades motion.
- Add a few drops of oil to the blades, turn clipper on for a few 
moments, turn off and unplug. Wipe off any excess oil.

Blade lever

-The lever is conveniently located near your thumb (if you’re right-
handed) so it can readily be adjusted while the clipper is in your 
hand.
-The lever adds versatility to your clipper by allowing you to 
gradually change the closeness of your cut without an attachment 
comb.
-When the lever is in the uppermost position, the blades will give 
you the closest cut and -leave the hair very short. Pushing the lever 
downward gradually increases the cutting length. See Picture 3 
(page 2).
-In its lowest position, the lever will leave the hair approximately the 
same length as the #1 comb.
-The lever will also extend the use of your blades since a different 
cutting edge is used in each setting. In addition, if extremely heavy 
hair cutting has jammed the blades, it will help you remove hair that 
has become wedged between the two blades without removing the 
blades.
-While the clipper is running, rapidly move the lever from “close 
cut” to “longer cut“ a couple of times. Doing this each time after you 

EN

Summary of Contents for MR-650SS

Page 1: ...icated in Ukraine 091 EN DE PL UA RU RO Owners manual Hair clipper set Bedienungsanleitung Haarschneidemaschine mit Zubeh rkit Instrukcji obs ugi Zestaw do strzy enia w os w Manualul proprietarului Se...

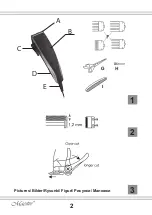
Page 2: ...2 Pictures Bilder Rysunki Figuri 1 3 2 B C D E...

Page 3: ...m for later use of subsequent owners This appliance is designed for domestic use only Under condition of observance of user regulations and a special purpose designation a parts of appliance do not co...

Page 4: ...s of the device NEVER touch the appliance with wet or damp hands Otherwise there is a risk to get an electric shock DO NOT let children or untrained persons use the appliance without supervision DO NO...

Page 5: ...the edge of a table or counter or touch hot surfaces This appliance is not intended for use by persons including children with reduced physical sensory or mental capabilities or lack of experience and...

Page 6: ...lation immediately stop using the device disconnect the device from the mains and apply to the nearest service center Operation Before startup Remove all wrap materials and stickers Make sure that all...

Page 7: ...hand The lever adds versatility to your clipper by allowing you to gradually change the closeness of your cut without an attachment comb When the lever is in the uppermost position the blades will giv...

Page 8: ...avoid tangling Seat the person so their head is approximately at your eye level This allow ease of visibility while cutting and a relaxed control of the unit Before cutting always first comb the hair...

Page 9: ...immed hair and to check for uneven strands Maintenance and care WARNING Before cleaning the appliance in any way make sure that the appliance plug is not connected to the socket Never place it in wate...

Page 10: ...Old appliances contain valuable materials that can be recycled Please arrange for the proper recycling of old appliances Please dispose your old appliances using appropriate collection systems Subject...

Page 11: ...altlich der Regeln des Betriebs und der Zweck Teilen des Produkts enthalten keine sch dlichen Substanzen Technische Eigenschaften Modell MR 652 Stromversorgung Strom variabel Nennfrequenz 50 60 Hz Bem...

Page 12: ...kabel niemals in Wasser oder andere Fl ssigkeiten Fassen Sie die Ladevorrichtung die Schneidemaschine und das Anschlusskabel nie mit nassen H nden f r den Anschluss an das bzw die Trennung vom Stromne...

Page 13: ...n sie feucht oder nass sind Lassen Sie die Haare zuvor trocknen Das Ger t darf nicht bei Hautentz ndungen verwendet werden Scheren Sie mit dieser Haarschneidemaschine keine Tiere Benutzen Sie niemals...

Page 14: ...auf das Wasser Im Falle des Auftretens des Rauchs Funken starken Geruch von gebrannte Isolation sollen Sie sofort Gebrauch des Ger tes unterbrechen den Netzstecker ziehen und Servicezentrum anwenden...

Page 15: ...bersch ssen des les mit Hilfe vom Stofftuches Die L nge von abgeschnittenen Haaren der Regulierhebel der auf der linken Seite des Maschinchen sich befindet erlaubt leicht die L nge der abgeschnittenen...

Page 16: ...lingeneinstellungskorrektheit Stecken Sie den Ger testecker in den Sockel hinein F r die Schaltung des Maschinchen stellen Sie den Schalter in die Lage ON eingeschaltet Schalten Sie das Maschinchen um...

Page 17: ...VORSICHT Reinigen Sie niemals den Apparat der zum Netz angeschlossen ist Nutzen Sie nicht die abrasive Reinigungsmittel aus Lassen Sie nicht das Wasser oder irgendeine andere Fl ssigkeit innerhalb de...

Page 18: ...d Lagerung verantwortungsbewusst nehmen um der Wiederverwertung der materiellen Ressourcen beizutragen Wenn Sie sich entschieden haben dieses Ger t zu entsorgen bitte benutzen Sie spezielle Recycling...

Page 19: ...e do u ytku domowego Je eli urz dzenie u ywane jest zgodnie z jego przeznaczeniem nie wytwarza szkodliwych substancji Charakterystyka techniczna Model MR 652 Zasilanie Pr d zmienny Cz stotliwo znamion...

Page 20: ...dzenia mokrymi r kami Przy nieprzestrzeganiu powy szych zasad istnieje niebezpiecze stwo pora enia pr dem Nie nale y pozostawia w czonego urz dzenia bez kontroli Przed rozpocz ciem korzystania z urz...

Page 21: ...zenie jest uszkodzone lub wpad o do wody Nie naprawiaj urz dzenia samodzielnie skontaktuj si ze sprzedawc Nie nale y u ywa akcesori w nie zawartych w zestawie Zawsze nale y od czy urz dzenie od sieci...

Page 22: ...wykorzystanie urz dzenia wyjmij wtyczk z rozetki i zwr si do sprzedawcy Korzystanie z urz dzenia Nale y usun opakowanie i naklejki reklamowe Ca kowicie rozwin przew d zasilania Nale y szczeg owo obej...

Page 23: ...wigni znajduje si na lewym boku maszynki umo liwia atwe dostosowanie d ugo ci ci cia w os w utrzymuj c urz dzenie w dogodnym po o eniu Mo liwa jest p ynna zmiana d ugo ci cia w os w bez dodatkowego na...

Page 24: ...ed rozpocz ciem strzy enia upewnij si e nie ma oleju mi dzy z bami Przed rozpocz ciem strzy enia dok adnie przeczesa w osy Nasadki Ka da nasadka posiada odpowiednie oznaczenie Pami taj aby dobrze zamo...

Page 25: ...y owija przewodu zasilaj cego wok urz dzenia Przechowywa w suchym ch odnym miejscu z dala od dzieci i os b niepe nosprawnych fizycznie i umys owo Utylizacja Urz dzenie oraz jego cz ci nie powinny by m...

Page 26: ...re a aparatului Set masin de frezat este destinat pentru uz casnic n condi ia respect rii normelor de exploatare i destina iei inte piesele produsului nu con in substan e d un toare Caracteristici teh...

Page 27: ...ENTIE Niciodat nu scufunda i dispozitivul cablul de alimentare i techerul acestuia n ap sau alte lichide Nu permite i p trunderea apei i a umidit ii pe componentele electrice ale dispozitivul Nu pune...

Page 28: ...piat service centru autorizat Acest dispozitiv nu este destinat utiliz rii de c tre copii i persoane cu deficien e fizice sau mintale speciale precum i de persoane care nu au cuno tin e i experien n u...

Page 29: ...ma ina animale Nu utiliza i dispozitivul Dvs pentru alte scopuri dec t cele pentru care a fost proiectat Pentru uz comercial cump ra i tehnic cu caracter industrial Ac iuni n caz de situa ii extreme...

Page 30: ...al i solven i Pentru lubrifiere depune i 1 2 pic turi de ulei pe lam apoi porni i ma ina i l sa i o s func ioneze c teva secunde pentru ca uleiul s se r sp ndeasc uniform ntre lame Opri i ma ina terge...

Page 31: ...ncepe lucrul verifica i dac sunt corect instalate lamele Conecta i techerul n priz Pentru pornirea ma inii pune i comutatorul n pozi ia ON pornit Porni i ma ina pentru ca uleiul s se r sp ndeasc unifo...

Page 32: ...moale Dup cur are lubrifia i lamele a a cum este descris mai sus P strarea nainte de depozitare lamele trebuie neap rat s fie lubrifiate Nu nf ura i cablul de alimentare n jurul aparatului P stra i d...

Page 33: ...33 Caracteristicile componentele i aspectul exterior al produsului pot fi u or modificate de c tre produc tor f r a compromite principalele calit i ale produsului...

Page 34: ...34 MR 652 50 60 220 240 7 II IP 0 RU...

Page 35: ...35 1 2 D E F G H I...

Page 36: ...36 2 RU...

Page 37: ...37...

Page 38: ...38 1 2 2 2 1 2 3 2 1 3 RU...

Page 39: ...39 ON 1 3 1 8 2 6 1 4 3 9 3 8 4 12 1 2...

Page 40: ...40 RU...

Page 41: ...41...

Page 42: ...42 MR 652 50 60 220 240 7 II IP 0 1 2 UA...

Page 43: ...43 D E F G H 2...

Page 44: ...44 UA...

Page 45: ...45 1 2 2 2...

Page 46: ...46 UA 1 2 3 2 1 3...

Page 47: ...47 ON 1 3 1 8 2 6 1 4 3 9 3 8 4 12 1 2...

Page 48: ...UA EN 60335 2 8 2017 feel maestro eu...

Reviews: