background image

7

- Unwind the power cord completely.

ATTENTION! 

A small quantity of smoke or a specific smell may 

appear after the first switching on as the result of conservation 
materials contact with heating element. This is a normal 
phenomenon and it shall disappear after several minutes of 
operation.

open the handle  (E/Pic.1), until the folding mechanism gets in to 
the lock position (С/Pic.1). 

- Before switching on the hairdryer to the power supply, make sure 
that the device switch (A / Pic.1) is set to “0” (oFF).
- Connect the device to the power supply. 
- Choose the desired operating mode by the Switch (A /Pic.1):

CAUTION: 

If the hairdryer stopped its work for an unknown reason, 

just set the switch A to position “0” off and unplug the device. 
Let it cool down. Then check the air intake grille, and in case of 
contamination clean it or hold the hairdryer a little further away from 
the hair while operation.

EN

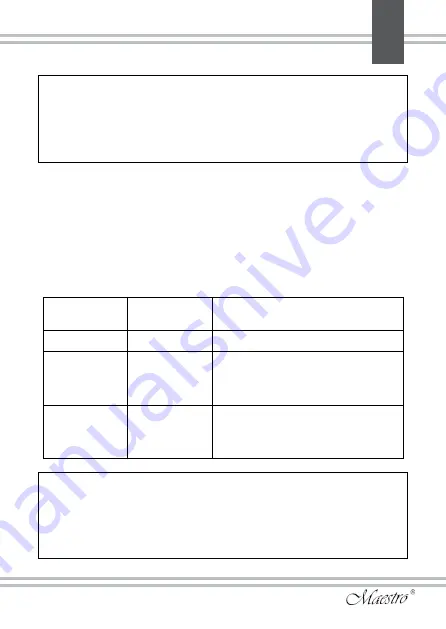
Position  

of the switch

Designations

Function

А0

0

(oFF) - the device is switched off

А1

1

First rate uses half of the power 
of the device, used for delicate 
hair drying and for modeling.

А2

2

The second speed includes the 
entire capacity of the device and 
is used for rapid hair drying.

Summary of Contents for MR205

Page 1: ...Model MR205 091 ertificated in Ukraine Owners manual Hair dryer Instrukcji obs ugi Suszarka Manualul proprietarului Usc tor de p r EN PL UA RU RO...

Page 2: ...2 Pictures Rysunki Figuri 1 A C F E G B D...

Page 3: ...equent owners The hair drier are intended to care for any type of natural hair thin normal naturally curling after permanent wave or tinted The appliance is designed for personal use only Under condit...

Page 4: ...liquid DO NOT allow water and moisture on the electrical parts of the device NEVER touch the appliance with wet or damp hands Otherwise there is a risk to get an electric shock DO NOT let children or...

Page 5: ...to at authorized service engineer for repair In the interest of safety regular periodic close checks should be carried out on the supply cord to ensure no damage is evident Should there be any signs...

Page 6: ...Once it has cooled down after a few minutes it is automatically switched on again Despite the fact that the device is equipped with protection against overheating it can be damaged if air flow stops...

Page 7: ...t to 0 OFF Connect the device to the power supply Choose the desired operating mode by the Switch A Pic 1 CAUTION If the hairdryer stopped its work for an unknown reason just set the switch A to posit...

Page 8: ...e socket Always unplug from the plug socket and let it cool down completely before cleaning Never place it in water or any other liquid Wipe the housing first with a slight wet then with soft dry clot...

Page 9: ...d appliances contain valuable materials that can be recycled Please arrange for the proper recycling of old appliances Please dispose your old appliances using appropriate collection systems Subject t...

Page 10: ...wszystkich rodzaj w w os w cienkich normalnych naturalnie kr conych Urz dzenie jest przeznaczone do u ytku osobistego Przy zachowaniu zasad eksploatacji i docelowego przeznaczenia cz ci wyrobu nie wy...

Page 11: ...i zasad przedstawionych w danej instrukcji czyni wykorzystanie naszego produktu wyj tkowo bezpiecznym UWAGA Nie u ywaj urz dzenia w miejscach w kt rych jest mo liwe przedostanie si wody lub wilgoci n...

Page 12: ...yczki zasilania mo e sta si przyczyn uszkodzenia urz dzenia lub powstania po aru Je eli urz dzenie zostanie wniesione z zimnego do ciep ego pomieszczenia nie pod czaj urz dzenia do pr du przed up ywem...

Page 13: ...pnie w osy za pomoc r cznika Zabrania si zatykania otwor w wlotowych i wylotowych urz dzenia Okresowo nale y czy ci kratk zabezpieczaj ca wlot powietrza aby usun wszelkie zanieczyszczenia blokuj ce do...

Page 14: ...suszarki do sieci upewnij si e prze cznik Rys 1 jest ustawiony na 0 OFF Prze cznikiem wybierz Rys 1 odpowiedni tryb pracy UWAGA Je li suszarka z nieznanych powod w zatrzymania swoj prac natychmiast u...

Page 15: ...ostygnie Nie nale y u ywa agresywnych rodk w czyszcz cych Nie nale y dopuszcza aby woda lub inny p yn dosta si do wn trza obudowy Aby oczy ci suszark przetrzyj jej powierzchni mi kk lekko wilgotn szma...

Page 16: ...kt i jego cz ci nie powinny by wyrzucane z jakimikolwiek innymi odpadami Je eli postanowili cie wyrzuci urz dzenie prosimy wykorzystaj do tego specjalne punkty odbieraj ce elektro mieci Charakterystyk...

Page 17: ...tip de p r natural sub ire normal ondulat permanent vopsit Usc torul de ntins p rul este destinat pentru uz personal n condi ia respect rii normelor de exploatare i destina iei inte piesele produsulu...

Page 18: ...techerul acestuia n ap sau alte lichide Nu permite i p trunderea apei i a umidit ii pe componentele electrice ale dispozitivul Nu pune i i nu p stra i dispozitivul n locuri de unde poate c dea n chiuv...

Page 19: ...her pot provoca daune dispozitivului i pot duce la incendiu Nu utiliza i niciodat dispozitivul dac este deteriorat cablul de alimentare sau techerul n cazul n care dispozitivul nu func ioneaz n mod co...

Page 20: ...ioneaz usc torul de exemplu cu p r sau puf sau cu m na aparatul se stinge automat C nd aparatul se va r ci peste c teva minute el se va porni automat din nou Chiar dac aparatul are func ia de protec i...

Page 21: ...te de func ionare Deschideti m nerul E Fig 1 p n c nd se fixeaz n dispozitivul de blocare a mecanismului de pliere C Fig 1 nainte de a conecta usc torul n priz asigura i v c comutatorul aparatului A F...

Page 22: ...coafurii cu ajutorul pieptenelui i bigudiurilor Cur area i ngrijirea ATENTIE Niciodat nu cur a i dispozitivul care este conectat la re eaua electric nainte de cur are deconecta i dispozitivul de la re...

Page 23: ...it i fizice i mintale Pentru a suspenda aparatul este prev zut bucla pe cablu G Fig 1 Reciclarea Acest produs i deriva ii acestuia nu trebuie aruncate mpreun cu alte de euri Insist m s ave i un punct...

Page 24: ...24 c MR 205 50 220 240 1200 II IP 0...

Page 25: ...25 1 2 A B C D F G...

Page 26: ...26 30 2...

Page 27: ...27...

Page 28: ...28 E 1 1 1 0 OFF 1 0 0 0 OFF 1 1 2 2...

Page 29: ...29 1 0 F 1...

Page 30: ...30 G 1...

Page 31: ...31 MR 205 50 220 240 1200 II IP 0...

Page 32: ...32 1 2 A B C D E F G...

Page 33: ...33 30...

Page 34: ...34...

Page 35: ...35 E 1 1 1 0 OFF 1 0 0 0 OFF 1 1 2 2...

Page 36: ...36 1 0 F 1...

Page 37: ...37...

Page 38: ...___________________ ________________________________________________________ ________________________________________________________ ________________________________________________________ _________...

Page 39: ...___________________ ________________________________________________________ ________________________________________________________ ________________________________________________________ _________...

Page 40: ...de in P R C for Maestro 1201 18 Apollo Corporation LTD add 1201 Hang Seng tsimshatsui Bldg 18 Carnarvon Road Tsim Sha Tsui Kln Hong Kong 1201 18 IEC 60335 2 23 2006 091 076 Maestro www feel maestro co...

Reviews: