background image

8

Preparation for work

- Before the first use of accessories, wash them with warm water 
and detergents and dry them thoroughly. Wipe the outside of the 
mixer case with soft wet cloth, then rub it dry.
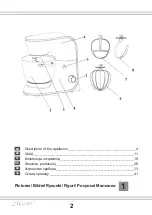
- Assure yourself that the switch of operating regimes (1/ Picture1) 
is in position «0» - OFF
Establish the mixer on the even stable surface.
- By assembling (dismounting) of the mixer, for mounting of head 
pieces and also by necessity of addition of ingredients during the 
process of work, the rising and sinking of the motor box (4/Fig.1) is 
realized by way of retention of the mixer position (inclination) fixing 
mechanism button. (5/Fig.1).
- Establish the cup (the bowl) on the housing base, rotate clockwise 
against stop and till the click of the holder. For removal of the cup it 
is necessary, correspondingly, to rotate it counterclockwise and to 
rise it upwards.
- Choose proper accessories for your products. 
- Insert the shank end of each of the head pieces into the grooves 
of the miser body. By way of a slight touch fix the head pieces in the 
openings till the click.
- Connect the male contact of the feed cable to the electric network.
- Switch on the mixer and select the needed velocity with the help 
of the interchanging switch (1/Fig.1). Use the recommendations 
for selection of velocity in dependence of the kind if the used head 
piece. (Table 1).

ATTENTION! 

Don’t create obstacles by the hand or by any other subjects to the 
free rotation of the head pieces. Avoid the hit of the mixed fluid to 
the mixer body.
- After the ingredients reach the required consistency move the 
switch to position «0» OFF. 

Summary of Contents for MR559

Page 1: ...Model MR559 ertificated in Ukraine Owners manual Mixer with bowl Bedienungsanleitung Mixer mit einer Schale Instrukcji obs ugi Mikser z misk Manualul proprietarului Mixer cu cana EN DE PL UA RU RO 091...

Page 2: ..._______________________________________________11 Konstrukcja urz dzenia_______________________________________________19 Structura produsului____________________________________________________26 ___...

Page 3: ...domestic conditions Under condition of observance of user regulations and a special purpose designation a parts of appliance do not contain unhealthy substances The particularities of this model are t...

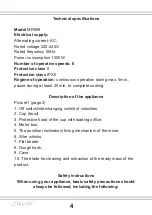
Page 4: ...st 20 min to complete cooling Description of the appliance Picture1 page 2 1 Off switch interchanging switch of velocities 2 Cup bowl 3 Protective hood of the cup with loading orifice 4 Motor box 5 Th...

Page 5: ...DO NOT leave the appliance exposed to the weather rain sun etc DO NOT leave the appliance without supervision when it is connected to the power supply Close supervision is necessary when the applianc...

Page 6: ...s ATTENTION Do not touch moving parts during the mixer operation Always disconnect appliance before cleaning assembling disassembling loading and unloading products Perform assembly and disassembly on...

Page 7: ...e Accessories for mixing 8 Picture1 shall be used for agitating dough minced meat yeasts Use the mixer only with the accessories supplied Do not plunge the accessories in the product deeper than the w...

Page 8: ...against stop and till the click of the holder For removal of the cup it is necessary correspondingly to rotate it counterclockwise and to rise it upwards Choose proper accessories for your products In...

Page 9: ...ly after terminating the use wash all removable parts with warm soapy water using soft nylon sponge then rinse with clean water and wipe with dry and clean towel Leave the accessories till they are co...

Page 10: ...ushalt Home Umwelt Vorbehaltlich der Regeln des Betriebs und der Zweck der Produkte enthalten keine sch dlichen Substanzen Die Besonderheiten dieses Models sind das Planetarsystem der Vermischung die...

Page 11: ...en Produktvorrichtung Bild 1 Seite 2 1 Der Ausschalter der Umschalter der Geschwindigkeiten 2 Das Becken 3 Der Schutzdeckel des Beckens mit der Einf llsch rze 4 Der Motorenraum 5 Der Mixerfeststeller...

Page 12: ...r Steckdose Stellen Sie den Schalter des Ger tes auf die Position AUS bevor Sie es vom Netz abschalten Es ist verboten das Ger t durch Ziehen des Netzsteckers aus der Steckdose am Kabel vom Netz auszu...

Page 13: ...stark gespannt nicht verwickelt und nicht berdreht ist Werfen Sie das Ger t nicht lassen Sie es nicht herunterfallen oder st rzen Wenn Sie das Ger t von einem kalten in einen warmen Raum gebracht habe...

Page 14: ...as Ger t sofort aus ziehen Sie den Netzstecker aus der Steckdose benutzen Sie das Ger t nicht mehr und wenden Sie sich bitte an ein nahegelegenes Servicecenter Der Gebrauch des Ger ts Allgemeine Regel...

Page 15: ...n Sie die Au enseite mit einem weichen leicht feuchten Tuch dann trocken wischen Tauchen Sie niemals den K rper des Mischers das Netzkabel und Stecker in Wasser oder eine andere Fl ssigkeit Stellen Si...

Page 16: ...en Sie den Kabelstecker der Einspeisung zum Leiternetz Schalten Sie den Mixer ein und w hlen Sie die n tige Geschwindigkeit durch den Umschalter 1 Zeichnung 1 Benutzen Sie die Richtlinien f r die W hl...

Page 17: ...ischen dann trocken wischen Sie mit einem sauberen Tuch trocken Lagerung Vor der Lagerung ziehen Sie das Ger t aus Reinigen Sie das Ger t und trocken es vor der Lagerung Wickeln Sie nicht das Netzkabe...

Page 18: ...w w domowych warunkach Przy zachowaniu zasad eksploatacji i docelowego przeznaczenia cz ci wyrobu nie wytwarzaj szkodliwych dla zdrowia substancji Cechami tego modelu s system mieszania planetarnego k...

Page 19: ...za do 20 minut Budowa Urz dzenia Rysunek 1 strona 2 1 Regulator szybko ci 2 Miska 3 Os ona ochronna do miski z korpusem do nape nienia 4 Komora silnika 5 Przycisk nachylenia si adaptera 6 opatki do ub...

Page 20: ...kazane na urz dzeniu odpowiada napi ciu sieci elektrycznej w twoim domu Wykorzystanie przed u aczy elektrycznych lub adapter w wtyczki zasilania mo e sta si przyczyn uszkodzenia urz dzenia lub powstan...

Page 21: ...h si cz ci w czasie pracy miksera Je li chcesz dokona zmiany opatek b d te za o y nasadk blendera od cz urz dzenie od sieci elektrycznej Zmian opatek wykonuj tylko po pe nym zatrzymaniu poruszaj cych...

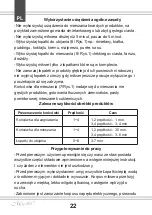
Page 22: ...mieszania 7 Rys 1 nadaje si do mieszania nie g stych produkt w gotowania t uczonych ziemniak w pasty pomidorowej mieszanek cukierniczych Zalecane szybko ci obr bki produkt w Przygotowywanie do pracy...

Page 23: ...w kierunku przeciwnym do ruchu wskaz wek zegara i podnie do g ry Wybierz odpowiedni do waszych produkt w komplet opatek Wstaw trzpie ka dej z ko c ek do rowk w obudowy miksera Z lekkim naciskiem mocu...

Page 24: ...kiem Przechowywanie Przed przechowywaniem od cz urz dzenie od sieci Oczy przetrzyj do sucha i wysusz urz dzenie i jego cz ci przed przechowywaniem Nie nawijaj przewodu dooko a urz dzenia Przechowuj ur...

Page 25: ...i solide n condi ii de uz casnic n condi ia respect rii normelor de exploatare i destina iei inte piesele produsului nu con in substan e d un toare Caracteristicile acestui model sunt sistem planetar...

Page 26: ...lare vitez 2 Bol 3 Capac de protec ie a bolului cu p lnie de nc rcare 4 Compartimentul motorului 5 Fixatorul pozi iei nclin rii mixerului 6 Accesorii b t tori 7 Tel pentru mixare 8 C rlig pentru aluat...

Page 27: ...m indicat pe acesta Utilizarea prelungitoarelor sau adaptoarelor pentru techer pot provoca daune dispozitivului i pot duce la incendiu Nu utiliza i niciodat dispozitivul dac este deteriorat cablul de...

Page 28: ...n care lucra i dac mixerul e pornit Nerespectarea regulilor poate duce la apari ia traumelor serioase Nu acoperi i cu nimic orificiul de ventilare pe corp in timp ce lucra i cu mixerul aceasta poate d...

Page 29: ...ai ad nc de suprafa a de lucru nu scoate i accesoriile din lichid c nd mixerul lucreaz a tepta i p n ele nu se vor stinge complet Tel pentru mixare 7 Fig 1 este potrivit pentru mixarea produselor cu c...

Page 30: ...v s l roti i n sens invers acelor de ceasornic i s l ridica i Alege i setul potrivit de accesorii pentru produsele dvs Introduce i tija fiec rei duze n canelurile carcasei mixerului Prin ap sarea u oa...

Page 31: ...L sa i accesoriile s se usuce bine Cur i i terge i i usca i aparatul nainte de depozitare P strarea Apoi cur a i dispozitivul i l sa i ca acesta s se usuce P stra i dispozitivul ntr un loc uscat r co...

Page 32: ...32...

Page 33: ...33 MR 559 50 220 240 1000 II IP 0 6 5 20 1 2 1 2 3 4 5 6 7 1 1 1 1 1...

Page 34: ...34 8 9 10...

Page 35: ...35...

Page 36: ...36 5 5 10 6 1 8 1...

Page 37: ...37 7 1 1 1 0 OFF 4 1 1 4 1 2 1 3 4 3 4 1 4 1 2 30 3 4 3 6 5 6 3 7...

Page 38: ...38 5 1 1 1 1 0 OFF...

Page 39: ...39...

Page 40: ...40 c 1 1 1 1 1...

Page 41: ...41 MR 559 50 220 240 1000 II IP 0 6 5 20 1 2 1 2 3 4 5 6 7 8 9 10...

Page 42: ...42...

Page 43: ...43...

Page 44: ...44 i 5 5 10 6 1 8 1 7 1 1 4 1 2 1 3 4 3 4 1 4 1 2 30 3 4 3 6 5 6 3 7...

Page 45: ...45 4 1 0 OFF 4 1 5 1 1 1 1...

Page 46: ...46 0 OFF...

Page 47: ...47...

Page 48: ...u EN 60335 2 14 2014 Made in P R C for Maestro A 803 8 5 T T Apollo Corporation Limited Room 803 8 F Podium Plaza 5 Hanoi Road TST Kln Hong Kong 803 8 5 T Importer Splash Sp z o o Al Krakowska 26 Jank...

Reviews: