background image

MAG FORGE M100R

MAG FORGE M100A 

PC Case

User Guide

使用手冊

Manuel d’utilisation

Summary of Contents for FORGE M100A

Page 1: ...MAG FORGE M100R MAG FORGE M100A PC Case User Guide 使用手冊 Manuel d utilisation ...

Page 2: ...English 繁體中文 Français ...

Page 3: ...MAG FORGE M100R MAG FORGE M100A PC Case User Guide ...

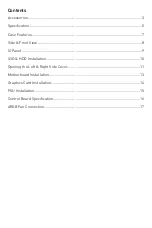
Page 4: ...5 Case Features 7 Side Front View 8 IO Panel 9 SSD HDD Installation 10 Opening the Left Right Side Cover 11 Motherboard Installation 13 Graphics Card Installation 14 PSU Installation 15 Control Board Specification 16 ARGB Fan Connection 17 ...

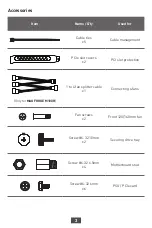
Page 5: ...nagement PCIe slot covers x2 PCI slot protection Only for MAG FORGE M100R 1 to 4 fan splitter cable x1 Connecting 4 fans Fan screws x2 Front 120 140mm fan Screw 6 32 10mm x2 Securing drive tray Screw 6 32 6 5mm x4 Motherboard stud Screw 6 32 6mm x6 PSU PCIe card ...

Page 6: ...4 Item Name Q ty Used for Screw 6 32 5mm x4 3 5 HDD Screw M3 5mm x17 Motherboard SSD Screw 6 32 4mm x3 3 5 HDD ...

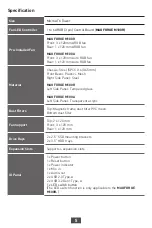
Page 7: ...MAG FORGE M100R Left Side Panel Tempered glass MAG FORGE M100A Left Side Panel Transparent acrylic Dust Filters Top Magnetic frame dust filter PVC mesh Bottom dust filter Fan Support Top 2 x 120 mm Front 3 x 120 mm Rear 1 x 120 mm Drive Bays 2 x 2 5 SSD mounting brackets 2 x 3 5 HDD trays Expansion Slots Supports 4 expansion slots IO Panel 1 x Power button 1 x Reset button 1 x Power indicator 1 x ...

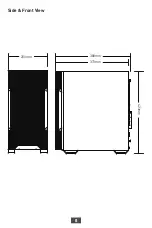
Page 8: ...nce CPU Cooler Height Max 160mm 6 3 inch Graphics Card Length Max 300 mm 11 81 inch PSU Length ATX 180mm 7 09 inch Max 300 mm 11 81 inch without 3 5 HDD tray installed Case Dimensions 388 D x 200 W x 423 H mm 15 28 D x 7 87 W x 16 65 H inch Motherboard Support M ATX ITX ...

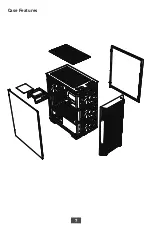
Page 9: ...7 Case Features ...

Page 10: ...8 200mm 388mm 423mm 373mm Side Front View 388mm 200mm 423mm 373mm ...

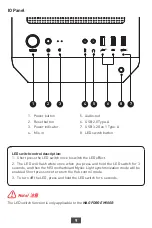
Page 11: ...plicable to the MAG FORGE M100R LED switch control description 1 Short press the LED switch once to switch the LED effect 2 The LED will flash white once when you press and hold the LED switch for 3 seconds and then the MSI motherboard Mystic Light synchronization mode will be enabled Short press once to return the Hub control mode 3 To turn off the LED press and hold the LED switch for 6 seconds ...

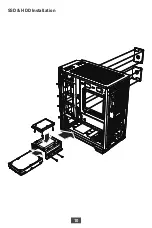
Page 12: ...10 SSD HDD Installation ...

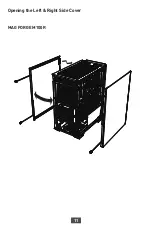
Page 13: ...11 Opening the Left Right Side Cover MAG FORGE M100R ...

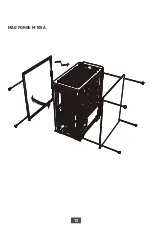
Page 14: ...12 MAG FORGE M100A ...

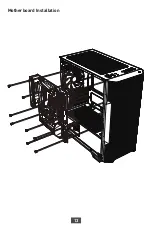
Page 15: ...13 Motherboard Installation ...

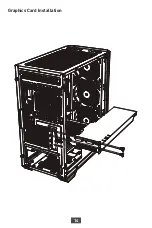
Page 16: ...14 Graphics Card Installation ...

Page 17: ...15 PSU Installation ...

Page 18: ...Pin Definition 5V Data Ground LED Effects 1 short press the LED switch LED effect cycle 1 Rainbow 2 Seven color trailing 3 Seven color gradient 4 Violet 5 White 6 Blue 7 Cyan 8 Green 9 Yellow 10 Red 11 Rainbow breathing 12 Red breathing 13 Yellow breathing 14 Green breathing 15 Cyan breathing 16 Blue breathing 17 White breathing 18 Violet breathing 19 Fixed rainbow 20 Red 21 Yellow 22 Green 23 Cya...

Page 19: ...ill lead to overheating abnormal color or no light Only for MAG FORGE M100R SYS_FAN SYS_FAN SYS_FAN SYS_FAN SYS_FAN SYS_FAN 1 to 6 ARGB Control Board ARGB Fan ARGB Fan ARGB Fan ARGB Fan ARGB Fan ARGB Fan Connect to the MSI motherboard JRAINBOW connector LED Switch SATA Pqwer ...

Page 20: ...MAG FORGE M100R MAG FORGE M100A PC Case User Guide 使用手冊 ...

Page 21: ...nt View 側面和前面 8 IO Panel IO 面板 9 SSD HDD Installation SSD 和硬碟安裝方式 10 Opening the Left Right Side Cover 開啟左右側板 11 Motherboard Installation 安裝主機板 13 Graphics Card Installation 安裝顯示卡 14 PSU Installation 安裝電源供應器 15 Control Board Specification 控制板規格 16 ARGB Fan Connection 連接 ARGB 風扇 17 ...

Page 22: ...slot covers PCIe 插槽檔片 x2 PCI slot protection 保護 PCIe 插槽 Only for MAG FORGE M100R 1 to 4 fan splitter cable 1 對 4 風扇分接線 x1 Connecting 4 fans 連接 4 個風扇 Fan screws 風扇長螺絲 x2 Front 120 140mm fan 前置 120 140mm 風扇 Screw 6 32 10mm 手轉螺絲 x2 Securing drive tray 固定硬碟支架 Screw 6 32 6 5mm x4 Motherboard stud 主機板螺柱 ...

Page 23: ...Item 項目 Name 名稱 Q ty 數量 Used for 用途 Screw 6 32 6mm 六角螺絲 x6 PSU PCIe card 電源供應器 PCIe 卡 Screw 6 32 5mm 圓頭螺絲 x4 3 5 HDD 3 5 硬碟 Screw M3 5mm x17 Motherboard SSD 主機板 SSD Screw 6 32 4mm 硬碟導軌螺絲 x3 3 5 HDD 3 5 硬碟 ...

Page 24: ... glass 左側強化玻璃 MAG FORGE M100A Left Side Panel Transparent acrylic 左側透明壓克力 Dust Filters 防塵濾網 Top Magnetic frame dust filter PVC mesh 頂部 PVC 磁性框防塵濾網 Bottom dust filter 下防塵濾網 Fan Support 支援風扇 Top 2 x 120 mm Front 3 x 120 mm Rear 1 x 120 mm Drive Bays 硬碟槽 2 x 2 5 SSD mounting brackets 2 個 2 5 SSD 安裝支架 2 x 3 5 HDD trays 2 個 3 5 硬碟槽 Expansion Slots 擴充槽 Supports 4 expansion slots 支援 4 個擴充槽 IO Panel IO 面板...

Page 25: ...r Height CPU 散熱器高度 Max 160mm 6 3 inch Graphics Card Length 顯示卡長度 Max 300 mm 11 81 inch PSU Length 電源供應器長度 ATX 180mm 7 09 inch Max 300 mm 11 81 inch without 3 5 HDD tray installed Case Dimensions 機殼尺寸 388 D x 200 W x 423 H mm 15 28 D x 7 87 W x 16 65 H inch Motherboard Support 支援主機板 M ATX ITX ...

Page 26: ...7 Case Features 機殼特色 ...

Page 27: ...8 200mm 388mm 423mm 373mm Side Front View 側面和前面 388mm 200mm 423mm 373mm ...

Page 28: ...USB 2 0 Type A 7 USB 3 2 Gen 1 Type A 8 LED switch button LED 切換按鈕 Note 注意 The LED switch function is only applicable to the MAG FORGE M100R LED 切換功能僅適用於 MAG FORGE M100R LED 按鈕控制說明 1 短按 LED 切換按鈕可切換 LED 效果 2 長按 LED 切換按鈕 3 秒鐘 風扇將閃爍一次白光 然後進入微星主機板 Mystic Light 同步模式 短按一次返回到集線器控制模式 3 長按 LED 切換按鈕 6 秒鐘可關閉 LED 1 2 3 4 5 6 8 7 ...

Page 29: ...10 SSD HDD Installation SSD 和硬碟安裝方式 ...

Page 30: ...11 Opening the Left Right Side Cover 開啟左右側板 MAG FORGE M100R ...

Page 31: ...12 MAG FORGE M100A ...

Page 32: ...13 Motherboard Installation 安裝主機板 ...

Page 33: ...14 Graphics Card Installation 安裝顯示卡 ...

Page 34: ...15 PSU Installation 安裝電源供應器 ...

Page 35: ...s the LED switch LED 效果 短按 LED 按鈕 LED effect cycle 1 Rainbow 2 Seven color trailing 3 Seven color gradient 4 Violet 5 White 6 Blue 7 Cyan 8 Green 9 Yellow 10 Red 11 Rainbow breathing 12 Red breathing 13 Yellow breathing 14 Green breathing 15 Cyan breathing 16 Blue breathing 17 White breathing 18 Violet breathing 19 Fixed rainbow 20 Red 21 Yellow 22 Green 23 Cyan 24 Blue 25 White 26 Violet LED 效果循環...

Page 36: ...ARGB 風扇 ARGB Fan ARGB 風扇 ARGB Fan ARGB 風扇 ARGB Fan ARGB 風扇 1 to 6 ARGB Control Board 1對6 ARGB 控制板 LED Switch LED 按鈕 SATA Power SATA 電源 Connect to the MSI motherboard JRAINBOW connector 連接到微星主機板 JRAINBOW 接頭 Note 注意 Supports up to 128 LEDs Exceeding this limit will lead to overheating abnormal colors or malfunction 最大支援 128 顆 LED 超過此限定會導致過熱 異色 不亮 ...

Page 37: ...MAG FORGE M100R MAG FORGE M100A Boîtier PC Guide d utilisation ...

Page 38: ...de côté 8 Panneau E S 9 Installation du SSD et du disque dur 10 Ouverture du couvercle latéral gauche et droit 11 Installation de la carte mère 13 Installation de la carte graphique 14 Installation du bloc d alimentation 15 Caractéristiques du panneau de contrôle 16 Connexion du ventilateur ARGB 17 ...

Page 39: ...t PCIe x2 Protection du slot PCI Uniquement pour MAG FORGE M100R Câble répartiteur de venti lateur 1 à 4 x1 Connecter 4 ventilateurs Vis de ventilateur x2 Ventilateur avant 120 140 mm Vis 6 32 10 mm x2 Fixation du plateau de lecteur Vis 6 32 6 5 mm x4 Boulon de la carte mère Vis 6 32 6 mm x6 PSU Carte PCIe ...

Page 40: ...4 Élément Nom Quantité Utilisé pour Vis 6 32 5 mm x4 HDD 3 5 Vis M3 5 mm x17 Carte mère SSD Vis 6 32 4 mm x3 HDD 3 5 ...

Page 41: ...MAG FORGE M100R Panneau latéral gauche Verre trempé MAG FORGE M100A Panneau latéral gauche Acrylique transparent Filtre à poussière Haut Filtre à poussière magnétique en PVC Filtre à poussière inférieur Ventilateurs supportés Haut 2 x 120 mm Avant 3 x 120 mm Arrière 1 x 120 mm Baies de stockage 2 x supports SSD 2 5 2 x plateaux HDD 3 5 Slots d extension Support 4 slots d extension Panneau E S 1 x ...

Page 42: ...isseur de processur Max 160 mm 6 3 pouces Longueur de la carte graphique Max 300 mm 11 81 pouces Longueur du bloc d alimentation ATX 180 mm 7 09 pouces Max 300 mm 11 81 pouces sans installer la baie de disque dur 3 5 Dimensions 388 P x 200 L x 423 H mm 15 28 P x 7 87 L x 16 65 H pouces Cartes mères suppor tées M ATX ITX ...

Page 43: ...7 Caractéristiques du boîtier ...

Page 44: ...8 200mm 388mm 423mm 373mm Vue de face et de côté 388 mm 200 mm 423 mm 373 mm ...

Page 45: ...ORGE M100R Description du contrôle de l interrupteur LED 1 Appuyez brièvement une fois sur l interrupteur LED pour changer l effet de LED 2 Lorsque vous appuyez sur l interrupteur LED et maintenez le pendant 3 secondes la LED clignotera une fois en blanc puis le mode de synchronisation Mystic Light de la carte mère MSI sera activé Appuyez brièvement une fois pour revenir au mode de contrôle Hub 3 ...

Page 46: ...10 Installation du SSD et du disque dur ...

Page 47: ...11 Ouverture du couvercle latéral gauche et droit MAG FORGE M100R ...

Page 48: ...12 MAG FORGE M100A ...

Page 49: ...13 Installation de la carte mère ...

Page 50: ...14 Installation de la carte graphique ...

Page 51: ...15 Installation du bloc d alimentation ...

Page 52: ...broches ARGB 5V Data Ground Effets de LED Appuyez brièvement sur l interrupteur LED Cycle de l effet de LED 1 Arc en ciel 2 Traînée de sept couleurs 3 Dégradé de sept couleurs 4 Violet 5 Blanc 6 Bleu 7 Cyan 8 Vert 9 Jaune 10 Rouge 11 Arc en ciel respiration 12 Rouge respiration 13 Jaune respiration 14 Vert respiration 15 Cyan respiration 16 Bleu respiration 17 Blanc respiration 18 Violet respirati...

Page 53: ...leur anormale ou l absence de lumière Uniquement pour MAG FORGE M100R SYS_FAN SYS_FAN SYS_FAN SYS_FAN SYS_FAN SYS_FAN Panneau de contrôle 1 à 6 ARGB Ventilateur ARGB Ventilateur ARGB Ventilateur ARGB Ventilateur ARGB Ventilateur ARGB Ventilateur ARGB Connecter au connecteur JRAINBOW de la carte mère MSI Interrupteur LED SATA Power ...

Reviews: