background image

4

– The Pressure Cooker must have water in order

to obtain pressure. It cannot be used with oil
alone.

– Never make any modifications to the safety

systems, nor use any imitation silicone gaskets,
or any non                        original spare part.

– Before opening the Pressure Cooker after

cooking, shake it slightly to prevent any
splashing.

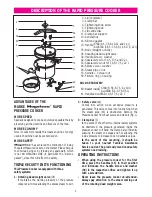
TO OPEN THE PRESSURE COOKER

– Rotate the tightening knob (5) counter clockwise

until the clamp bar (3) gets down as far as possible
laying on the lid (2). Slide the lid horizontally
towards the edge of the body.

TO CLOSE THE PRESSURE COOKER

– With the tightening knob turned to its lower

position and placing the lid over the body, make
sure it fits well by sliding the fingers around it.

– Then rotate the tightening knob clockwise until a

small pressure is noticed. Proceed to definitive
closure by turning the tightening knob between

1.

1/2

and 2 turns

until the lid is well closed.

– Put the “Rotating dead weight valve” (36) on the

steam pipe (45), which is fixed on the lid.

COOKING IN THE PRESSURE COOKER

– Place the pressure cooker over the heat source

regulated to maximum.

– The cooking time is calculated from the time when

the rotating dead weight valve starts moving and
releases steam. Reduce the heat intensity to a setting
enough to keep it rotating slowly.

– While cooking it is NORMAL to obsreve small amounts

of steam coming out of the safety valve (44).

– If you use a gas burner make sure the flame is

adjusted from the beginning and the Pressure
Cooker is placed centrally on the burner, in order to
avoid the flame extending beyond the base. In this
way, energy will be saved and deterioration of the
handles and silicone gasket will be prevented.

END OF COOKING. 
OPENING OF THE PRESSURE COOKER

– Once the cooking time is finished, remove the

rotating dead weight valve in order to lose the
pressure.

– Once all the steam has left the inside follow the steps

explained in.

“HOW TO OPEN THE PRESSURE COOKER”. NEVER
IMMERSE THE PRESSURE COOKER IN WATER

.

PRACTICAL ADVICE

Energy will be saved, if once the heat source has been
switched off, the pressure cooker is left on the stove
thereby taking advantage of its residual heat until
the pressure drops.
If you observe that:

Steam comes out of the side of the lid

The reasons for this could be the following:
– The lid might not be well fitted onto the body or the

tightening knob might not be tight enough.

– The silicone gasket is worn, in which case it must be

replaced with a                            trademark original.

The rotating dead weight valve does not turn

– Check whether the pressure cooker has enough water.
– Revise whether the steam pipe is dirty. If it is so,

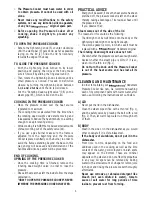
clean it with a thin rod (Fig. 1).

Do not turn the knob until the Pressure Cooker
is out of the heat source and has lost all its
pressure.

CLEANING AND MAINTENANCE

– In order to maintain your

trademark

Pressure Cooker like new, we recommend washing
each of its component parts with warm water, after
each use, following the instructions set out below.

A) LID

– Never put the lid in the dishwasher.
– Clean the steam pipe orifice with a thin rod (Fig. 1),

and the safety valve by pressing the bolt with a rod
(Fig. 2). Then, let warm tap water run through both
of them.

B) BODY

– Wash in the sink or in the dishwasher as you would

other cookware if it is of stainless steel.

If the body is of aluminium, do not put it in the
dishwasher.

– From time to time, depending on the food and

additives used in the cooking, as well as the lime
content of the water, gold-coloured or bluish spots
may appear on the bottom. These are mineral
deposits on the steel and do not affect its properties
in any way. All spots can be removed by boiling
water with a small amount of vinegar or lemon juice
in the pot and rinsing the presure cooker thoroughly
afterwards.

Never use corrosive or abrasive detergent like
bleach (not even diluted in water), tomato
sauce or salt water for long periods of time
inside to prevent rust from forming.

®

®

®

Summary of Contents for STAR Y STAR

Page 1: ...N 0110088193 Certificado de Empresa ISO 9001 2000 Directiva Europea para Ollas a Presi n GAS ELECTRIC Fabricado en Espa a Asociaci n Espa ola de Fabricantes de Cuberterias y Menaje Made in Spain NOTE...

Page 2: ...ooker to more than 2 3 of its capacity For foods that swell during cooking such as rice dry pulses or stewed fruit only fill to half its volume J Use the heat sources in accordance with their instruct...

Page 3: ...are part which is not AN ORIGINAL ONE in particular the silicone gasket since this will affect the safety TRIPLE SECURTY IN ITS FUNCTIONING This Pressure Cooker is equipped with three safety systems 1...

Page 4: ...nside follow the steps explained in HOW TO OPEN THE PRESSURE COOKER NEVER IMMERSE THE PRESSURE COOKER IN WATER PRACTICAL ADVICE Energy will be saved if once the heat source has been switched off the p...

Page 5: ...whole assembly must be replaced WARNINGS Once the pressure cooker is clean keep it with the lid placed upside down on the body to air the parts If you observe any anomaly in the functioning of your p...

Page 6: ...ch 8 Broad beans 8 Cobbage 10 Cauliflower 10 Artichokes 10 Runner beans 10 Carrots 10 Asparagus 10 PASTAS Minutes Spaghetti 8 Macaroni 10 Rice with chicken 10 White rice 10 POTATOES Minutes Leek and p...

Page 7: ......

Page 8: ...s BLISTER exclusively and to reject any imitation RECAMBIOORIGINAL OLLA A PRESION RAPIDA ompa a enaje om stico S L C Astintze n 6 Apartado 23 48160 Derio Vizcaya Espa a Tel 0034 944 544 222 Fax 0034 9...

Page 9: ...E LAS INSTRUCCIONES Modelos STAR Y STAR Le o STAR Color y Fiesta AUTENTIC ALUSTAR OLLAS A PRESION RAPIDAS RECETARIO Y MANUAL DE INSTRUCCIONES TUV DIN EN ISO 9001 ZN 0110088193 Certificado de Empresa I...

Page 10: ...xpanden durante la cocci n como arroz las legumbres secas o la compota hacerlo solo hasta la mitad de su volumen J Utilizar las fuentes de calor conforme a las instrucciones de uso K Despu s de cocina...

Page 11: ...istemas de seguridad 1 V lvula giratoria 36 Mantiene en todo momento la presi n de la Olla dejando salir el vapor sobrante 2 V lvula de seguridad 44 Act a si se genera un aumento excesivo de presi n S...

Page 12: ...borde de la tapa Es posible que se deba a que la tapa est mal encajada o no ha apretado lo suficiente el pomo La junta de cierre est gastada en cuyo caso hay que sustituirla por una original marca La...

Page 13: ...e cualquier modo es aconsejable despu s de un uso prolongado cada 2 a os aproximadamente llevarla a alguno de estos servicios para comprobar su correcto funcionamiento ATENCI N Ante la proliferaci n d...

Page 14: ...spinacas 8 Habas 8 Repollo berza 10 Coliflor 10 Alcachofas 10 Jud as verdes vainas 10 Zanahorias 10 Esp rragos 10 PASTAS Minutos Espaguetis 8 Macarrones 10 Arroz con pollo 10 Arroz blanco 10 PATATAS M...

Page 15: ...iflor con un poco de sal Dejamos en cocci n durante 10 minutos y abrimos la Olla Le a adimos el aceite con los ajos dorados y al gusto una pizca de piment n y perejil Jud as verdes con ali oli 10 minu...

Page 16: ...s a que comience a girar la v lvula giratoria y contamos 20 minutos Si el caldo nos sale ligero se pasan unas lentejas por el pasapur s y se a ade al resto Alubias con chorizo 25 minutos INGREDIENTES...

Page 17: ...teca los trozos de pollo A media operaci n se le a ade la cebolla picada y el ajo Cuando toman color se a aden los champi ones ya muy limpios y la pimienta Se pone el jerez y la taza de agua Cerramos...

Page 18: ...s guste Ya est n listos para darles la preparaci n que nos guste Los callos de ganado mayor son m s sabrosos que los de animales j venes Tarta de pl tanos 3 minutos INGREDIENTES 8 pl tanos 100 grs de...

Page 19: ......

Page 20: ...torizados POR SU SEGURIDAD EXIJALOS ESTOS SON LOS ORIGINALES RECAMBIOORIGINAL OLLA A PRESION RAPIDA RECAMBIOORIGINAL OLLA A PRESION RAPIDA RECAMBIOORIGINAL OLLA A PRESION RAPIDA RECAMBIO ORIGINAL OLLA...

Reviews: