background image

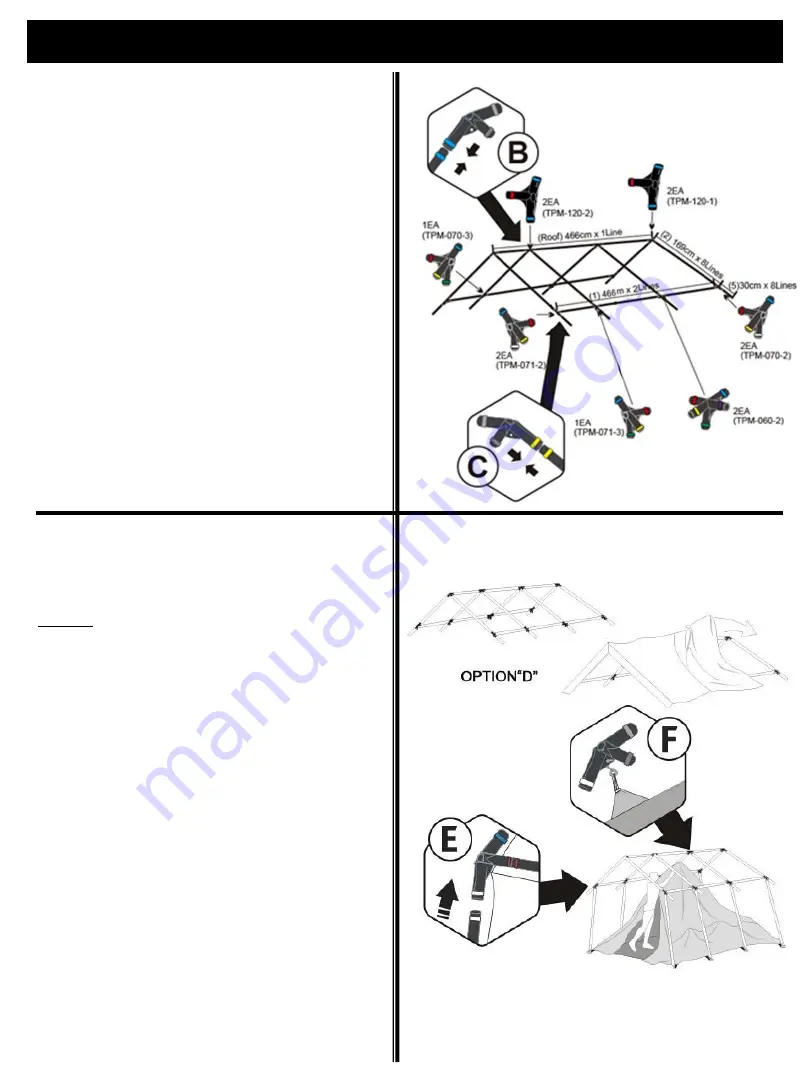
B   Slide the roof poles with blue tape into 

the hubs of the center ridge pole and 
the twist the pole until you hear a click, 
indicating the pole is properly secured 
to the hub. Then slide the opposite ends 
of the roof poles into the hubs of the 
roof edge poles.

C   Slide the small eave poles with the 

yellow tape into the hubs of the roof 
edge poles and twist the pole until you 
once again hear a click.

Step 2:

Assembly Instructions

OPTIONAL STEP D: If rainfly is wanted at time 

of set-up, drape rainfly over roof frame 

before

attaching leg poles. Place rainfly 

around the ends of the eave poles. If rainfly 
is not needed at time of set-up, instructions 
are available in step 4 for future reference

E   On one side of tent ONLY slide the leg 

poles into the corresponding hubs. The 
colored tape on the pole should match the 
colored taped side of the hub.  For ease of 
set up do not put leg poles in on other side 
until after next step. 

F   Place the Tent Body underneath the tent 

frame. Find “S” hooks on the center ridge 
of the tent body and connect them to the 
holes in the bottom of hub on the center 
ridge pole.

G   Starting in the corners raise the tent and 

insert the remaining color coded leg poles 
into the hubs of the roof edge poles.

Step 3:

6

Summary of Contents for FSMGCT2009

Page 1: ...mer Service 888 922 2336 7 00 am to 12 00 am CST daily Live Chat at www academy com Email customerservice academy com OR Customer Service 877 579 1550 Monday thru Friday 8 30am to 5 30pm EST Made in C...

Page 2: ...2 Table of Contents Note Before beginning assembly of product make sure all parts are present Compare parts with package content list and hardware contents If any part is missing or damaged do not at...

Page 3: ...inside as objects may cause leakage at the point of contact To prevent seam leakage floor seams in particular a seam sealer compound must be applied to the seams Use recommended water repellent compou...

Page 4: ...r more people are recommended Select a clean level area for the campsite free of debris and sharp objects away from a natural watercourse Use of a ground cloth is recommended to prolong the life of th...

Page 5: ...WO PEOPLE A Extend all poles and sort into groups by the color of tape affixed to the poles ie Roof Poles blue tape Eave Poles yellow tape Corner Leg Poles white tape Middle Leg Poles green tape etc T...

Page 6: ...efore attaching leg poles Place rainfly around the ends of the eave poles If rainfly is not needed at time of set up instructions are available in step 4 for future reference E On one side of tent ONL...

Page 7: ...into the bottom of the steel leg pole Total of 8 and then connect the remaining quick clips to the leg poles K At the corner of the tents pull in opposing directions to make sure tent floor fully stre...

Page 8: ...sliders O Included Room divider can be hung by using attached fabric loops on the interior walls and floor of the front in back of the tent P Attach mesh shelf by using the plastic S hooks to the fab...

Page 9: ...a brush For tougher stains spray the area with water and lightly wipe it off with a few strokes Do not use washer or dryer DO NOT SCRUB THE FABRIC ALWAYS MAKE SURE TENT IS COMPLETELY DRY BEFORE REPAC...

Reviews: