background image

4

English

2. Preparing For First-Time Use

Charging the ProMark3 Battery Pack

The ProMark3 includes a rechargeable, replaceable battery 
pack. Before using the receiver, you must first charge the bat-
tery pack:

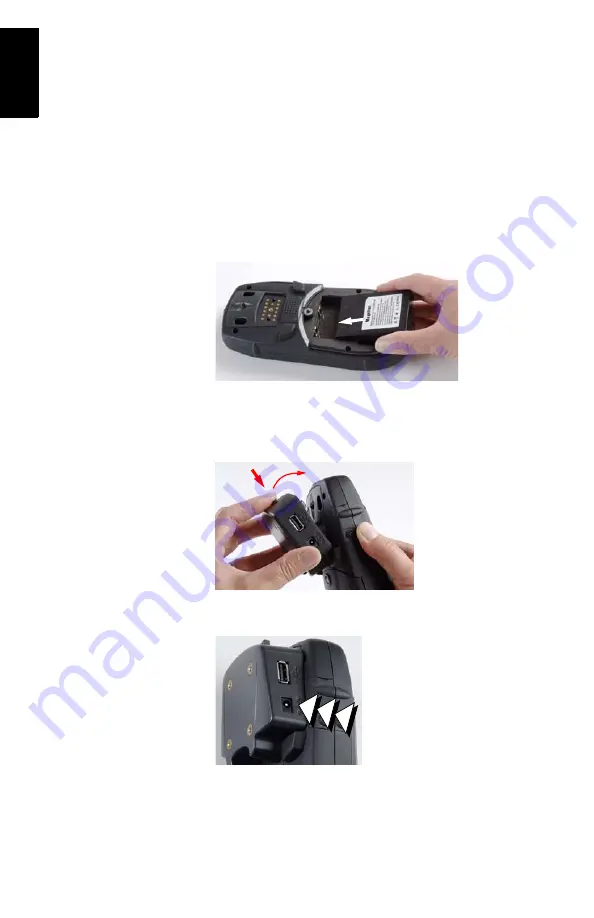
1. Locate the removable battery provided.
2. Open the battery door, located in the back of the receiver, 

using a screwdriver or a coin.

3. Insert the battery –label side upward, contact towards the 

top of the unit– into the battery compartment:

4. Close the battery door and tighten the screws.
5. Attach the Clip-on I/O module to the receiver as shown 

below (Insert bottom first, hold down release button, press 
I/O module against unit and release button):

6. Connect the AC adapter (see below) and then let it charge 

the battery for approximately six hours.

Battery Life

Whether used as a rover or 

a base, ProMark3 will run 

for 8 hours with its inter-

nal battery in typical con-

ditions of use. 

Connect cable from AC 
adapter to this input

Summary of Contents for ProMark3

Page 1: ...ProMark 3 ProMark3 RTK Getting Started Guide...

Page 2: ...product will be warranted for 90 days from the date of return shipment or for the bal ance of the original warranty whichever is longer Magellan Navigation warrants that software products or software...

Page 3: ...cerning this limited war ranty please call or write Magellan Navigation Inc 960 Overland Court San Dimas CA 91773 Phone 1 909 394 5000 Fax 1 909 394 7050 or Magellan Navigation SAS ZAC La Fleuriaye BP...

Page 4: ...ansmission Opening dismantling or repairing of this product by anyone other than an authorized Magellan Navigation Service Center will void this warranty 6 EXCLUSION OF INCIDENTAL OR CONSEQUEN TIAL DA...

Page 5: ...cifying the Antenna Used 9 Choosing the Units 9 Checking that ProMark3 Receives Satellites 10 RTK Setup 11 Introduction to RTK 11 Base Rover Configuration 13 Setting Up the Base 14 Configuring the Bas...

Page 6: ...ver Setup 52 Initialization Phase 53 Data Collection 53 Quitting the Surveying Function 54 Mobile Mapping 55 Preliminary Steps 55 Logging New GPS GIS Data 56 Revisiting and Updating Existing GPS GIS J...

Page 7: ...L1 algorithm From the hardware point of view ProMark3 RTK is strictly similar to ProMark3 RTK implementation in ProMark3 RTK relies on the use of A base rover system base rover configuration with its...

Page 8: ...essories Handstrap External GNSS Antenna GNSS Solu tions CD RTK specific accessories Two Styli External Antenna Cable License free radio with its power data cable 1 Accessories General Purpose Fasteni...

Page 9: ...Tap Key vs Button In this guide the verb Press refers to any action performed on the keyboard and Tap refers to any action performed with the stylus on the touch screen including on the on screen keyp...

Page 10: ...l side upward contact towards the top of the unit into the battery compartment 4 Close the battery door and tighten the screws 5 Attach the Clip on I O module to the receiver as shown below Insert bot...

Page 11: ...with its main icons see op posite right There are three categories of programs behind these icons ProMark3 primary functions Survey ing and Mobile Mapping icons For a ProMark3 RTK with the FAST Surve...

Page 12: ...integrated GPS receiver and the time zone that you specify To set the time zone In the ProMark3 workspace double tap the Settings icon Double tap the Date Time function This opens the Date Time Proper...

Page 13: ...m of the screen and then tap OK to start the initialization process This closes the GPS Initialization window 2 If you have a rough idea of what the coordinates of your current position are directly e...

Page 14: ...tings Now that ProMark3 displays a navigation screen press the MENU key and tap Setup see screen opposite There are many options to select among and all are explained in full in the ProMark3 RTK ProMa...

Page 15: ...ters for your antenna an tenna radius phase center offset and SHMP offset slant height measurement point offset The choices made through the External Antenna option be come the default antenna setting...

Page 16: ...ellites you may have to move to a more open area When used with its internal antenna Mobile Mapping only the receiver will have the best view of the sky when you hold it at an angle of 45 degrees from...

Page 17: ...ated by a static receiver base are needed for the rover to be able to deliver centimeter accurate positions 2 Data Link The data link that must be established to transfer corrections from the base to...

Page 18: ...the antenna should stay still over an unknown point until initialization is achieved This method gives faster initialization than On The Fly initialization in the same operating conditions The time re...

Page 19: ...e base is installed on a known point The coordinates of this point were uploaded to ProMark3 RTK from a GNSS Solutions project containing this point This means the point is now selectable from the lis...

Page 20: ...lite obstructions in the vicinity 1 Set up the tripod tribrach combination over the point 2 Screw the RTK vertical antenna extension into the tri brach 3 Insert the kinematic bar on top of the RTK ver...

Page 21: ...ipod 12 Measure and record the instrument height HI of the GNSS antenna 13 Turn on the ProMark3 RTK and check that the green LED indicator on the radio is on This means the connection between the radi...

Page 22: ...reference point Height Type Slant or Vertical 4 Tap Start The ProMark3 RTK starts operating as a base RTCM 3 1 corrections are now broadcast via the radio modem The screen shows the following paramete...

Page 23: ...onto the pole 7 Place the ProMark3 RTK into the field bracket 8 Measure the antenna height Configuring the Rover 1 Turn on the ProMark3 RTK 2 Double tap the DGPS Configuration icon This opens the DGPS...

Page 24: ...corrections are no longer received Check your radios Solution Position solution status Should be a blinking Float throughout initialization When Fixed appears in the Solution field this means the rove...

Page 25: ...the GNSS antenna to the unit using the cable provided 5 Measure the antenna height In the Rover Only Configuration example described in this guide Surveying is used as the user interface The NTRIP mod...

Page 26: ...e end of the search sequence an icon representing your cell phone should be vis ible in the Bluetooth Manager window Double tap the cell phone icon The Bluetooth Manager win dow now shows the Bluetoot...

Page 27: ...ection window Double tap the icon you have just created in the connection window Enter the following parameters User Name Password Domain Enable the Save password option Tap on the Dial Properties but...

Page 28: ...again This takes you back to the NTRIP Settings window see example opposite Set the Network and Station fields to select the base to work with Tap OK This takes you back to the DGPS Configuration win...

Page 29: ...displayed parameters while the receiver initializes Baseline Baseline length Elapsed Counts the time since you started initializa tion Sats Should be 6 or more for fast initialization PDOP Should be...

Page 30: ...irst point you want to log and stand still on that point 2 Press the LOG key and then enter the following parame ters Site ID A 4 character string Survey Mode Logging Point Site Description An optiona...

Page 31: ...e cho sen distance unit Your position s current coordinates as determined by the system 4 If you are satisfied with the quality of the displayed data tap the on screen LOG button This opens a new scre...

Page 32: ...nter the following parame ters Site ID A 4 character string Survey Mode Kinematic Site Description An optional 20 character narrative description of the point Tap inside the field enter your text from...

Page 33: ...es when the position is fixed Always displayed in meters whatever the cho sen distance unit Your position s current coordinates as determined by the system 4 Tap the START button to start logging the...

Page 34: ...r this period of time to improve accuracy If it is 1 second there is no position averaging but work pro ceeds more quickly Enter coordinates manually check button Do not check this button if the point...

Page 35: ...these values see diagram above left Carefully plumb the pole for precise staking The dis played distances should be interpreted as follows East 0 233 M means you must move east to zero this value Nort...

Page 36: ...n appears at the bottom of the screen see screen below right Tap the STORE button This saves the point position and takes you back to the stakeout screen 9 Tap Next to display the list of control poin...

Page 37: ...w dis played 2 In the Name field type in the name of the job you wish to create For example type in tuto1 crd 3 Then tap OK to create the job The screen then displays the Units tab 4 On the Units tab...

Page 38: ...nal memory and enter a Unit ID Reminder This parameter is used as header in raw data filenames 5 Tap OK to enter all these settings FAST Survey then asks you to enter the position of the base and then...

Page 39: ...ion you wish to use see oppo site and then follow the instructions on the screen NOTE Except for On The Fly Initialization the message Please do not move the antenna until the position is Fixed will a...

Page 40: ...ap OK Messages follow successively indicating that the system is taking the 5 requested readings Then FAST Survey dis plays the average coordinates it has determined 5 Tap OK if you agree The Point St...

Page 41: ...or the start point in the Starting Pt ID field This field will be incremented by one after each point logging You do not need to define a name finishing with a figure FAST Survey will place one anyway...

Page 42: ...points 2 On this screen FAST Survey asks you to choose the point you want to stake out You can either type in its coordi nates in the Northing Easting and Elevation fields or select a pre defined poin...

Page 43: ...tion of this point 4 Tapping on the STORE button allows you to start perform ing measurements to determine the position of the point Your current position and heading Provides access to monitor screen...

Page 44: ...re Readings function Once the position has been determined FAST Survey displays the results of the computation so that you can check them see below right 5 Tap OK if you are satisfied with the results...

Page 45: ...e first and you turn it off last 5 Required observation time mainly depends on distance between the two units reception conditions Rover unit estimates observation time needed When Obs Range on screen...

Page 46: ...oth units Rover collects data continuously throughout the survey 5 User preset occupation observation time on each surveyed point Defaults 5 min on init point 15 sec on surveyed points Countdown tells...

Page 47: ...turn it off last Use the same logging interval on both units Rover collects data continu ously throughout the survey 5 Site ID is automatically incremented along the trajectory according to the record...

Page 48: ...is required to ensure that your kinematic surveys whether continuous or Stop Go will reach centime ter level accuracies through post processing With the Known method you can make a survey at a fairly...

Page 49: ...ite obstructions in the vicinity 1 Set up the tripod tribrach combination over the point 2 Attach the vertical extension bar and a tribrach adapter to the GNSS antenna 3 Place the GNSS antenna assembl...

Page 50: ...ave a ProMark3 RTK press MENU tap Receiver Mode and then Post processing 4 Press the NAV key until you see the Satellite Status screen see opposite Wait until at least 4 satellites are received 5 When...

Page 51: ...e and in the rover Control Point check box If you check this box you will be able later on to use the point associated with this Site ID as a control point Data Collection 7 Tap the Log button at the...

Page 52: ...sion required to complete your survey After data col lection is complete take all ProMark3 receivers used in the survey to the office and download the data to an office computer as described in Downlo...

Page 53: ...bar for initializa tion be sure to incorporate the bar as part of the base setup as shown opposite Rover Setup Install the unit on its range pole 1 Attach the field bracket onto the pole 2 Place the...

Page 54: ...following parameters Site ID A 4 character string Survey Mode Stop and go Site Description An optional 20 character narrative description of the point Antenna Height Distance from the rover antenna m...

Page 55: ...ount down beginning from the value of the Time on site field set on the Survey Settings screen At the end of the countdown sequence the Remain field reads 00 00 00 8 Move the rover antenna from the in...

Page 56: ...pole Initialize Check that None is now selected Time on Site Enter the occupation time needed on each point that you will survey typically 15 seconds 11 While holding the pole stationary above the poi...

Page 57: ...ata collection phase Running a Kinematic Survey This chapter describes a typical Kinematic survey in which initialization is performed on a known point The fastest ini tialization method Base Setup an...

Page 58: ...ere is enough satellites received press the LOG key The Survey Settings screen opens 6 Enter the following parameters Survey Mode Kinematic Antenna Height Distance from the rover antenna mounted on to...

Page 59: ...isplayed showing the counting down of the initialization phase see screen opposite The Remain field will count down beginning from the value of the Time on site field set on the Survey Settings screen...

Page 60: ...vey Be careful not to mask the antenna between the two trajectories Done Will end the kinematic survey by closing the data file and taking you back to the last displayed nav igation screen After selec...

Page 61: ...ou can extend the use of RTK to Mobile Mapping However the current position status Float Fixed etc can only be seen on the Position screen see page 70 Preliminary Steps It is assumed that you have alr...

Page 62: ...and then tap the right attribute value describing the feature near you for example Good This takes you back to the Log ging screen Select the next attribute in the list and repeat the pre vious step R...

Page 63: ...fault logging interval is 5 seconds To change this interval Tap Options on the screen and highlight Logging Inter val Two options are then prompted By Time Select this option when you want to log a ne...

Page 64: ...n area feature the first and last position calculated by the receiver are connected when you close the feature Record the attributes of an area feature as you do for a line feature see page 57 Tap the...

Page 65: ...t edly until the Map screen is displayed The Map screen provides a geographical view of the different features present in the job From this screen you will now indicate the first feature you want to r...

Page 66: ...istance to the feature goes to zero or close to zero or simply because you can identify it visually Another nice way of being informed that you have arrived at the feature is to set the Alarms option...

Page 67: ...ature Note that only point features can be repositioned If you wish to reposition a line or area feature you should record a new feature and then delete the old one in MobileMap per Office 3 Adding Mo...

Page 68: ...cularly describes the download proce dures based on the use of the USB cable provided It is as sumed that both GNSS Solutions and Mobile Mapper Office have already been installed on your PC Working on...

Page 69: ...his opens the Con nect Via Cable dialog In this dialog choose the port created on the PC fol lowing the installation of the USB driver and then click OK The following appears successively in the statu...

Page 70: ...2 On the PC Run GNSS Solutions and open or create the project in which to download your RTK results In GNSS Solutions select Tools Preferences and make sure Show RTK functions is enabled otherwise ch...

Page 71: ...lists the files you want to import top Each row describes one of these files filename associated Site ID etc 6 At the bottom of the window define which of the sites is the control point base and enter...

Page 72: ...k the PC to search for this driver on the installation CD and then follow the on screen instructions to complete the driver installation Double tap the FAST Survey icon Select File 6 Data Transfer Thi...

Page 73: ...pper field Click OK The job is then downloaded to the project open in GNSS Solutions On the PC a job folder is created in the open project folder to store all the downloaded files At the end of the tr...

Page 74: ...obileMapper Office now views the data collected in the field 5 From the menu bar select File Export 6 Select one of the formats displayed and you will see a Browse for Folder window that allows you to...

Page 75: ...een displays the navigation screen you would like to use as your favorite guidance tool You can also use the ESC key to scroll through the navigation screens in reverse order Map screen Shows a map of...

Page 76: ...ity of information namely six data fields plus an active compass Speedometer screen Displays your speed in a familiar graph ical format There are also four additional data fields plus a trip odometer...

Page 77: ...e NOTE is only active after has been tapped Allows you to list the content of the parent folder Valid when using the File Transfer service of a remote ProMark3 after you have opened a subfolder Lists...

Page 78: ...ocked To purchase an optional FAST Survey function Total Station or GPS first run FAST Survey go to Equip About Fast Sur vey Change Registration and read the registration code on the Product Registrat...

Page 79: ...al positioning navigation for land sea and air based operations GSM Global System for Mobile communica tions The most popular standard for mobile phones in the world HRMS Horizontal Root Mean Square A...

Page 80: ...d Bag 2 G GOTO 60 GPRS 11 GPRS Connection 21 H Handstrap 2 Height Type 24 26 28 45 48 52 HI 15 43 Holding the unit 10 55 HRMS 25 27 I I O module 4 62 66 Initialization methods 42 Initialize 48 52 Init...

Page 81: ...ey Settings screen kinematic 53 Survey Settings screen static 44 Survey Settings screen Stop Go 48 T Tap 57 Target on Map screen 60 Time on Site 53 Trajectory 26 U Units 9 24 26 28 45 48 52 Unlock Fas...

Page 82: ...28 09 39 39 In Germany 49 81 6564 7930 Fax 49 81 6564 7950 In Russia 7 495 956 5400 Fax 7 495 956 5360 In the Netherlands 31 78 61 57 988 Fax 31 78 61 52 027 Email surveysalesemea magellangps com www...

Reviews: