INITIAL SETUP, INSTALLATION, AND ASSEMBLY:
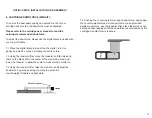
4.1.1 Unpack the eccentric counterweight and gently, holding the
arm in such a way that you won’t damage the tonearm or the pivot
push it into the weight mount, located in the back of the tonearm.
It is recommended that you twist the counterweight left and right
while pushing in the counterweight, this will help to let it slide in.
Moving the eccentric counterweight left and right will shift the
tonearm center of gravity, allowing it to tilt.
4.1.2 Level the eccentric counterweight to allow the tonearm to be
as leveled as possible, as we will continue the final adjustments
on page 10 of this manual.
7
INITIAL SETUP, INSTALLATION, AND ASSEMBLY:
4A. TONEARM SETUP AND CALIBRATION
(FACTORY
ASSEMBLED)
:
Please read the following steps carefully!
The tonearm is factory calibrated and leveled, but the shipping
and handling of the turntable can modify the factory settings.
A correct tonearm and cartridge calibration will ensure the best
audio quality and will extend the life of the stylus tip and your
records, so please take time and care to set your turntable
carefully and correctly.
For all the following adjustments, you might need:
Small screwdriver to set the cartridge (Not Provided).
Set of Allen keys 1/16 for all adjustments except for the tonearm
mount 9/64 (Not Provided).
Digital Scale (Provided).
Protractor and VTA Scale (Provided).
4A.1 PRE-SET THE CARTRIDGE WEIGHT:
The final downforce (weight) of the cartridge will be adjusted on
page 10 of this manual. This pre-set is for allowing you to
measure and align the cartridge correctly.
4A.1.1 Unpack the digital scale and insert the batteries (Included).
Place the scale on top of the platter, carefully turn it on and wait
for 2 secods for the scale to tare.
4A.1.2 Carefully remove the stylus guard and unlock the tonearm.
4A.1.3 Using the tonearm lifter, very carefully position the stylus
on the black dot of the scale and allow it to measure the weight.
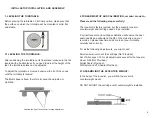
3. LEVELING THE TURNTABLE:
Before placing the turntable on its final position, make sure that
the surface on which the turntable will be mounted is solid, flat
and stable.
3.1 LEVELING THE TURNTABLE:
After positioning the turntable on its final place, make sure that its
leveled with a bubble level, if you need to adjust the height of the
feet, the turntable spikes can be adjusted.
To adjust the turntable, screw and unscrew the tip of the cones
until the turntable is leveled.
The Motor base is fixed; therefore it cannot be adjusted or
modified.
4. TONEARM SETUP AND CALIBRATION
(ASSEMBLY REQUIRED)
:
Please read the following steps carefully!
The tonearm is factory leveled, but the eccentric tonearm
counterweight and cartridge needs to be installed.
A correct tonearm and cartridge calibration will ensure the best
audio quality and will extend the life of the stylus tip and your
records, so please take time and care to set your turntable
carefully and correctly.
For all the following adjustments, you might need:
Small screwdriver to set the cartridge (Not Provided).
Set of Allen keys 1/16 for all adjustments except for the tonearm
mount 9/64 (Not Provided).
Digital Scale (Provided).
Protractor and VTA Scale (Provided).
4.1 ASSEMBLING THE ECCENTRIC WEIGHT:
In the back of the tonearm, you will find the eccentric
counterweight mount.
DO NOT MOUNT the cartridge until counterweight is installed.
Correct
Inorrect
Summary of Contents for TT10
Page 1: ...TT 10Turntable User Manual...


