background image

5

IMPORTANT SAFETY INSTRUCTIONS


WARNING

: To reduce the risk of fire, electric shock, and/or injury to persons, basic safety precautions should 

ALWAYS be followed when using electrical appliances.
When using electrical appliances, basic safety precautions should be followed, including the following:
1. 

Read all instructions before using the appliance.

2. 

Risk of child entrapment and suffocation; NEVER allow children to operate, play with, or crawl inside the 
appliance.

3. 

This appliance must be grounded. Connect only to a properly grounded outlet. See the “GROUNDING 
INSTRUCTIONS” section found on page 4.

4. 

Install or locate the appliance only in accordance with the provided installation instructions.

5. 

DO NOT place the dryer in steamy rooms or where the dryer is directly exposed to rain. Moisture may 
destroy the electrical insulation causing an electrical shock hazard.

6. 

Use the dryer only for its intended use as described in the user guide. This type of dryer is specifically 
designed to dry clothes. It is not designed for industrial or laboratory use.

7. 

As with any appliance, close supervision is necessary when used around children or incapacitated persons.

8. 

DO NOT operate the dryer if it has a damaged power cord or plug, if it is not working properly, or if it has 
been damaged or dropped in any manner.

9. 

The dryer should be serviced only by qualified service personnel. Contact the nearest authorized service 
facility for examination, repair, or adjustment.

10.  DO NOT cover or block any openings on the appliance.
11.  DO NOT put your hand in the spin basket during operation. The spin basket is rotating at a high speed and 

the rotating parts may cause injury to your hand.

12.  DO NOT immerse the power cord or plug in water.
13.  Keep the cord away from all heated surfaces.
14.  DO NOT store or use gasoline or any other flammable vapors and liquids in the vicinity of this or any other 

appliance. The fumes can create a fire hazard or explosion.

15.  When cleaning the surfaces of the door and the frame, use only mild, nonabrasive soaps or detergents 

applied with a sponge or soft cloth. NEVER clean appliance parts with flammable fluids. The fumes can 
create a fire hazard or explosion.

16.  This dryer is for indoor use only. DO NOT use outdoors.
17.  DO NOT place the appliance or cord near heat sources such as radiators, heaters, air ducts, or direct 

sunlight.

18.  DO NOT run the cord under floor coverings. Arrange the cord away from high traffic areas so it will not be 

a trip hazard.

19.  To disconnect the appliance, turn the appliance off, switch off the power outlet and remove the plug from 

the power outlet. 

20.  After turning off the power supply to the dryer, wait at least 2 minutes before turning it on again.
21.  DO NOT carry the appliance by the cord or pull to disconnect it from the outlet. To disconnect, grasp the 

plug and pull.

Summary of Contents for MCSDRY35W

Page 1: ...1 PLEASE READ THIS MANUAL CAREFULLY BEFORE USING YOUR DRYER AND KEEP IT FOR FUTURE REFERENCE Model MCSDRY35W 3 5 Cu Ft Compact Dryer User s Manual...

Page 2: ...tering your product include the following 1 Registering your product will allow us to contact you regarding a safety notification or product update 2 Registering your product will allow for more effic...

Page 3: ...T REGISTRATION 2 PRECAUTIONS 4 IMPORTANT SAFETY INSTRUCTIONS 5 SPECIFICATIONS 7 PARTS AND FEATURES 8 INSTALLATION INSTRUCTIONS 9 OPERATION INSTRUCTIONS 12 CARE AND MAINTENANCE 15 TROUBLESHOOTING 17 LI...

Page 4: ...escape wire for electric current This appliance is equipped with a power cord that has a grounding wire with a grounding plug The plug must be plugged into an electrical outlet that is properly instal...

Page 5: ...dryer should be serviced only by qualified service personnel Contact the nearest authorized service facility for examination repair or adjustment 10 DO NOT cover or block any openings on the applianc...

Page 6: ...l alcohol or lacquer in the dryer 29 DO NOT use if the power supply cord is damaged 30 Items will oil on them can ignite spontaneously especially when exposed to heat sources such as this dryer Piling...

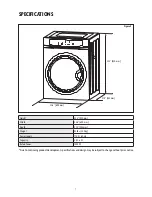
Page 7: ...pth 21 5 545 mm Weight 53 lbs 24 0 kg Power Supply 110 V 60 Hz Capacity 3 5 Cu Ft Rated Power 1500 W Due to continuing product development specifications and design may be subject to change without pr...

Page 8: ...htly differ from the illustrations in this manual a Door b Window c Control Panel d Door Gasket e Drum f Lint Filter g Air Intake Shroud The appearance of your model may slightly differ from the illus...

Page 9: ...l conduction contacts of the dryer 7 Check the power supply a Check your local power source The dryer requires a current of approximately 12 Amperes 110 Volts and a 60 Hz grounded outlet b A short pow...

Page 10: ...ween the top of the dryer and the ceiling above to allow easy installation and adequate spacing for exhaust If mounting above a top load washing machine allow sufficient spacing to open the lid of the...

Page 11: ...reduce the ventilation needed to operate your unit as well as put the appliance in a tilted position on the wall which could present a possible unstable wall installation 8 Mount the dryer to the wal...

Page 12: ...of air cooling to end the program NORMAL DRY Sensor Dry The unit will run until the humidity level in the drum has reached 40 Then the unit will stop heating and go through 10 min of air cooling to en...

Page 13: ...ed and or rubber coated materials Garments with vinyl or plastic materials NOTE DO NOT use fabric softeners or related products that help eliminate static unless recommended by the manufacturer of the...

Page 14: ...are unsure of the drying time NOTE Refer to the Fabric Care Chart on page 14 for commonly used fabric care symbols NOTE Always remove the laundry load from the dryer as soon as possible Fabric Care Sy...

Page 15: ...int Filter Assembly 1 Remove the lint filter by pulling outward using the four 4 grip holes in the filter assembly NOTE The lint filter assembly must be installed when operating the dryer The lint fil...

Page 16: ...mbly must be installed when operating the dryer The air intake filter assembly must be cleaned before and after each use 2 The air intake filter consists of two 2 parts air intake shroud and air intak...

Page 17: ...in your house The door is not closed The dryer drum does not rotate The dryer is not plugged in The circuit breaker tripped or a fuse blew Check for a blown circuit fuse or tripped main circuit break...

Page 18: ...vice by an authorized service technician is not available The removal and reinstallation of your appliance if it is installed in an inaccessible location or is not installed in accordance with publish...

Page 19: ...19 CNA International Inc d b a MC Appliance Corporation All rights reserved Magic Chef logo is a registered trademark of CNA International Inc www mcappliance com Printed in China...

Page 20: ...20...

Page 21: ...21 LEA ESTE MANUAL ANTES DE UTILIZAR SU SECADORA Y GU RDELO PARA FUTURA REFERENCIA Modelo MCSDRY16W Secadora compacta de 1 6 pies c bicos Manual del usuario...

Page 22: ...o siguiente 1 Al registrar su producto nos permite contactarle para notificarle de un cambio de seguridad o actualizaci n del producto 2 Si llegara a necesitar servicio bajo garant a registrando su pr...

Page 23: ...CAUCIONES 24 INSTRUCCIONES DE SEGURIDAD IMPORTANTES 25 ESPECIFICACIONES 27 PARTES Y FUNCIONES 28 INSTRUCCIONES DE INSTALACI N 29 INSTRUCCIONES DE FUNCIONAMIENTO 32 CUIDADO Y MANTENIMIENTO 36 SOLUCI N...

Page 24: ...r una trayectoria de escape a la corriente el ctrica Por lo tanto este aparato est equipado con una clavija polarizada que contiene una terminal para la conexi n a tierra la cual debe de conectarse a...

Page 25: ...sufrido alguna ca da 9 Este secadora debe ser revisado solamente por un personal cualificado de servicio Contacta un facilidad de servicio el m s cercano para examinar reparar o ajustar 10 No cubra o...

Page 26: ...amables ni combustibles tales como gas gasolina alcohol o laca en la secadora 29 NO la use si el cable el ctrico est da ado 30 Los art culos con aceites pueden incendiarse espont neamente sobre todo c...

Page 27: ...20 mm 32 3 Ancho 600 mm 23 6 Profundidad 545 mm 21 5 Peso 24 0 kg 53 lbs Suministro el ctrico 110 V 60 Hz Capacidad 3 5 Cu Ft Voltaje nominal 1500 W Debido al desarrollo continuo de productos las espe...

Page 28: ...a las ilustraciones del manual a Puerta b Ventana c Panel de control d Junta de la puerta e Tambor f Filtro de pelusas g Cubierta de la entrada de aire El aspecto de su modelo puede variar levemente c...

Page 29: ...n el ctrica de la secadora 7 Verifique el suministro el ctrico a Verifique su fuente de energ a local La secadora necesita una corriente de aproximadamente 12 amperios 110 voltios y un tomacorriente...

Page 30: ...dora y el techo para permitir una instalaci n f cil y un espacio adecuado para el escape de vapor Si la monta sobre una lavadora de tapa superior deje el espacio suficiente para abrir la tapa de la mi...

Page 31: ...ores se reducir la ventilaci n necesaria para el funcionamiento del equipo y este quedar en una posici n inclinada lo que producir a un posible montaje inestable sobre la pared 8 Coloque la secadora e...

Page 32: ...tambi n incluir n una funci n de enfriamiento de 10 minutos Extra Seco Sensor seco La unidad funcionar hasta que el nivel de humedad en el tambor alcance 35 Entonces la unidad dejar de calefacci n y p...

Page 33: ...mismo tiempo los botones Programa y Temperatura y mant ngalos presionados durante 3 segundos NOTA Al bloquear la secadora solo bloquean los botones NO bloquea la puerta de la misma CLASIFICACI N Y CAR...

Page 34: ...ntes con garant a escrita por el fabricante de que el suavizante puede usarse en su secadora de forma segura ART CULOS SEPARADOS Use el modo de secado temporizado cuando solo se vaya a secar un art cu...

Page 35: ...uro combustible para encendedores alcohol puro o R113 solamente Limpieza en combustible de aviaci n alcohol puro o R113 solamente No limpiar en seco Secar plano Puede colgarse para secar Secar colgado...

Page 36: ...1 Retire el filtro de pelusas tirando hacia afuera usando los cuatro 4 orificios de agarre en el montaje del mismo NOTA El montaje del filtro de pelusas debe instalarse cuando la secadora est en func...

Page 37: ...oma de aire NOTA El montaje del filtro de toma de aire debe instalarse cuando la secadora est en funcionamiento El montaje del filtro de toma de aire debe limpiarse antes y despu s de cada uso 2 El fi...

Page 38: ...ta no est cerrada El tambor de la secadora no gira La secadora no est enchufada Si dispar el disyuntor o se quem un fusible Verifique que no haya un fusible de circuito quemado o que no se haya dispar...

Page 39: ...t cnico de servicio no est disponible La remoci n y reinstalaci n de su gran aparato si est instalado en un lugar inaccesible o no est instalado de conformidad con las instrucciones de instalaci n pub...

Page 40: ...International Inc realiza negocios bajo el nombre de MC Appliance Corporation Derechos reservados El logotipo Magic Chef es una marca registrada de CNA International Inc www mcappliance com Impreso en...

Reviews: