Pronto 100 ID Card Printer – User Guide
25
INITIAL PRINTER SETUP
Ethernet Setup
Setting up a Static IP Address
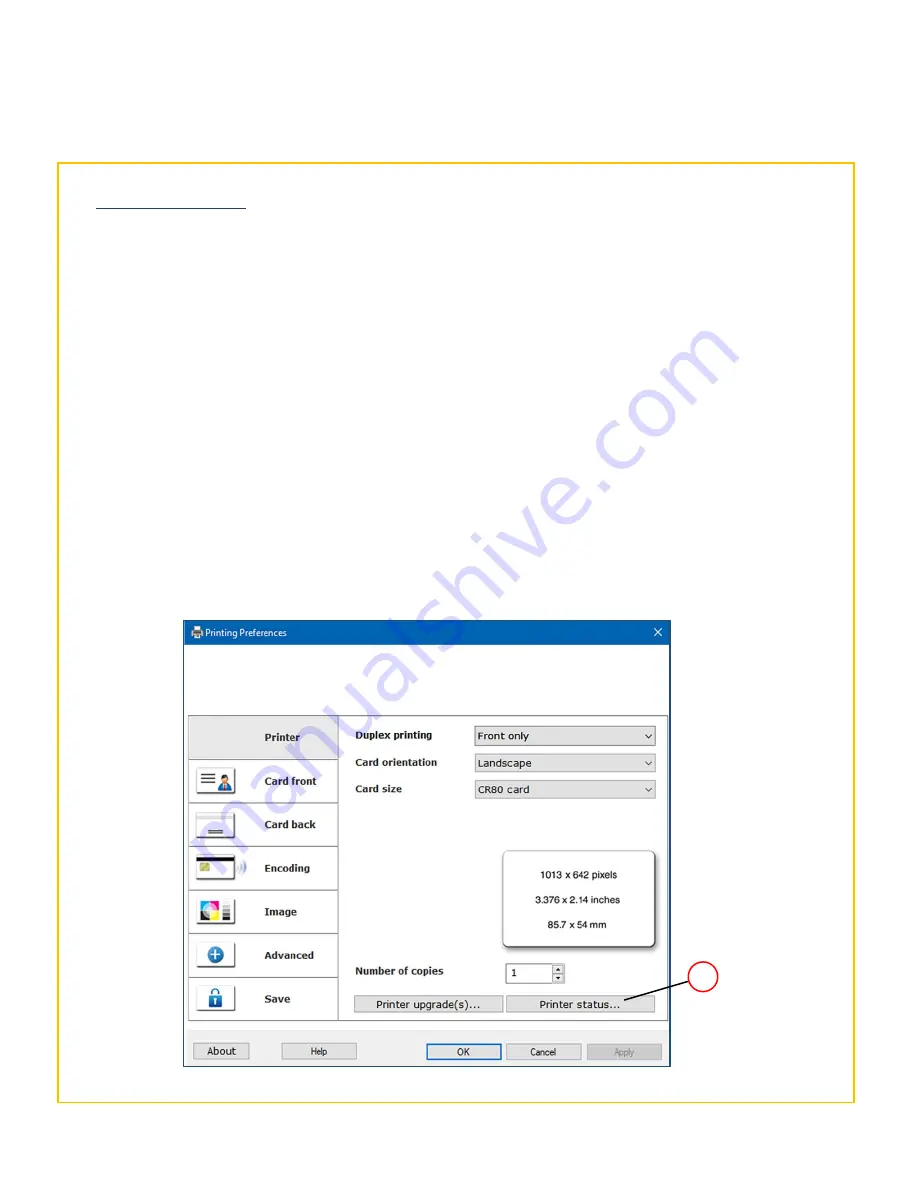
Selecting the Printer Status option
1
NOTE:
This process is mandatory for Ethernet printing on both Windows and Mac.
To set up the printer for Ethernet (network) operation, the printer will first need to be connected via the USB
port. (This is temporary. After the printer has been setup for networking, the USB cable can be disconnected
and the network (Ethernet) connector fitted).
First, ensure the printer has a communication link (or Status) with the PC. This can be done as follows:
1.
Open the
Control Panel
window. When open, ensure the
View by:
option (top-right of window) is
selected to
Small icons
. Select the
Devices and Printers
option from the displayed list. In the ‘Devices and
Printers’ window, you should now see various driver icons (one of which, should be the Magicard printer).
2.
Right-click on the printer icon and select
Printing Preferences
. This will open the
Printer
window below.
3.
Click on the
Printer Status…
button
(
1
)
. The printer should show as ‘connected’ (please see the following
page for the
Printer Status
window
details).
This ensures there is communication between the printer and PC.
Summary of Contents for Pronto 100
Page 1: ...1 Pronto 100 Card Printer User Guide Document No 5380 Issue 1 03...
Page 18: ...Pronto 100 ID Card Printer User Guide 18 Customising the Settings and Features...
Page 19: ...Pronto 100 ID Card Printer User Guide 19 3 2 1 4 5 6 7 8 9 10 11 12 1 2 3 4 6 8 10 5 7 9 12 11...
Page 41: ...Pronto 100 ID Card Printer User Guide 41 CE Declaration...


