background image

9)

CLEANING & REMOVING COIN JAMS 

The iCoin allows full access to the internal coin 
path for cleaning or to remove a coin jam that 
the Coin Release Mechanism was not able to 
remove.

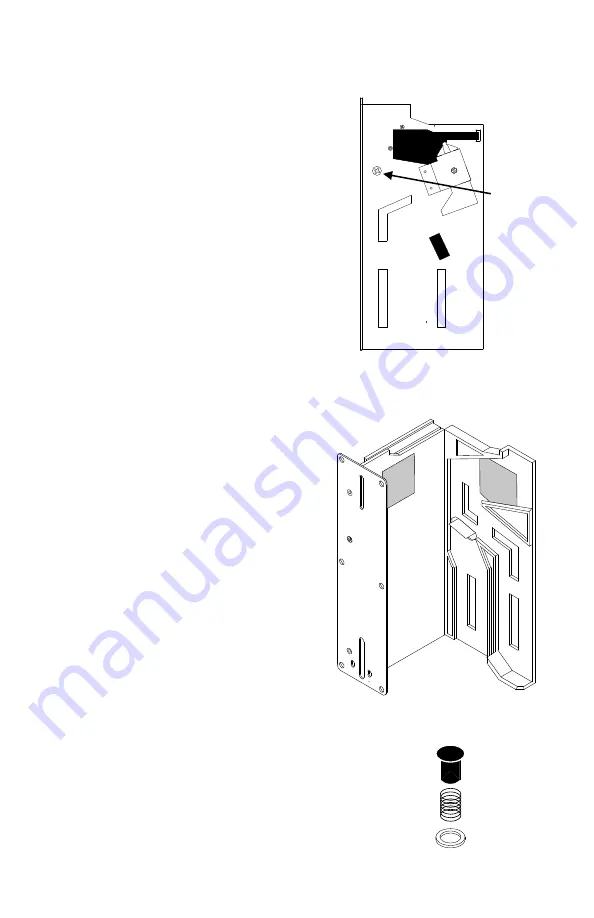
To gain access to the internal coin path you 
must first remove the screw that holds the Coin 
Release Mechanism to the body of the iCoin as 
shown in figure 9.1. Remove the screw while 
holding the Coin Release Mechanism to prevent 
it from turning. Once the screw is fully removed 
the 3 components of the Coin Release 
Mechanism will be loose so place them aside.

The right side of the iCoin can now be opened 
a full 90° to gain access to the complete 
internal coin path for cleaning or removal 
of any coin jam as shown in figure 9.2. 

Do 

not open the side more than 90° 
otherwise damage to the hinge may 
occur voiding any warranty.

For cleaning use a cotton swab or soft cloth 
with isopropyl alcohol or Windex to clean 
the coin path and the sensor. 

Do not use 

any sharp objects or abrasive cleaners 
that my damage the sensors or the coin 
path.

When reinstalling the Coin Release 
Mechanism, ensure that the components are 
assembled in the correct order as shown in 
figure 9.3.

Screw

Holding

Coin

Release

Mechanism

figure 9.1

figure 9.2

figure 9.3

Summary of Contents for iCoin CP990

Page 1: ...v 1 0 Instruction Manual Model CP990 Model CP890 iCoin Electronic Multi Coin Acceptor...

Page 2: ...This page intentional left blank...

Page 3: ...ng turned back on to ensure that the iCoin powers up correctly Model Power Requirements Power Connections Pulse Connections CP990 CP890 24 5 VAC Yellow Black Blue Note 1 Purple Note 2 CP990 R CP890 R...

Page 4: ...ngs Following this the display shows which preprogrammed currency coins it will accept as well as if there are any learned tokens that it will accept By default the iCoin power saving mode is enabled...

Page 5: ...iCoin can accept have di erent values di erent number of pulses will be sent to the timer depending on which coin is accepted Only 1 pulse will be sent to the timer for the lowest value coin that the...

Page 6: ...for Selected Token show the total number of pulses that will be sent when the currently selected token is accepted The total number of pulses that will be sent is the sum of all the indicator lights...

Page 7: ...ithout dropping any coins after which the learned indicator light for the selected token will turn o signifying that the token is now erased 6 DISPLAYING THE ACCEPTED COIN When a coin is accepted by t...

Page 8: ...e trying to adjust the speed setting The Variable Fixed Pulse setting is by default set to variable such that the number of pulses sent by the iCoin for the Cdn quarter 1 coin and 2 coin is dependent...

Page 9: ...ou are in setup mode To save all changes you must press the Press to Learn Selected Token 3 pushbutton This will save the current configurations settings and the iCoin will restart with the new settin...

Page 10: ...2 fixed 1 low least strict 2 medium 4 high most strict 1 low least strict 2 medium 4 high most strict 1 fast 2 slow 1 1 minute 2 3 minutes 4 5 minutes Preprogrammed Coins Sizing Token Sizing Group 2 P...

Page 11: ...be loose so place them aside The right side of the iCoin can now be opened a full 90 to gain access to the complete internal coin path for cleaning or removal of any coin jam as shown in figure 9 2 D...

Page 12: ...dition when learning tokens record the details of each token on the following lines SERIAL ___________________________________ TokenA Description ____________________________________________ TokenB De...

Reviews: