background image

M A G M A    

12               

Chapter 4     Install 3

rd

 Party PCI Cards 

Make sure that all PCI cards are fully seated in their connectors. When 
correctly seated in its connector, you will notice a firm resistance when 
you pull up gently on the card. To keep the cards in place, secure them 
in the enclosure with their retaining screws (supplied with the Magma 
expansion chassis). 


IMPORTANT 

The sheer number of PCI cards and device drivers available 
makes it impossible for Magma to fully test and certify all available 
PCI cards for use in the Magma expansion chassis. Our best 
advice to you in this regard is to insist on full PCI Specification 
compliance from your card and system vendors. Cards and 
systems should be at least PCI Specification Revision 2.0 
compliant or better. Compliance in your system motherboard, PCI 
cards, and console firmware (or BIOS) is your best assurance that 
everything will install and operate smoothly. 

Not all PCI cards are as "well-behaved" as they should be. 
Sometimes simply moving a PCI card that is having a problem to a 
different slot, or reordering your cards in their slots, will alleviate 
"behavior" problems. 


System Should Be Up and Running 

Apply power to the Magma expansion chassis first, then power up the 
computer.  

Use the procedures detailed in 

Chapter 4

 to confirm the card 

installation(s) in the Windows Device Manager or Apple System Profiler.  


Finishing Touches 

After your system is working properly, replace any empty slots with slot 
covers, and replace the host computer cover and the expansion chassis 
cover. 


Summary of Contents for CB1H

Page 1: ...PCI Expansion Chassis User s Guide 1 Slot PCI Expansion Model CB1H Model CB1F...

Page 2: ...lectro magnetic mechanical optical or otherwise in whole or in part without prior written consent from Magma Limitation of Liability Information presented by Magma in this guide is believed to be accu...

Page 3: ...tly 6 Starting Up 6 Shutting Down 6 CHAPTER 3 VERIFY INSTALLATION 7 Windows 7 Mac OS X 8 CHAPTER 4 INSTALL 3 RD PARTY PCI CARDS 10 Remove PCI Expansion Chassis Cover 10 Install PCI Card in PCI Expansi...

Page 4: ...rchandise to Magma 25 APPENDIX A BUS HIERARCHY 26 Bus Hierarchy 26 APPENDIX B DC POWER INFORMATION 27 DC Power Options 27 Battery Sizing Selection 27 For Batteries Rated in Watt Hours 28 APPENDIX C CO...

Page 5: ...r information for your Magma host card This manual is divided into the following parts Chapter 1 Provides General Specifications and Parts List Chapter 2 Briefly explains Expansion Chassis installatio...

Page 6: ...the following step from causing injury DANGER or STOP Used to indicate and prevent the following step from causing serious injury or significant data loss Disclaimer We have attempted to identify most...

Page 7: ...that could interfere with other electronic equipment in the area of your system WhenWorkingInsideaComputer Before taking covers off a computer perform the following steps 1 Turn off the computer and a...

Page 8: ...risk of damage to components Magma strongly encourages you to follow proper ESD procedure which can include wrist straps and smocks when servicing equipment You can also take the following steps to p...

Page 9: ...rd Cable Length 1 meter PCI Local Bus Specification Revision 2 2 PCI Bridge Architecture Spec Revision 1 1 Interconnect Bandwidth 132 MB sec Theoretical Max of PCI 33 32 Cooling One 4 CFM Fan Power Su...

Page 10: ...S Standard 115V power cord 1 Host Card CardBus is standard 4 Rubber feet to be installed by user 1 Software CDROM 1 User s Manual 1 The Magma PCI expansion cable uses a 68 pin connector however it is...

Page 11: ...over Turning the system power off at the power on off switch does not remove power to components High voltage is still present CAUTION Before touching anything inside the enclosure move to an ESD stat...

Page 12: ...ill conveniently reach from the connector of the Host Card to the connector on the back of the chassis See your Host Card Installation Guide for information on installing your Host Card Attach one end...

Page 13: ...wering up the Magma expansion chassis for the first time Although the power supply has an over voltage protection device built into it it may not trip in time to fully protect a device that has been i...

Page 14: ...iguration code to recognize the PCI bus hierarchy and any attached devices There is an On Off switch on the back of the expansion chassis as well as an LED indicator to indicate power status Verify th...

Page 15: ...Installation Guide for information on how to connect your Host Card Always power up your Expansion System by turning on the power to the Expansion Chassis first followed by your host computer Windows...

Page 16: ...n your system host computer first then the expansion chassis and reconnect the cables and reseat the PCI Host Card to ensure that you have a solid connection Then restart the Magma expansion chassis f...

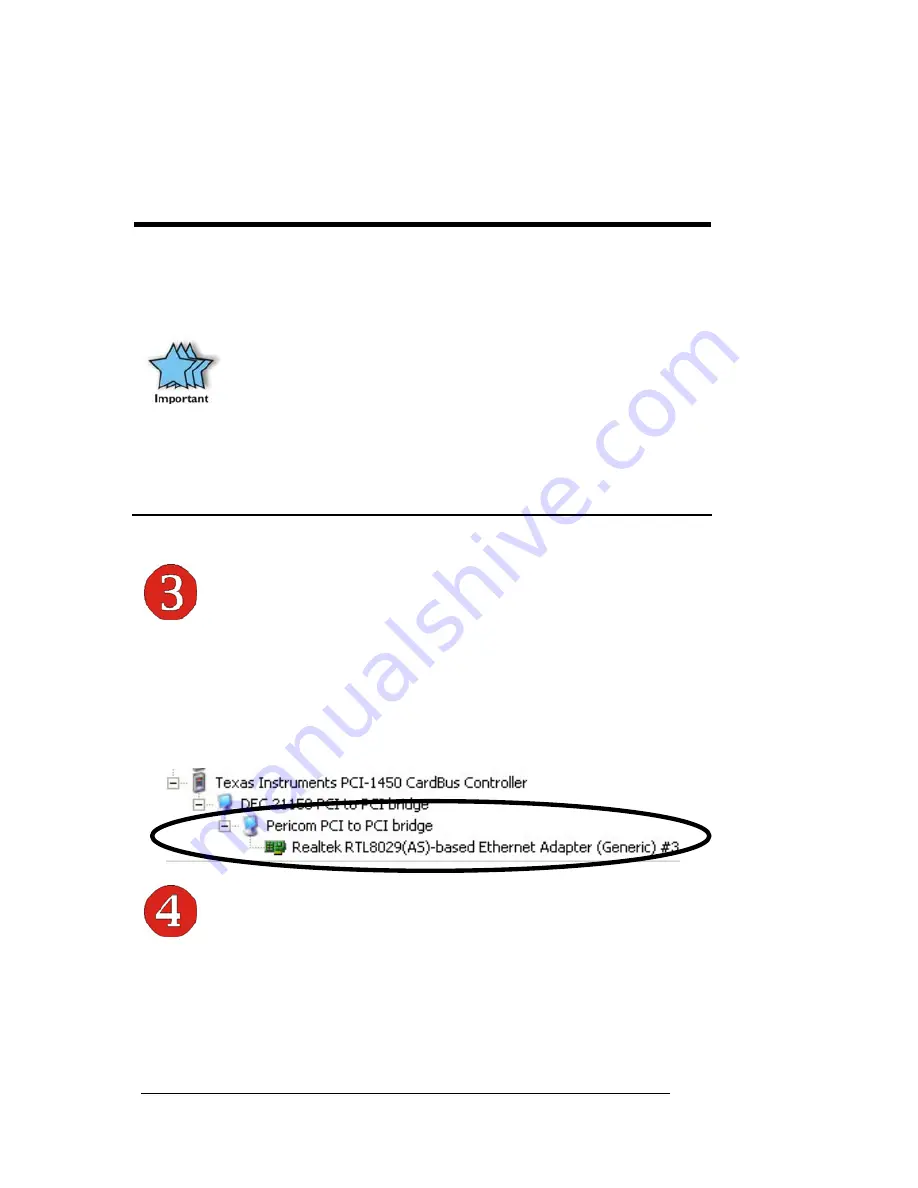
Page 17: ...PCI as shown below Any PCI Cards you install in the expansion chassis will appear behind the pci bridge device If any of these devices are not displayed as shown above you should shut down your system...

Page 18: ...h 3 rd Party PCI cards However if you have verified a successful installation of the Magma expansion system as defined in Chapter 4 but experience difficulty installing your 3 rd Party PCI cards the P...

Page 19: ...the cover off CAUTION When replacing the enclosure cover be sure that the front edge guides on the cover engage the inner lip of the enclosure InstallPCICardinPCIExpansionChassis Install PCI cards fol...

Page 20: ...vendors Cards and systems should be at least PCI Specification Revision 2 0 compliant or better Compliance in your system motherboard PCI cards and console firmware or BIOS is your best assurance tha...

Page 21: ...ving problems try these simple troubleshooting steps My Computer Can t Find the PCI Expansion System When Nothing Works My PCI Card Doesn t Work The PCI to PCI Expansion System is correctly displayed...

Page 22: ...tional troubleshooting steps Double check the PCI host card to ensure it is inserted correctly in a PCI slot Try moving the PCI host card to a different PCI slot Check for a bad cable or connection Tr...

Page 23: ...Magma expansion system and that you have correctly installed your 3 rd Party PCI card s and their associated drivers as required If it powers up OK but nothing works check the computer s Device Manage...

Page 24: ...hout the Magma expansion system attached call Magma Technical Support ii If it still hangs the problem is in the computer and not with the Magma expansion system or the 3 rd Party PCI cards b If it bo...

Page 25: ...or fail to resolve your problem 1 Shut down the computer followed by the Magma expansion chassis 2 Remove the PCI card displaying a problem 3 Replace the problem card with a simple PCI card such as an...

Page 26: ...nd if the PCIe to PCI Bridge Connections and the 3 rd Party PCI card s are now correctly visible Support for 3rd Party PCI Cards Magma will provide reasonable technical support to with 3 rd Party PCI...

Page 27: ...ode indicates that there is a problem with the 3 rd Party PCI Card driver If necessary contact the PCI Card s manufacturer for updated PNP compatible drivers If all else fails contact Magma Technical...

Page 28: ...sis are not working correctly Reinstall the PCI host card into the computer s PCI slot and recheck all cable connections If the error code remains try another PCI slot If you still have the error call...

Page 29: ...uter Make 9 Computer Model 10 Operating System and Version 11 Make Model of PCI cards in expansion chassis 12 Detailed description of the problem You can also visit our web site at www magma com suppo...

Page 30: ...follow these instructions 1 Locate a file called dbgview exe on the Magma CDROM 2 Double click on the file dbgview exe 3 While the dbgview screen is open locate and double click on a file called dump...

Page 31: ...can purchase an inexpensive license from APSoft for use beyond the evaluation period PCIScope has proven to be extremely useful when verifying and debugging configurations involving the Magma PCI Expa...

Page 32: ...ore Help You should save this data as a file on your computer Please include your name and date as part of the file name with an extension of bpd Then email this file to support magma com if you are e...

Page 33: ...ep the packaging from the original shipment of your Magma product However if you return a product to Magma for warranty repair replacement or take advantage of the 30 day money back guarantee you will...

Page 34: ...rs are We only know how they increment starting from the host card The key point in the figure of the 1 slot Topology is that the connecting cable between the host card and the 1 slot backplane is act...

Page 35: ...1H or CB1F Please visit our web site at www magma com for more information The CB1H CB1F is designed to accommodate DC input in the range 9 16 VDC the most common voltages for batteries in this indust...

Page 36: ...e multiples of a lesser number of hours Examples If you want 5 hours of continuous operation with a 14 4VDC battery set Locate row 5 in Column 1 of the table above read across the row to the 14 4VDC C...

Page 37: ...Rules Operation is subject to the following two conditions 1 this device may not cause harmful interference and 2 this device must accept any interference received including interference that may caus...

Page 38: ......

Page 39: ......

Page 40: ...Manual P N 09 09920 01 D Magma 9918 Via Pasar San Diego CA 92126 USA Phone 858 530 2511 Fax 858 530 2733 www magma com...

Reviews: