background image

A

B

C

D

E

F

2

EN 05

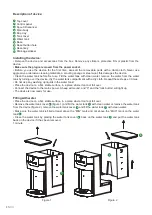
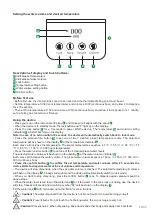
Description of display and touch buttons:

A

 Indicates set temperature

B

 Indicates set water volume

C

 Lock button

D

 Temperature setting button

E

 Water volume setting button

F

 Confirm button

Before first use

• Before first use, the internal tubes need to be rinsed and the thermostat boiling point must be set.

• Set the temperature at 000 (room temperature) and volume at 000 (continuous flow), and allow it to dispense 

for ± 10 seconds. 

• Then set the temperature at 100 and volume at 000 (continuous flow), and allow it to dispense for ± 1 minute, 

so the boiling point detection is finished.

Using the device

• Place your cup on the removable drip tray 

5

 and make sure it aligns with the spout 

3

• When the device is in standby mode, the lock button and “0” light up on the display.
• Press the lock button 

C

 for ± 3 seconds to power ON the device. The temperature 

A

 and volume setting 

indicators 

B

 will start flashing on the display. 

Note! in case of no action within 10 seconds, the device will automatically switch back to lock mode.

• Press the temperature button 

D

 to set one of the 7 desired preset temperature levels. The selected 

temperature will be shown on the display 

2

 at the temperature indicator 

A

.

Each press will increase the temperature. The preset temperature sequence: 45 °C => 55 °C => 65 °C => 75 
°C => 85 °C => 100 °C => 000 (room temperature).
• Press the water volume button 

E

 to set one of the 4 desired preset water levels.

The selected water volume will be shown on the display 

2

 at the water volume indicator 

B

Each press will increase the water volume. The preset water volume sequence: 100 ml => 200 ml => 300 ml => 

000 (continuous flow)

• Press the confirm button 

F

 to confirm the set temperature and water volume. After ± 5 seconds the 

device starts to dispense water at the set volume and temperature.

• The device will stop dispensing when the set water volume is reached. The selected temperature & volume 

will flash on the display 

2

, 5 beeps will sound, and the device will automatically switch to lock mode.

• When you want to stop dispensing, press the confirm button 

F

 once. To dispense again, please repeat the 

above steps.
• When the water level is too low in the water tank 

7

 or if the water in the tank runs out during use, the device 

will stop, 5 beeps will sound and a warning symbol “E7” will be shown on the display 

2

.

Fill the water tank 

7

 with cold water up to the “MAX” mark in the tank.

 • Caution! 

The water dispensed from the device is hot. Do not touch it to avoid burning yourself.

 • Caution! 

Prevent burns. Do not touch the hot boiling water, the cup or mug are very hot.

• Caution! 

Prevent burns. When dispensing, keep hands and other body parts away from hot steam.

Setting the water volume and desired temperature

Summary of Contents for MI-HA-IHWD02-CB

Page 1: ...USER MANUAL Model MI HA IHWD02 CB...

Page 2: ......

Page 3: ...er the age of 8 and under supervision Keep the device and power cord out of the reach of children below the age of 8 years This device is intended for domestic or similar use not for professional use...

Page 4: ...ble materials Do not leave the device unattended when it is in use This device is not a toy and should be kept under strict supervision to prevent children from using the device as a toy Do not allow...

Page 5: ...use the device indoors in dry areas and not in the vicinity of water other liquids or humidity Do not use the device if it the cable or power plug has fallen into water or any kind of fluid Never imme...

Page 6: ...th a dry cloth Repeat these steps 3 times Do not use any washing up liquids in the water tank Place the device on a flat stable surface in a place where it cannot fall over Connect the device to the m...

Page 7: ...e The preset temperature sequence 45 C 55 C 65 C 75 C 85 C 100 C 000 room temperature Press the water volume button E to set one of the 4 desired preset water levels The selected water volume will be...

Page 8: ...the remaining water Open the drainage stopper on key 11 at the bottom of the base by turning it counter clockwise so the remaining water can flow out of the device Once all the remaining water has be...

Page 9: ...ating Thermostat cut off Use the reset key to press the reset button and recover the device Water Leakage Drainage stopper is loosened Tighten the drainage stopper on the bottom 6 SPECIFICATIONS 6 SPE...

Page 10: ...gevoerd door kinderen tenzij ze ouder zijn dan 8 en onder toezicht staan van een volwassene Houd dit apparaat en het stroomsnoer buiten bereik van kinderen jonger dan 8 jaar Dit apparaat is uitsluiten...

Page 11: ...en elektrische schok te verminderen moet u het apparaat beschermen tegen druppelend of opspattend water en uit de buurt houden van vochtige omgevingen en met water gevulde voorwerpen zoals vazen Derge...

Page 12: ...ouder zijn dan 8 en onder toezicht staan van een volwassene Gebruik het apparaat uitsluitend binnenshuis in droge gebieden en niet in de buurt van water andere vloeistoffen of vocht Gebruik het appara...

Page 13: ...a met een droge doek Herhaal deze stappen ongeveer 3 keer Gebruik geen afwasmiddel in het waterreservoir Plaats het apparaat op een stabiele en vlakke ondergrond op een plek waar het niet kan omvallen...

Page 14: ...uur E Knop voor het instellen van het watervolume F Bevestigingsknop Voor het eerste gebruik Voor het eerste gebruik moeten de leidingen in het apparaat worden gespoeld en moet het kookpunt van de the...

Page 15: ...euw water wilt tappen herhaalt u de bovenstaande stappen Als er te weinig water in het waterreservoir 7 zit of als het water in het reservoir op raakt tijdens het gebruik stopt het apparaat Er klinken...

Page 16: ...n wij u aan het apparaat maandelijks te ontkalken als u het regelmatig gebruikt Gebruik uitsluitend een gifvrij reinigingsmiddel zoals citroenzuur of azijn Schenk citroenzuur of azijn in het waterrese...

Page 17: ...de waterinlaat Stuur het apparaat naar het servicecentrum om de temperatuursensor te laten controleren of vervangen Op het display staat E1 E4 Probleem met de temperatuursensor van de wateruitlaat Stu...

Page 18: ...nce ne doivent pas tre effectu s par des enfants moins qu ils aient plus de 8 ans et qu ils soient sous la surveillance d un adulte Maintenez l appareil et le c ble d alimentation hors de port e des e...

Page 19: ...oc lectrique prot ger l appareil contre les ruissellements ou claboussures d eau et les endroits humides et le tenir l cart d objets remplis de liquides tels que des vases De tels objets ne doivent pa...

Page 20: ...Le nettoyage et la maintenance ne doivent pas tre effectu s par des enfants moins qu ils aient plus de 8 ans et qu ils soient sous la surveillance d un adulte Utilisez l appareil uniquement l int rie...

Page 21: ...n tournant l appareil sens dessus dessous s cher le r servoir d eau avec un chiffon sec R p ter ces tapes 3 fois Ne pas utiliser de liquide vaisselle dans le r servoir d eau Posez l appareil sur une s...

Page 22: ...gler le volume d eau F Bouton pour confirmer votre choix Avant la premi re utilisation Avant la premi re utilisation les tuyaux internes doivent tre rinc s et le point d bullition du thermostat doit t...

Page 23: ...uyez une fois sur la bouton de confirmation F Pour reprendre la distribution r p tez les tapes susmentionn es Lorsque le niveau d eau dans le r servoir 7 est trop bas ou si l eau du r servoir s puise...

Page 24: ...pareil dans de l eau ou tout autre liquide Nettoyez l appareil apr s chaque utilisation Nettoyer le bo tier et l int rieur avec un chiffon humide Ne pas utiliser de liquide vaisselle dans le r servoir...

Page 25: ...rature l entr e d eau Envoyez l appareil au centre de service pour contr ler ou remplacer le capteur de temp rature L cran affiche E1 E4 D f a i l l a n c e d u c a p t e u r d e temp rature la sorti...

Page 26: ...gef hrt werden Ab 8 Jahren m ssen sie beaufsichtigt werden Halten Sie das Ger t und Stromkabel von Kindern unter 8 Jahren fern Das Ger t ist nur f r den h uslichen oder hnlichen Gebrauch bestimmt nich...

Page 27: ...ebungen gesch tzt werden Halten Sie es von Objekten die mit Fl ssigkeiten gef llt sind wie Vasen fern Solche Gegenst nde sollten nicht auf das Ger t oder in dessen N he gestellt werden Verwendung Verw...

Page 28: ...rtung d rfen nicht von Kindern unter 8 Jahren ausgef hrt werden Verwenden Sie das Ger t nur in Innenr umen in trockenen Bereichen und nicht in der N he von Wasser anderen Fl ssigkeiten oder Feuchtigke...

Page 29: ...erholen Sie diese Schritte 3 Mal Benutzen Sie kein Geschirrsp lmittel im Wassertank Stellen Sie das Ger t auf eine flache stabile Oberfl che an einem Ort wo es nicht umfallen kann Schlie en Sie das Ge...

Page 30: ...enge F Best tigungstaste Vor der ersten Benutzung Vor dem ersten Gebrauch m ssen die Innenrohre gesp lt und der Siedepunkt des Thermostats eingestellt werden Stellen Sie die Temperatur auf 000 Zimmert...

Page 31: ...Sie erneut Wasser entnehmen m chten Wenn der F llstand im Wassertank 7 zu niedrig ist oder w hrend des Gebrauchs zu Ende geht stoppt das Ger t es ert nen f nf Signalt ne und auf dem Display wird das W...

Page 32: ...eine andere Fl ssigkeit Reinigen Sie das Ger t nach jedem Gebrauch Reinigen Sie das Geh use und das Innere des Ger ts mit einem feuchten Tuch Benutzen Sie kein Geschirrsp lmittel im Wassertank Verwend...

Page 33: ...hicken Sie das Ger t zur berpr fung oder zum Austausch des Temperatursensors an den Kundendienst Das Display zeigt E1 E4 Temperatursensor des Wasserauslasses hat ein Problem Schicken Sie das Ger t zur...

Page 34: ...0 EU Energy Related products ERP 2009 125 EC Low Voltage Directive LVD 2014 35 EU Restriction of the use of certain Hazardous Substances in Electrical and Electronic Equipment RoHS Directive 2011 65 E...

Page 35: ......

Page 36: ...Version 2021 04 20...

Reviews: