background image

4  Safety and General Information (cont’d)

1

Read these instructions.

2.

  Keep these instructions.

3.

  Heed all warnings.

4.

  Follow all instructions.

5.

  Clean only with a dry cloth.

7.

  Do not block any of the ventilation openings. Install in accordance 

with the manufacturers instructions.

8.

  Do not install near any heat sources such as radiators, heat 

registers, stoves, or other apparatus (including amplifiers) that 
produce heat.

9.

  Do not defeat the safety purpose of the polarized or 

groundingtypeplug. A polarized plug has two blades with one wider 
than the other. A grounding type plug has two blades and third 
grounding prong. The wide blade or third prong are provided for 
your safety. When the provided plug does not fit into your outlet, 
consult an electrician for replacement of the obsolete outlet.

1

0.

  Protect the power cord from being walked on or pinched 

particularly at plugs, convenience receptacles, and the point where 
they exit from the apparatus.

11.

  Only use attachments/accessories specified by the manufacturer.

1

2.


Use only with a cart, stand, tripod, bracket, or table 
specified by the manufacturer, or sold with the apparatus.
When a cart is used, use caution when moving the 

cart/apparatus combination to avoid injury from tip-over.

1

3.

  Unplug this apparatus during lightning storms or when unused for 

long periods of time.

1

4.

  Refer all servicing to qualified service personnel. Servicing is 

required when the apparatus has been damaged in any way, such as 
power-supply cord or plug is damaged, liquid has been spilled or 
objects have fallen into apparatus, the apparatus has been exposed 
to rain or moisture, does not operate normally, or has been 
dropped.

1

5.

  This product may contain lead and mercury. Disposal of these 

materials may be regulated due to environmental considerations.
For disposal or recycling information, please contact your local
authorities or the Electronic Industries Alliance: www.eiae.org

1

6.


Damage Requiring Service

 - The appliance should be serviced

by qualified service personnel when:

A. 

The power supply cord or the plug has been damaged; or

B.

  Objects have fallen, or liquid has been spilled into the 

appliance; or

C. 

The appliance has been exposed to rain; or

D. 

The appliance does not appear to operate normally or
exhibits a marked change in performance; or

E. 

The appliance has been dropped, or the enclosure damaged.

1

7.


Tilt/Stability

 - All televisions must comply with recommended

international global safety standards for tilt and stability properties 
of its cabinet design.
• Do not compromise these design standards by applying excessive 
pull force to the front, or top, of the cabinet which could 
ultimately overturn the product.
• Also, do not endanger yourself, or children, by placing electronic 
equipment/toys on the top of the cabinet. Such items could 
unsuspectingly fall from the top of the set and cause product 
damage and/or personal injury.

1

8.


Wall or Ceiling Mounting

 - The appliance should be mounted 

to a wall or ceiling only as recommended by the manufacturer.

1

9.


Power Lines

 - An outdoor antenna should be located away from

power lines.

20.


OutdoorAntenna Grounding

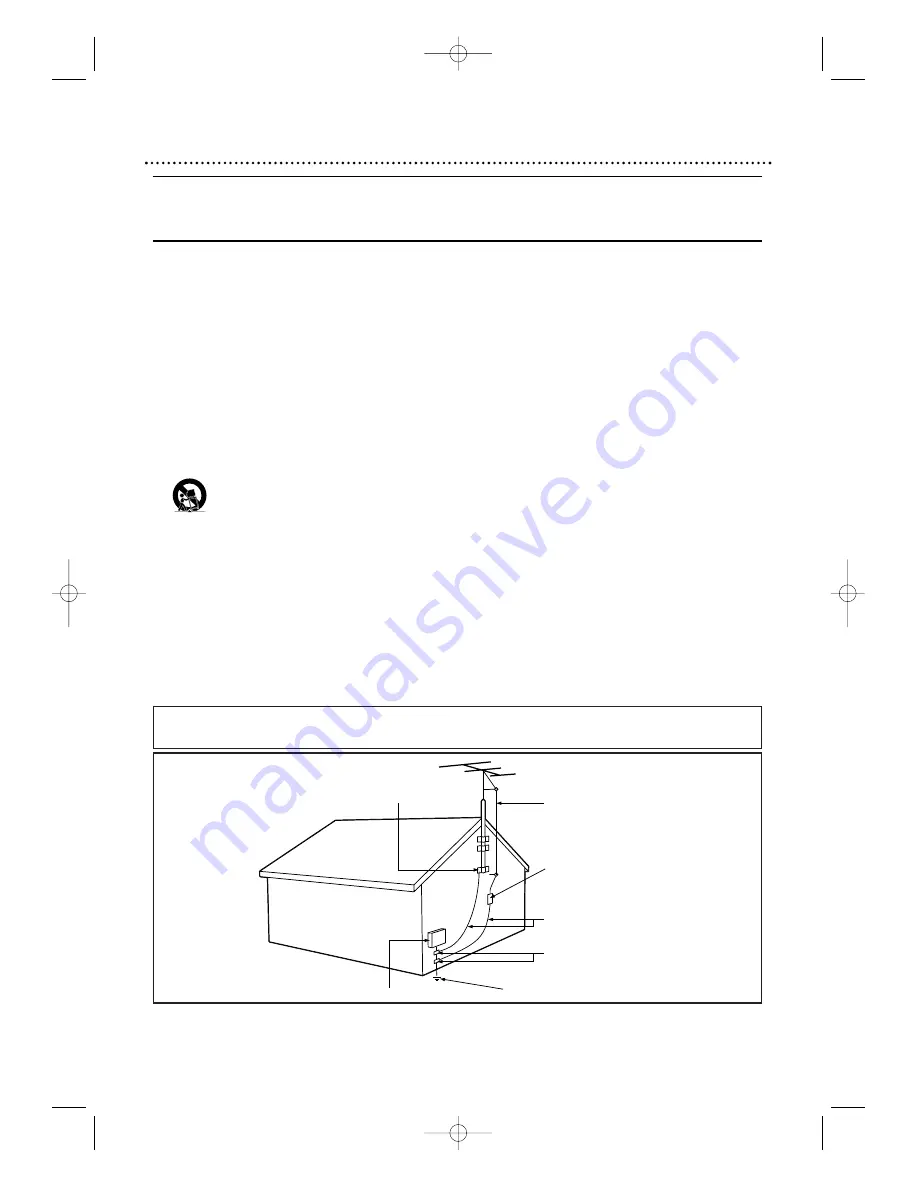
 - If an outside antenna is 

connected to the receiver, be sure the antenna system is grounded 
so as to provide some protection against voltage surges and built 
up static charges.
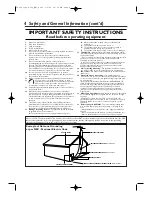
Section 810 of the National Electric Code, ANSI/NFPA No. 70-
1984, provides information with respect to proper grounding of 
the mast and supporting structure, grounding of the lead-in wire 
to an antenna discharge unit, size of grounding connectors, 
location of antenna-discharge unit, connection to grounding 
electrodes, and requirements for the grounding electrode. See 
Figure below.

2

1

.


Object and Liquid Entry

 - Care should be taken so that objects 

do not fall and liquids are not spilled into the enclosure through 
openings.
a) Warning: To reduce the risk of fire or electric shock, this 
apparatus should not be exposed to rain or moisture and objects 
filled with liquids, such as vases, should not be placed on this 
apparatus.

22.


Battery Usage CAUTION

 - To prevent battery leakage that 

may result in bodily injury, property damage, or damage to the 
unit:
• Install all batteries correctly, with + and - aligned as marked on 
the unit.
• Do not mix batteries (old and new or carbon and alkaline, etc.).
• Remove batteries when the unit is not used for a long time.

Note to the CATV system installer: This reminder is provided to call the CATV system installer's attention to Article 820-40 of the NEC 
that provides guidelines for proper grounding and, in particular, specifies that the cable ground shall be connected to the grounding 
system of the building, as close to the point of cable entry as practical.

ANTENNA LEAD IN WIRE

ANTENNA DISCHARGE UNIT 

(NEC SECTION 810-20)


GROUNDING CONDUCTORS 

(NEC SECTION 810-21)


GROUND CLAMPS

POWER SERVICE GROUNDING ELECTRODE SYSTEM 

(NEC ART 250, PART H)


GROUND CLAMP

ELECTRIC SERVICE EQUIPMENT

Example of Antenna Grounding
as per NEC - National Electric Code

IMPORTANT SAFETY INSTRUCTIONS

Read before operating equipment

T2132_1102_0102_EN1_0303  3/3/05  10:18 AM  Page 4

Summary of Contents for 27MDTR20 - Tv/dvd/vcr Combination

Page 1: ...ox Toutefois si vous ne parvenez pas r soudre votre probl me vous pouvez acc der notre aide en ligne l adresse www magnavox com ou formez le 1 800 661 6162 Francophone 1 800 705 2000 English speaking...

Page 2: ...itled to protection by one of the most comprehensive warranties and outstanding service networks in the industry What s more your purchase guarantees you ll receive all the information and special off...

Page 3: ...cular installation If this equipment does cause harmful interference to radio or television reception which can be determined by turning the equipment off and on the user is encouraged to try to corre...

Page 4: ...l safety standards for tilt and stability properties of its cabinet design Do not compromise these design standards by applying excessive pull force to the front or top of the cabinet which could ulti...

Page 5: ...36 Zero Return Sleep Timer 37 Time Search 38 Index Search 39 Videotape Playback Features 40 Automatic Operation Features 41 AdditionalTV Features Closed Captions 42 SettingV Chip 43 48 Multi Channel T...

Page 6: ...ave menus If the DVD has a menu access it by pressing DISC MENU on the remote control Details are on page 52 Setup Menus Some instructions explain how to use the setup menus of the TV VCR DVD There ar...

Page 7: ...les DVD CD contains Windows MediaTM Audio On the following disc the sound may not be heard Super Audio CD Only the sound on the CD layer can be heard The sound on the high density Super Audio CD layer...

Page 8: ...e remote control at the remote sensor on the front of the TV VCR DVD Details are on page 17 Do not put objects between the remote control and the TV VCR DVD TV VCR DVD Maintenance Remove any light adh...

Page 9: ...eiver To view any channel set the TV VCR DVD to the output channel channel 03 or 04 of the Cable Box Satellite Receiver Then select channels at the Cable Box Satellite Receiver Your Cable Box Satellit...

Page 10: ...DVD s power cord ANT AUDIO OUT COAXIAL ANT Indoor Antenna not supplied example only DHooking UpYour TV VCR DVD to Another Video Source VCR DVD player Camcorder etc You may need this connection if you...

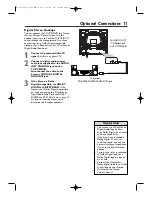
Page 11: ...f you want to hear the TV VCR DVD sound through the Stereo instead Use these connections for a Dolby Digital compatible Stereo or for a Receiver that has a Mini Disc or Digital Audio Tape deck 1 Conne...

Page 12: ...you still can use the Number buttons to select it This is a non memorized channel it may have weak reception in your area To update your memorized and non memorized channels see page 19 Remember if y...

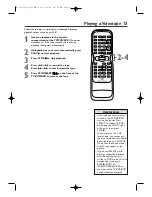
Page 13: ...Helpful Hints Follow these steps to simply play a videotape Videotape playback options are on pages 35 41 1 Insert a videotape in the cassette compartment of the TV VCR DVD The power will come on If t...

Page 14: ...ctivity at the TV VCR DVD the unit will turn off PLAY STOP RECORD DISC MENU SPEED C RESET STANDBY ON PICTURE SELECT SLEEP CH VOL MUTE ZOOM 1 2 3 4 5 6 7 8 9 0 10 100 1 5 6 2 3 Press OPEN CLOSE A on th...

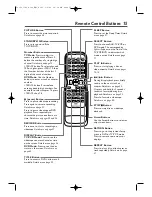
Page 15: ...tart a recording on videotape Details are on page 27 DISPLAY Button TV VCR Mode Press to see the videotape counter channel or time on the screen Details are on page 26 DVD Mode Press to see the disc s...

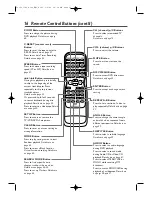
Page 16: ...program or to start Random playback Details are on page 65 Press to select a Black Level or Virtual Surround setting Details are on page 64 SEARCH MODE Button Press to find a specific time chapter tra...

Page 17: ...or DVD mode If you switch to TV VCR mode wait about 4 seconds before switching back to DVD mode This button works the same as the SELECT button on the remote VCR TV light red Appears if the TV VCR DV...

Page 18: ...hannels Details are on pages 9 10 Power Cord Connect to a standard AC outlet 120V 60Hz AUDIO OUT COAXIAL Jack Connect this jack to a Digital Stereo using a digital audio coaxial cable not supplied Use...

Page 19: ...V VCR mode The red VCR TV light will appear 1 Press SETUP once so the TV VCR SETUP menu appears 2 Press or to select LANGUAGE 3 Press ENTER repeatedly to select ENGLISH ESPA OL or FRAN AIS The selecte...

Page 20: ...ected an Antenna TV or a Cable TV signal CATV to the TV VCR DVD Then press ENTER The menu will disappear and a TV channel will appear The channel number will appear along with ADD DELETE 4 Press or un...

Page 21: ...ING CLOCK Then press ENTER 3 Press or to select MANUAL CLOCK SET Then press ENTER 4 While the MONTH space is flashing press or until the correct month appears Then press B MANUAL CLOCK SET MONTH DAY Y...

Page 22: ...ntil the correct minute appears 9 Press SETUP Although seconds are not displayed they begin counting from 0 when you press SETUP Use this action to synchronize the clock exactly Press DISPLAY to see t...

Page 23: ...V VCR mode The red VCR TV light will appear 1 Press SETUP 2 Press or to select SETTING CLOCK Press ENTER 3 With AUTO CLOCK selected press ENTER so ON appears beside AUTO CLOCK SETTING CLOCK AUTO CLOCK...

Page 24: ...CLOCK AUTO CLOCK CH SEARCH AUTO CLOCK CH MANUAL CLOCK SET D S T B ON 08 OFF SETTING CLOCK AUTO CLOCK AUTO CLOCK CH SEARCH AUTO CLOCK CH MANUAL CLOCK SET D S T B ON 02 OFF 10 Press SETUP to remove the...

Page 25: ...l ON appears beside D S T Or press ENTER so OFF appears beside D S T if you want to disable this feature 4 Press SETUP to remove the menu SETTING CLOCK AUTO CLOCK AUTO CLOCK CH SEARCH AUTO CLOCK CH MA...

Page 26: ...N TITLE SETUP A B REPEAT SEARCHMODE CLEAR MODE ANGLE SUBTITLE AUDIO DISPLAY SPEED C RESET STANDBY ON PICTURE SELECT SLEEP CH VOL MUTE ZOOM 1 2 3 4 5 6 7 8 9 0 10 100 REPEAT 2 3 1 s B BRIGHT to decreas...

Page 27: ...ding The REC OTR light will flash on the front of the TV VCR DVD If the tape does not have a record tab the tape will eject Insert another tape 5 To pause the recording press k To resume recording pre...

Page 28: ...REC OTR I on the front of the TV VCR DVD repeatedly to select a recording length Recording will start immediately Each press of REC OTR I will increase the recording time by 30 minutes The maximum re...

Page 29: ...UX in the Timer Programming menu Choose the channel you want to record at the Cable Box Satellite Receiver Leave the Cable Box Satellite Receiver on for the timer recording Leave the TV VCR DVD set to...

Page 30: ...M or PM will appear with the hour Then press B and press or to select the minute you want recording to start Press B TIMER PROGRAMMING CH 61 DATE MON 7 04 BEGIN 7 30 END B P M TIMER PROGRAMMING CH 61...

Page 31: ...04 BEGIN 7 30 END 8 50 B P M P M To correct information while setting the Timer Recording press s to go back one step and select the incorrect information Press or to enter the correct information Whi...

Page 32: ...R PROGRAMMING Press ENTER 2 Press or to select a timer recording then press B 3 Press s or B to select the information you want to change Press or to enter the correct information 4 Press SETUP to rem...

Page 33: ...ram s USER S SET UP RENTAL REPEAT PLAY AUTO RETURN OFF OFF ON B TV VCR SETUP TIMER PROGRAMMING SETTING CLOCK CHANNEL SET UP USER S SET UP V CHIP SET UP LANGUAGE ENGLISH CAPTION OFF ZERO RETURN TIME SE...

Page 34: ...nsert a prerecorded tape in the source unit If playback begins press STOP C on the VCR or Camcorder 3 The TV VCR DVD will record your tape Insert a blank videotape in the cassette compartment of the T...

Page 35: ...SET UP Then press ENTER 3 Press or to select REPEAT PLAY 4 Press ENTER until ALL or BLANK appears beside REPEAT PLAY Or to cancel Repeat Play press ENTER to select OFF 5 Press SETUP to remove the menu...

Page 36: ...RENTAL REPEAT PLAY AUTO RETURN ON OFF OFF B TV VCR SETUP TIMER PROGRAMMING SETTING CLOCK CHANNEL SET UP USER S SET UP V CHIP SET UP LANGUAGE ENGLISH CAPTION OFF ZERO RETURN TIME SEARCH INDEX SEARCH B...

Page 37: ...ress SLEEP until the correct amount of time appears on the screen with SLEEP Each press of SLEEP will increase the time by 30 minutes You may set a Sleep Timer of 30 60 90 or 120 minutes After 5 secon...

Page 38: ...CR DVD will rewind or fast forward the tape the specified amount of time The time counts down on the screen as the search progresses When 0 00 is reached the tape will start playing Or to cancel the T...

Page 39: ...beginning of the desired program 4 When the program is reached playback will start INDEX SEARCH 0 3 TV VCR SETUP TIMER PROGRAMMING SETTING CLOCK CHANNEL SET UP USER S SET UP V CHIP SET UP LANGUAGE ENG...

Page 40: ...pe playback press k A still picture will appear on the screen The picture advances each time you press k After a tape is paused for 5 minutes playback will stop automatically This prevents damage to t...

Page 41: ...after timer recordings see Auto Return details on page 33 Automatic Tracking Adjustment The TV VCR DVD automatically adjusts the videotape tracking to give you the best possible picture quality With...

Page 42: ...XT2 display half screen text such as a channel guide schedule or announcement OFF turns off closed captions Captions will not appear on the screen 3 Press SETUP to exit the menu TV VCR SETUP TIMER PRO...

Page 43: ...Guidelines To block any inappropriate programming set your limits in both MPAA RATING and TV RATING Before you begin make sure The TV VCR DVD is on The unit is in TV VCR mode Press SELECT on the remo...

Page 44: ...matically 5 Press SETUP to save your settings and remove the menus TV Y TV Y7 TV G TV PG TV 14 TV MA VIEW VIEW BLOCK BLOCK BLOCK BLOCK B If you want to disableV Chip so you can view all TV programming...

Page 45: ...been a power failure 4 Press or to select TV RATING Press ENTER V CHIP SET UP TV RATING MPAA RATING CHANGE CODE B ACCESS CODE TV VCR SETUP TIMER PROGRAMMING SETTING CLOCK CHANNEL SET UP USER S SET UP...

Page 46: ...ress or to select FV Fantasy Violence violence that seems realistic to young children Then press ENTER to select BLOCK or VIEW When you select TV PG TV 14 or TV MA Press or to select D Suggestive Dial...

Page 47: ...move the menus G PG PG 13 R NC 17 X VIEW VIEW VIEW BLOCK BLOCK BLOCK B V CHIP SET UP TV RATING MPAA RATING CHANGE CODE B ACCESS CODE TV VCR SETUP TIMER PROGRAMMING SETTING CLOCK CHANNEL SET UP USER S...

Page 48: ...will appear instead of the code to protect its identity 4 Press or to select CHANGE CODE Then press ENTER 5 Press the Number buttons to enter your preferred access code in the NEW CODE space Then ent...

Page 49: ...udio STEREO and SAP both appear Although a program may be broadcast in both stereo and second audio you cannot record in both stereo and second audio at the same time During tape playback HIFI will ap...

Page 50: ...ecord normal audio Helpful Hint For TV Audio 1 While receiving an MTS broadcast press AUDIO repeatedly to select STEREO SAP Second Audio Program or MONO The output mode changes as described below ever...

Page 51: ...DIO to select HIFI or MONO The current mode appears on the TV screen for about 5 seconds The initial setting is HIFI This setting is saved until the cassette is ejected For External Devices Pressing A...

Page 52: ...t describe the contents of the disc or allow you to customize disc playback For example the menu may offer choices for subtitle languages special features or scene selection To use the DVD disc menu a...

Page 53: ...ay vary depending on the disc g 1 g 2 g 3 g 4 or g 5 will appear briefly on the TV screen to indicate forward searching Or h 1 h 2 h 3 h 4 or h 5 will indicate reverse searching For DVD playback the s...

Page 54: ...ons The title or chapter will play To select a single digit title chapter number when there are more than 10 tracks press ENTER to play the title chapter If you enter a title chapter number that is no...

Page 55: ...l not begin or the current track will continue to play B Using SEARCH MODE Press SEARCH MODE so theTrack Search Display TR appears Within 30 seconds press the Number buttons to select the track number...

Page 56: ...l cancel the Resume feature Playback will start at the beginning the next time you insert the disc For MP3 and JPEG the playback will resume from the beginning of the current track To cancel Resume an...

Page 57: ...MP3 folder A and JPEG folder B all MP3 tracks in folder A and all JPEG files in folder B will be repeated A B Repeat Follow these steps to play a section of a DVD Audio CD or Video CD repeatedly 1 Du...

Page 58: ...umber The Marker display will disappear in about 30 seconds or press SEARCH MODE again to remove the Marker display 4 To return to a Marker during playback press SEARCH MODE until you see the Markers...

Page 59: ...xample below six languages are available 6 After a few seconds the subtitles will appear Or press SUBTITLE repeatedly to turn off Subtitles When no subtitles are available NOT AVAILABLE appears at the...

Page 60: ...its normal size press ZOOM repeatedly The sound will be mute during slow motion playback The gray box with an inner blue box that shows during Zoomed playback is the position guide To remove it or sho...

Page 61: ...guage in the disc menu Audio languages may be abbreviated such as ENG for English Or 3 dashes may appear instead of an abbreviation Stereo Sound Adjust Stereo Sound to determine whether you will hear...

Page 62: ...playing time of the current CD T Current Repeat setting if active T Track repeat A All tracks repeat A B A B repeat DVD Display Before you begin press SELECT to put the TV VCR DVD in DVD mode The gre...

Page 63: ...OOM 1 2 3 4 5 6 7 8 9 0 10 100 REPEAT 1 2 Helpful Hint only during PROGRAM Playback only during RANDOM Playback or or only during FOLDER Playback TR 2 25 0 01 15 Elapsed playing time of the current tr...

Page 64: ...4 Press SETUP to remove the menu 2 Press s or B to select INIT INITIALIZE at the top of the menu then press ENTER 3 Press K K or L L to selectYES Then press ENTER twice To cancel select NO instead IN...

Page 65: ...a track within a program repeatedly During programmed playback press REPEAT so ALL all tracks in the program or TRACK appears The entire program or the current track will play over and over You canno...

Page 66: ...AY B or ENTER Press TITLE to return to the first item in the highest level of folders or files Press or B to return to previous or next levels To change the TRANSITION MODE of JPEG playback press MODE...

Page 67: ...8 on how to set the DUAL PLAYBACK ON or OFF 1 Press SELECT to put the DVD VCR in DVD mode DVD light will appear on the front of the DVD VCR 2 While playback is stopped press MODE A folder list will ap...

Page 68: ...etails are on pages 59 and 61 If you set AUDIO to ORIGINAL the default setting of the DVD Audio will play PLAY STOP ENTER RECORD DISC MENU RETURN TITLE SETUP A B REPEAT SEARCHMODE CLEAR MODE ANGLE SUB...

Page 69: ...Hebrew 5569 Hindi 5455 Hungarian 5467 I K Icelandic 5565 Indonesian 5560 Interlingua 5547 Interlingue 5551 Inupiak 5557 Irish 5347 Italian 5566 Japanese 5647 Javanese 5669 Kannada 5760 Kashmiri 5765...

Page 70: ...the TV VCR SETUP menu appears 2 When playback is stopped press SETUP again The QUICK SETUP screen will appear 3 Press s or B to select CUSTOM at the top of the menu then press ENTER 4 Press s or B to...

Page 71: ...E press K or L to select a setting then press ENTER This function allows you to adjust the quality of a still image AUTO is the default setting If you select FIELD still images will be stabilized but...

Page 72: ...NG is available only when the unit is connected to a Stereo using theAUDIO OUT COAXIAL jack If you selected DOLBY DIGITAL press ENTER repeatedly to select BITSTREAM or PCM Select BITSTREAM if you used...

Page 73: ...r a 4 digit password The password will appear on the screen Write it down so you don t forget it Press ENTER and proceed to step 6 on the next page If you have set a password before this menu will app...

Page 74: ...e prompted to enter a new 4 digit password Use the Number buttons to enter a new 4 digit password then press ENTER PARENTAL LEVEL will reset to ALL Press SETUP to remove the menu See pages 75 76 to re...

Page 75: ...all discs can play 8 Adult material 7 NC 17 Not appropriate for children under 17 6 R Restricted parental approval required for viewers under 18 4 PG13 Unsuitable for children under 13 3 PG Parental...

Page 76: ...set an on screen message will indicate the DVD cannot play Remove the DVD then set PARENTAL LEVEL to ALL Reload the DVD and begin playback Some DVDs may let you enter your 4 digit password to begin p...

Page 77: ...DVD 1 Press SETUP once so theTV VCR SETUP menu appears 2 When playback is stopped press SETUP again The QUICK SETUP screen will appear 4 Press s or B to select OTHERS then press ENTER QUICK SETUP TV M...

Page 78: ...you want the player to turn off when there is no activity at the player or its remote for 20 minutes If you selected DUAL PLAYBACK press ENTER to choose ON or OFF This feature lets you play MP3 and JP...

Page 79: ...used in movie theaters Sound is heard through multiple channels not just the right and left as with standard stereo Dubbing copying a videotape from a separate VCR or camcorder HQ high quality a featu...

Page 80: ...r heating a cold room or when the humidity is high There is no warning that moisture is in your TV VCR DVD Playing a tape when moisture has accumulated could damage the tape and the TV VCR DVD If you...

Page 81: ...Details are on page 36 If moisture has accumulated in the unit keep the power on for at least 2 hours but do not play a tape TV VCR DVD does not display closed captions forTV programs Make sure close...

Page 82: ...nals Antenna In VHF UHF Cable TV 75 ohm unbalanced F type Video In One RCA connector Audio L R In Two RCA connectors Headphone 1 8 stereo 3 5 mm Coaxial Digital Audio Out One pin jack 500m Vpp 75 ohm...

Page 83: ...mproper installation connections to improper voltage supply abuse neglect misuse accident unauthorized repair or other cause not within the control of Magnavox A product that requires modification or...

Page 84: ...ols 26 picture button 15 26 play B button 13 15 17 playing discs 14 playing videotapes 13 power cord 10 18 programs 65 random playback 65 ratings mpaa 47 tv 43 46 real time tape counter 37 rear panel...

Reviews: