background image

Helpful Hints (cont’d)  41

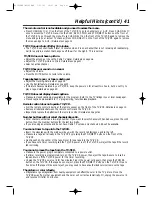
The remote control is not available and you need to access the menu.

• Press CHANNEL 

or 

on the front of the TV/VCR to go to channel zero or AUX. Press CHANNEL 

once to access the TV/VCR menu. Use the PLAY, REW, F.FWD, and STOP/EJECT buttons on the front of
the TV/VCR to go through the menu. Press CHANNEL 

on the front of the TV/VCR again to remove the

menu and go to your lowest TV channel. (Press CHANNEL 

on the front of the TV/VCR again to remove

the menu and go to AUX.) Details are on page 12.

TV/VCR power shuts off after 15 minutes.

• The TV/VCR will shut itself off after 15 minutes when it is on a channel that is not receiving a broadcast sig-

nal (for example, a station that has gone off the air for the night).  This is normal.

TV/VCR does not have a picture.
• Adjust the antenna or check the Cable TV signal. Details are on page six.
• Adjust the TV/VCR picture controls. Details are on page 21.
• Select an active channel.

TV/VCR has poor sound or no sound.

• Adjust the volume.
• Press the MUTE button to restore the volume.

Tape playback is poor or tape is destroyed.

• Adjust the tracking. Details are on page 38.
• Use the Rental feature. Details are on page 30.
• If moisture has accumulated in your TV/VCR, keep the power on for at least two hours, but do not try to

play a tape. Details are on page 40.

TV/VCR does not display closed captions.

• Make sure closed captioning is available for the program. Refer to the TV listings in your local newspaper.
• Closed captions are available for TV programming, not videotape playback. 

Remote control does not operate TV/VCR.

• Aim the remote control directly at the remote sensor on the front of the TV/VCR. Details are on page 12.
• Remove all obstacles between the remote control and the TV/VCR.
• Inspect and replace the batteries in the remote control. Details are on page five.

Number buttons will not select channels above 69.

• Enter channel numbers as a two-digit number. If you want to select channels 100 and above, press the +100

button, then the Number buttons for the last two digits.

• If you are using an antenna and do not have Cable TV service, only channels 2-69 will be available. 

You cannot insert a tape into the TV/VCR.

• Insert the videotape with the window side up, with the record tab facing you and to the left.
• Make sure a tape isn’t already in the TV/VCR by pressing the STOP/EJECT button on the front of the

TV/VCR.

• Gently push on the center of the tape. Never force a tape into the TV/VCR.
• If you have set a timer recording and the TV/VCR power is off, the TV/VCR will eject the tape if the record

tab is missing.

You cannot remove the tape from the TV/VCR.

• Make sure the power plug is completely connected to a power outlet.
• If a timer recording is programmed, turn on the TV/VCR power, then eject the tape. Be sure to insert a

tape and turn off the TV/VCR power for the timer recording.

• Unplug the TV/VCR power cord for five minutes. Plug in the power cord again, then press the POWER

button on the TV/VCR. If the tape does not eject, press the STOP/EJECT button on the TV/VCR three to
five times. If the tape still does not eject, you may need to have an authorized servicer remove the tape.

The picture or color is faulty.

• Magnetism or geomagnetism from nearby equipment can affect the color in the TV picture. Move the

TV/VCR away from other equipment, and the color will correct automatically. Or, unplug the power cord
and reconnect it after 30 minutes.

MC132EMG\MC192EMG  1/31/03  10:41 AM  Page 41

Summary of Contents for MC132EMG - 13' Tv/vcr Combination

Page 1: ...WE CAN GUIDE YOU THROUGH CONNECTIONS FIRST TIME SETUP AND ANY OF THE FEATURES WE WANT YOU TO START ENJOYING YOUR NEW PRODUCT RIGHT AWAY CALL US BEFORE YOU CONSIDER RETURNING THE PRODUCT 1 800 705 200...

Page 2: ...s our way of saying welcome and thanks for investing in a MAGNAVOX product P S Remember to get the most from your MAGNAVOX product you must return your Warranty Registration Card within 10 days So ple...

Page 3: ...owing mea sures 1 Reorient or relocate the receiving antenna 2 Increase the separation between the equipment and receiver 3 Connect the equipment into an outlet on a circuit different from that to whi...

Page 4: ...tting the Clock 16 19 Daylight Savings Time 20 Picture Control Status Displays 21 Recording Options Timer Recording 22 24 Timer Recording Auto Return 25 Rerecording Tape Duplication 26 One Touch Recor...

Page 5: ...Safety Battery Usage CAUTION To prevent battery leakage that may result in bodily injury property damage or damage to the unit Install ALL batteries correctly with the and markings on the battery ali...

Page 6: ...th a Cable TV Signal or Outdoor Antenna BHooking Up Your TV VCR With a Cable Box Satellite Receiver To view any channel set the TV VCR to the Cable Box Satellite Receiver output channel channel 03 or...

Page 7: ...R and to the AUDIO In Jack white on the front of the TV VCR Connect a Video cable to the VIDEO OUT Jack on the VCR and to the VIDEO In Jack yellow on the front of the TV VCR 3 Follow the steps on page...

Page 8: ...ls and Cable TV channels To play or record a videotape before setting TV channels press the MENU button to remove the SETUP menu To set up chan nels later see Resetting TV Channels on page 14 To selec...

Page 9: ...ul Hints Follow the steps below to play a tape 1 Insert a tape in the TV VCR s cassette com partment The power will come on If the tape s record tab is missing playback should start automati cally 2 I...

Page 10: ...ording The Record light will flash If the tape does not have a record tab the TV VCR will eject the tape immediately Insert another tape and try again 5 To pause the recording for example during comme...

Page 11: ...is stopped press to rewind the tape at high speed During tape playback press to rewind the tape while the pic ture stays on the screen Details are on page 28 Press to select a menu item or to change a...

Page 12: ...setting of a menu item F FWD Fast Forward Button When tape playback is stopped press to fast forward the tape at high speed During playback press to fast forward the tape while the picture stays on t...

Page 13: ...r Cable TV signal here Details are on page six Antenna Hole Connect the stem of an indoor rod antenna here Details are on page six AC Power Cord Connect to a standard AC outlet to supply power to the...

Page 14: ...Press F FWD B or REW s to select ENG LISH or ESPA OL Spanish 3 Press MENU to remove the menu 1 2 1 3 Resetting TV Channels The TV VCR may memorize available channels when you turn it on the first time...

Page 15: ...select ADD DELETE CH Then press F FWD B CHANNEL SET UP B ADD DELETE CH TV AUTO PRESET 3 Press the Number buttons to choose a channel you want to add or delete 0 8 ADD DELETE 4 Press F FWD B or REW s...

Page 16: ...y for proper timer recording If a Public Broadcasting Station PBS is available in your area follow Auto Clock Setting below If not follow Manual Clock Setting on pages 18 19 Auto Clock Setting You can...

Page 17: ...e channels when you enter your AUTO CLOCK CH at step 6 It will take the TV VCR several minutes to scan the channels An _ _ appears in the lower left corner of the screen when the search is complete AU...

Page 18: ...ICTURE CONTROL B SETTING CLOCK CHANNEL SET UP USER S SET UP V CHIP SET UP LANGUAGE ENGLISH CAPTION OFF ZERO RETURN TIME SEARCH 2 Press PLAY or STOP to select MANUAL CLOCK SET Then press F FWD B 3 Whil...

Page 19: ...0 5 P M 7 While the MINUTE space is flashing press PLAY or STOP until the desired minute appears Example 40 MANUAL CLOCK SET MONTH DAY YEAR 0 5 0 6 TUE 2 0 0 3 HOUR MINUTE 0 5 4 0 P M 8 Press MENU Alt...

Page 20: ...ENU Press PLAY or STOP to select SETTING CLOCK Then press F FWD B M E N U TIMER PROGRAMMING PICTURE CONTROL B SETTING CLOCK CHANNEL SET UP USER S SET UP V CHIP SET UP LANGUAGE ENGLISH CAPTION OFF ZERO...

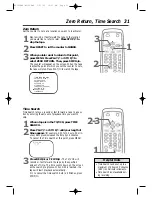
Page 21: ...green to the picture Adjust Sharpness to make the image softer or more clear 4 Press MENU to remove the picture controls Or they will disappear automatically five seconds after you make the last adjus...

Page 22: ...A tape is in the TV VCR for the recording 1 Press MENU Press PLAY or STOP to select TIMER PROGRAMMING Press F FWD B 2 Press PLAY or STOP to select a program posi tion Then press F FWD B 3 Press PLAY...

Page 23: ...STOP until the end hour and AM or PM appears Then press F FWD B TIMER PROGRAMMING CH DATE BEGIN END B 61 7 04 FRI 7 30PM 8 30PM 8 Press PLAY or STOP until the end minute appears Press F FWD B TIMER P...

Page 24: ...ecording Details 1 With the TV VCR on press MENU Press PLAY or STOP to select TIMER PROGRAMMING Press F FWD B 2 Press PLAY or STOP to select a timer recording then press F FWD B 3 Press F FWD B or REW...

Page 25: ...select AUTO RETURN Press F FWD B or REW s until ON appears beside AUTO RETURN To deacti vate AUTO RETURN select OFF USER S SET UP RENTAL OFF REPEAT PLAY OFF B AUTO RETURN ON If you press POWER while t...

Page 26: ...io and video cables not supplied Connect the source unit VCR or Camcorder to a power source after connections are made 2 The VCR or Camcorder will play your tape Insert a prerecorded tape in the sourc...

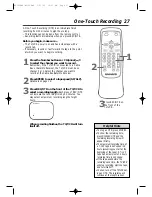
Page 27: ...SLP Details are on page 10 3 Press REC OTR on the front of the TV VCR to select a recording length Each press of REC OTR will increase the recording time by 30 minutes You may select a maximum record...

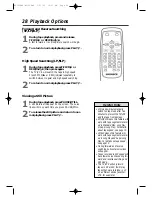
Page 28: ...SLP It will play tapes that were recorded in LP on a different device another VCR for example Helpful Hints Forward and Reverse Searching SP LP SLP 1 During tape playback press and release F FWD B or...

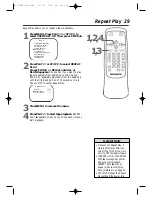
Page 29: ...IMER PROGRAMMING PICTURE CONTROL SETTING CLOCK CHANNEL SET UP B USER S SET UP V CHIP SET UP LANGUAGE ENGLISH CAPTION OFF ZERO RETURN TIME SEARCH USER S SET UP RENTAL OFF B REPEAT PLAY ALL AUTO RETURN...

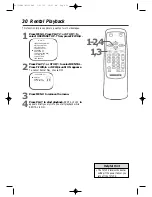
Page 30: ...ERO RETURN TIME SEARCH USER S SET UP B RENTAL ON REPEAT PLAY OFF AUTO RETURN OFF 2 Press PLAY or STOP to select RENTAL Press F FWD B or REW s until ON appears To cancel Rental Play choose OFF 3 Press...

Page 31: ...earch can be set up to a maximum of 9 hours 50 minutes 9 50 in 10 minute increments Time Search is not available dur ing recording Helpful Hints 2 3 1 Zero Return Time Search 31 Zero Return Set the co...

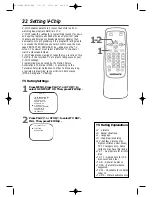
Page 32: ...the Television Parental Guidelines In order to block any inap propriate programming set your limits in both places MPAA Rating and TV Rating TV Rating Settings 1 Press MENU Press PLAY or STOP to sele...

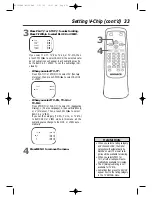
Page 33: ...W while in this menu all the subratings also change to BLOCK or VIEW auto matically TV PG BLOCK B D BLOCK L BLOCK S BLOCK V BLOCK TV Y7 BLOCK B FV BLOCK 4 Press MENU to remove the menu 3 Press PLAY or...

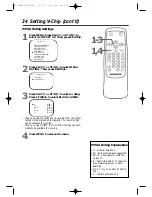
Page 34: ...to select BLOCK or VIEW B G VIEW PG VIEW PG 13 VIEW R BLOCK NC 17 BLOCK X BLOCK When you select a rating and choose BLOCK the higher ratings will be blocked automatically The lower ratings will be ava...

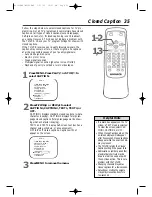
Page 35: ...displays standard closed captions what a character is saying CAPTION2 displays foreign lan guage closed captions foreign language words show ing what a character is saying TEXT1 and TEXT2 display hal...

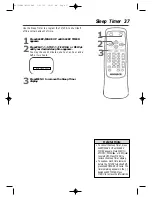
Page 36: ...n at the specified time WAKE UP B ON OFF ON TIMER TV TAPE TV TIME 12 OOAM WAKE UP ON OFF ON TIMER B TV TAPE TV TIME 12 OOAM 2 Press F FWD B or REW s until ON appears 3 Press PLAY or STOP to select TV...

Page 37: ...two hours SLEEP TIMER 2 00 3 Press MENU to remove the Sleep Timer display To cancel the Sleep Timer press SLEEP WAKE UP until SLEEP TIMER appears Press PLAY STOP F FWD B or REW s to select OFF Press...

Page 38: ...the TV VCR power on or off but the TV VCR must be plugged in If a timer recording is programmed a tape cannot be ejected when the power is off In this case turn on the TV VCR power then eject the tape...

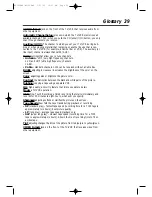
Page 39: ...ens the picture color Contrast the distinction between the black and white parts of the picture Dubbing copying a tape using a separate VCR HQ high quality a circuitry feature that improves picture de...

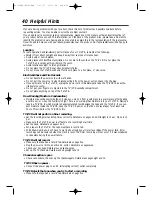
Page 40: ...ectly Details are on pages 22 24 Midnight is 12 a m Noon is 12 p m Make sure the TV VCR power is off before the recording s start time Set the clock Details are on pages 16 19 Put a tape in the TV VCR...

Page 41: ...n the front of the TV VCR Details are on page 12 Remove all obstacles between the remote control and the TV VCR Inspect and replace the batteries in the remote control Details are on page five Number...

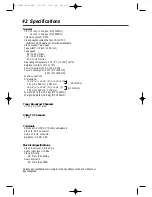
Page 42: ...1 2 W x 14 15 16 D MC132EMG 401 mm x 368 mm x 380 mm 19 3 4 H x 19 3 8 W x 18 3 4 D MC192EMG 502 mm x 493 mm x 476 mm Weight 23 15 lbs 10 5 kg MC132EMG Weight 42 99 lbs 19 5 kg MC192EMG Tuner Broadca...

Page 43: ...navox does not distribute the product the local Magnavox service organization will attempt to provide service although there may be a delay if the appropriate spare parts and technical manual s are no...

Page 44: ...laying a tape 9 power button 11 12 power cord 7 13 ratings movie 34 tv 32 33 rear panel 13 rec otr button 12 27 record light 12 recording 10 recording prevention 5 remote control 11 remote sensor 12 r...

Reviews: