background image

English

10

IMPORTANT!
–  The progressive scan video quality 
is only possible when using YPbPr 
and a progressive scan television is 
required.

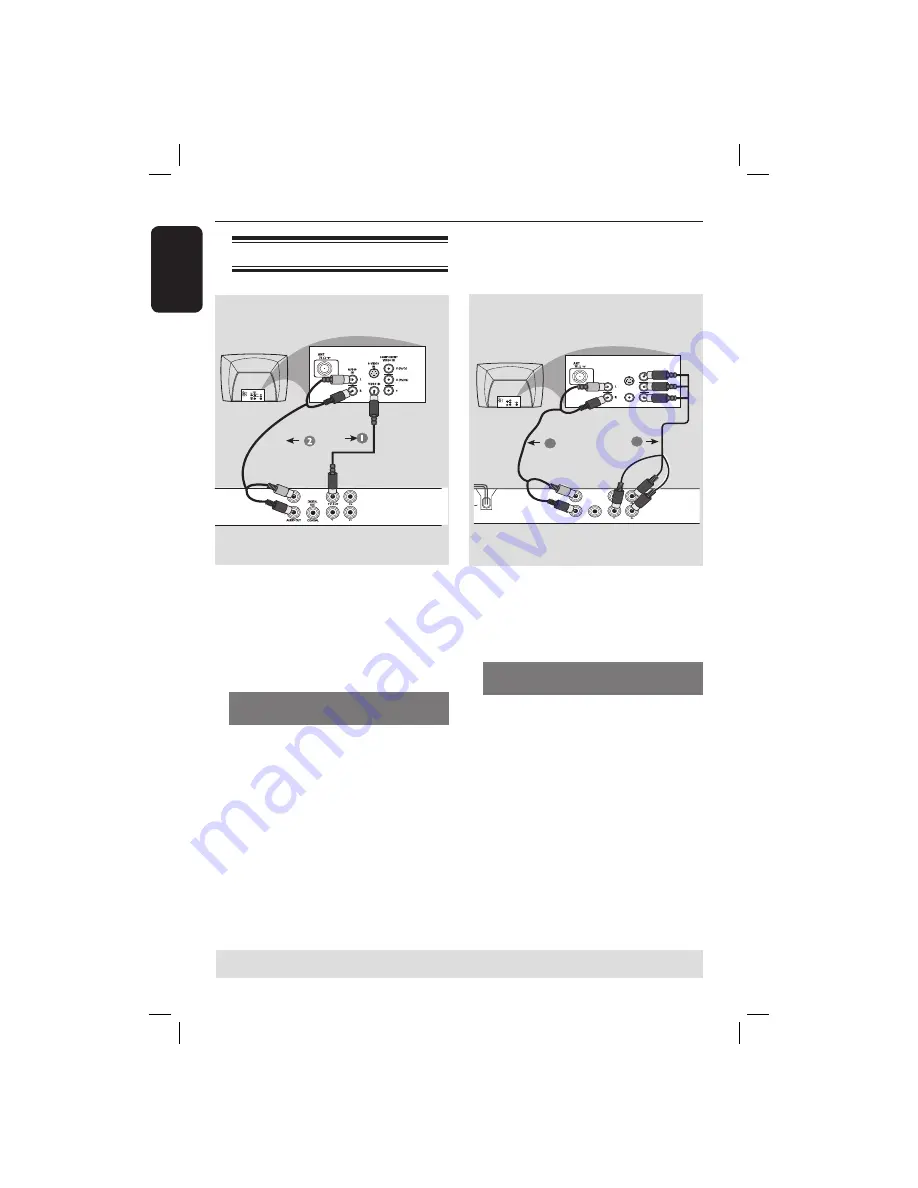
Using Component Video jacks 
(YPbPr)

A

  Use the component video cables (red/

blue/green) to connect the DVD player’s 

YPbPr

 jacks to the component video 

input jacks (or labeled as YPbPr) on the 
television (cable not supplied).

B

  To hear sound of this DVD player 

through your television, use the audio 
cables (white/red) to connect AUDIO 
OUT (L/R) jacks of the DVD player to 
the corresponding AUDIO IN jacks on 
the television (cable supplied).

C

  Proceed to page 17 for detailed 

progressive scan setup.

Connections

TIPS: 

Before making or changing any connections, make sure that all the devices are disconnected 
from the power outlet.

Connecting to television

IMPORTANT!
–  You only need to make one video 
connection from the following 
options, depending on the 
capabilities of your television.
–  Connect the DVD player directly 
to the television.

Using Composite Video jacks 
(CVBS)

A

  Use the composite video cable (yellow) 

to connect the DVD player’s 

TV OUT


(CVBS) jack to the video input jack (or 
labeled as A/V In, Video In, Composite or 
Baseband) on the television (cable 
supplied).

B

  To hear sound of this DVD player 

through your television, use the audio 
cables (white/red) to connect AUDIO 
OUT (L/R) jacks of the DVD player to 
the corresponding AUDIO IN jacks on 
the television (cable supplied). 

AUDIO OUT 

DIGIT AL 

OUT 

TV OUT

COAXIAL 

AUDI O 

IN 

V (Pr/Cr) 

U (Pb/Cb ) 

S-VIDE O 

IN 

VIDEO IN 

COMPONENT 

VIDEO IN 

AUDIO 
OUT 

V (Pr/Cr) 

U (Pb/Cb ) 

S-VIDEO 

IN 

VIDEO IN 

COMPONEN T 

VIDEO IN 

COMPONENT VIDEO OUT

COMPONENT VIDEO OUT

01-43_MDV460_37_eng2.indd   10

01-43_MDV460_37_eng2.indd   10

2007-01-26   9:52:23 AM

2007-01-26   9:52:23 AM

Summary of Contents for MDV460

Page 1: ...MDV460 01 43_MDV460_37_eng2 indd 1 01 43_MDV460_37_eng2 indd 1 2007 01 26 9 52 16 AM 2007 01 26 9 52 16 AM ...

Page 2: ... PARTS INSIDE REFER SERVICING TO QUALIFIED SERVICE PERSONNEL Visit our World Wide Web Site at http www magnavox com usasupport Congratulations on your purchase and welcome to the family Dear MAGNAVOX product owner Thank you for your confidence in MAGNAVOX You ve selected one of the best built best backed products available today We ll do everything in our power to keep you happy with your purchase...

Page 3: ... 3 Class II equipment symbol This symbol indicates that the unit has a double insulation system d _ _ n ch t 01 43_MDV460_37_eng2 indd 3 01 43_MDV460_37_eng2 indd 3 2007 01 26 9 52 21 AM 2007 01 26 9 52 21 AM ...

Page 4: ... Information All unnecessary packaging has been omitted The packaging has been made easy to separate into two materials cardboard box and polyethylene bags protective foam sheet Your DVD player consists of materials which can be recycled and reused if disassembled by a specialised company Please observe the local regulations regarding the disposal of packaging materials exhausted batteries and old...

Page 5: ...s product incorporates copyright protection technology that is protected by method claims of certain U S patents and other intellectual property rights owned by Macrovision Corporation and other rights owners Use of this copyright protection technology must be authorized by Macrovision Corporation and is intended for home and other limited viewing uses only unless otherwise authorized by Macrovisi...

Page 6: ...l to operate the system 16 Step 2 Finding your viewing channel 16 Step 3 Setting up Progressive Scan feature 17 Step 4 Selecting the matching color system 18 Step 5 Setting the language 19 On screen display OSD language 19 Audio Subtitle and DVD menu languages 19 Playback from Disc Playable discs 20 Supported formats 20 Playback Features Starting disc playback 21 Basic playback controls 21 Pausing...

Page 7: ... setup menu 28 OSD Language 28 Subtitle Audio DVD Menu 28 Using the Video setup menu 29 31 Setting the Aspect Ratio 29 View Mode 30 TV System 30 Video Out 30 Smart Picture 31 Using the Audio setup menu 32 33 Digital Output 32 Night Mode 33 Down Sampling 33 Using the Rating setup menu 34 35 Rating level settings 34 35 Changing the Password 35 Using the Misc Miscellaneous setup menu 36 37 Restoring ...

Page 8: ...2 0 from the left and right to prevent overheating 10cm 4 0 10cm 4 0 5cm 2 0 5cm 2 0 Avoid high temperatures moisture water and dust Apparatus shall not be exposed to dripping or splashing Do not place any sources of danger on the apparatus such as liquid filled objects lighted candles Cleaning discs Some problems occur because the disc inside the player is dirty frozen picture sound disruptions p...

Page 9: ...n Management System Check the regional code number on the disc package If the number does not match the player s region number see table below the player may be unable to playback the disc Tips It may not be possible to play CD R RW or DVD R RW in all cases due to the type of disc or condition of the recording If you are having trouble playing a certain disc remove the disc and try a different one...

Page 10: ...ecting to television IMPORTANT You only need to make one video connection from the following options depending on the capabilities of your television Connect the DVD player directly to the television Using CompositeVideo jacks CVBS A Use the composite video cable yellow to connect the DVD player s TV OUT CVBS jack to the video input jack or labeled as A V In Video In Composite or Baseband on the t...

Page 11: ...ble yellow to connect the DVD player s TV OUT CVBS jack to the video input jack on the RF modulator B Use the RF coaxial cable not supplied to connect ANTENNA OUT or TO TV jack on the RF modulator to the ANTENNA IN jack on the television RF coaxial cable to TV Back of RF Modulator example only C To hear sound of this DVD player through your TV use the audio cables white red to connect AUDIO OUT L ...

Page 12: ...g in the AC power cord to the power outlet Never make or change any connections with the power switched on When no disc is loaded press STANDBY ON on the DVD player front panel may appear on the display panel AUDIO OUT DIGITAL OUT TVO COAXIAL AC MAINS AUDIO OUT V Pr Cr U Pb Cb Y S VIDEO IN VIDEO IN COMPONENT VIDEO IN 01 43_MDV460_37_eng2 indd 12 01 43_MDV460_37_eng2 indd 12 2007 01 26 9 52 24 AM 2...

Page 13: ... capabilities of your receiver the receiver will produce a strong distorted sound or no sound at all Stereo system has right left Audio In jacks A Select one of the video connections CVBSVIDEO IN or COMPONENT VIDEO IN depending on the options available on your television B Use the audio cables white red to connect AUDIO OUT L R jacks of the DVD Player to the corresponding AUDIO IN jacks on the ste...

Page 14: ...nnect to YPbPr input of a TV CVBS TV Out Connect to CVBS Video input of a TV STANDBY ON Turns on the player or switches to standby mode Disc Tray OPEN CLOSEç Opens or closes the disc tray Display panel Shows information about the current status of the DVD player NEXT Skip to next title chapter track PREV Skip to previous title chapter track STOP Stops playback u PLAY PAUSE Starts or interrupts pla...

Page 15: ...el ANGLE Selects a DVD camera angle ZOOM Enlarge a picture on the TV screen DISPLAY Displays information on TV screen during playback 1 To switch the DVD player to standby mode or ON SEARCH To start playback from designated point SETUP Enters or exits the system setup menu Selects an item in the menu fast and slow forward backward OK Acknowledge menu selection STOP Stops playback u PLAY PAUSE Star...

Page 16: ...A Press STANDBY ON 2 on the DVD player to turn it on B Turn on the TV and set it to the correct video in channel You should see the blue DVD background screen Usually these channel are between the lowest and highest channels and may be called FRONT A V IN VIDEO See your TV s manual for more details Or you may go to channel 1 on your TV then press the Channel down button repeatedly until you see th...

Page 17: ...ly to select Video Out then press G Select P Scan then press OK to confirm The menu will appear on the TV Activating Progressive Scan 1 Ensure your TV system supports Progressive Mode 2 If there is a distorted picture on the TV wait 15 seconds for automatic recover Yes NO H Press to highlight Yes and press OK to confirm The menu will appear on the TV Confirm again to use new setting Revert to orig...

Page 18: ...TV has the NTSC colour system It will change the video signal of a PAL disc and output it to NTSC format Multi Select this if the connected TV is compatible with both NTSC and PAL multi system The output format will be in accordance with the video signal of the disc E Select a setting and press OK Follow the instructions show on the TV to confirm the selection if any Confirm again to use new setti...

Page 19: ...ress to go back to previous menu item Press SETUP to exit the menu item Audio Subtitle and DVD menu languages You can choose your preferred language or sound track from audio subtitles and DVD menu languages If the selected language is not available on the disc the disc s default language will be used instead Language Video Audio Rating Misc OSD Language English Subtitle Auto DVD menu Audio Englis...

Page 20: ...Playback from Disc TIPS Some discs cannot be played on this DVD player due to the configuration and characteristics of the disc or due to the condition of recording and authoring software that was used Super Video CD MP3 Disc Supported formats MP3 WMA tracks The file extensions has to be mp3 wma JPEG ISO format Maximum 15 characters display Supported sampling frequencies and corresponding bit rate...

Page 21: ...ossible for certain discs Always refer to the instructions supplied with the discs Basic playback controls Unless otherwise stated all operations described are based on Remote Control use Pausing playback A During playback press PLAY PAUSE u to pause playback and display a still picture Sound will be muted B To resume normal playback press PLAY PAUSE u again Selecting title chapter track Press PRE...

Page 22: ...ne of the last 5 discs Play from start press PREV appears during playback for first 10 seconds During the message appears on the TV screen press PREV to start playback from the beginning Playback restarts from the first title DVD or the beginning of the title track VCD CDDA SVCD To remove the message from the TV screen press DISPLAY Slow Motion You can slow forward or slow reverse a disc during pl...

Page 23: ...t continuously C To exit the sequence press REPEAT A B Selecting various repeat functions Repeat play mode The repeat play options vary depending on the disc type A While playing a disc press REPEAT continuously to choose a repeat options For DVD Repeat Chapter currently playing chapter Repeat Title currently playing title Off cancel For Video CD Audio CD Repeat Single currently playing track Repe...

Page 24: ...Angle 4 1 DVD Time Time 00 00 56 VCD Track Track 21 3 VCD Tip For DVDs with multiple angles press ANGLE to display the right icon after the left entry appears on the TV screen Title Chapter Track selection A Press SEARCH B Press to select Title Chapter or Track C Use the alphanumeric keypad 0 9 to input a valid number D Press OK to confirm The playback skips to the chosen title chapter track Time ...

Page 25: ...the first 5 seconds playback will go to the previous track During playback pressing RETURN TITLE will return to the menu screen if PBC is on If you want to skip the index menu and playback directly from the beginning Press DISC MENU key on the remote control to turn to PBC off Special DVD Features Playing aTitle A Press DISC MENU The disc title menu appears on the TV screen B Use keys or alphanume...

Page 26: ...e folder C Press to select a track file D Press OK to confirm Tips If the playing file is not selected the ID3 Meta information will disappear If a jpeg file is selected a preview will appear Playback selection During playback you can Press PREV NEXT to select the previous next track file in the current folder Press on the remote to rotate flip the picture files Press PLAY PAUSE u repeatedly to pa...

Page 27: ...Use to view the zoomed picture Playback with multi angles JPEG During playback press to rotate the picture on the TV screen flip the picture vertically by 180º rotate the picture anti clockwise by 90º rotate the picture clockwise by 90º Tip It may not be possible to play certain MP3 JPEG disc due to the configuration and characteristics of the disc or condition of the recording 01 43_MDV460_37_eng...

Page 28: ...ut that means the feature is not available or not possible to change at the current state D Use to select a setting and press OK to confirm Example English The setting is selected and setup is complete E To exit press SETUP OSD Language This menu contains various language options for the language displayed on the screen For details see page 19 Subtitle Audio DVD Menu These menus contains various l...

Page 29: ... access Example Aspect Ratio The options for the selected item appears If the selection in the menu is greyed out that means the feature is not available or not possible to change at the current state D Use to select a setting and press OK to confirm Example 4 3 The setting is selected and setup is complete E To exit press SETUP Setting the Aspect Ratio The picture shape can be adjusted to fit you...

Page 30: ...ion to fit the screen width Auto Fit Select this to take the minimum value of horizontal and vertical fit scale ratio like letter box Pan Scan Select this to take the maximum value of horizontal and vertical fit scale ratio B Use to select a setting and press OK to confirm TV System This menu contains the options for selecting the color system that matches the connected TV For details see page 18 ...

Page 31: ...options BRIGHTNESS Increase the value to brighten the picture or vice versa Choose zero 0 for average setting CONTRAST Increase the value to sharpen the picture or vice versa Choose zero 0 to balance the contrast TINT Increase the value to darken the picture or vice versa Choose zero 0 for average setting COLOR Increase the value to enhance the color in your picture or vice versa Choose zero 0 to ...

Page 32: ...ple On The setting is selected and setup is complete E To exit press SETUP Digital Output Select this if you connect to a multichannel decoder receiver A In Audio press to select Digital Output then press All Select this if the connected device has a built in multichannel decoder that supports one of the multichannel audio format Dolby Digital MPEG 2 PCM Select this if the connected device is not ...

Page 33: ...ing and press OK to confirm DVD Menu Options continued TIPS The underlined option is the factory default setting Press to go back to previous menu item Press SETUP to exit the menu item Down Sampling You can enable and disable the digital signal for better sound output quality A In Audio press to select Down Sampling then press On Playback a disc recorded at the sampling rate of 48kHz Off Playback...

Page 34: ...s Depending on the DVD you may be asked to change the parental level while playing the disc The rating levels are from 1 to 8 and are country dependent You can prohibit the playing of certain discs that are not suitable for your children or have certain discs played with alternative scenes A In Rating press to select Parental control then press B Use the alphanumeric keypad 0 9 to enter the four d...

Page 35: ...ot prohibit play of such discs Changing the Password You need to enter your four digit password to play a prohibited disc or if prompted for a password A In Rating press to select Set Password then press OK You will be prompted to enter your four digit password Enter Password B Use the alphanumeric keypad 0 9 to enter the four digit password then press OK When doing this for the first time enter t...

Page 36: ...s OK to confirm Example No The setting is selected and setup is complete E To exit press SETUP Restoring to the original settings Setting the Default function will reset all options and your personal settings to the factory defaults except your password for rating level A In Misc press to select Use Default Settings then press OK The menu will appear Use Default Settings NO YES Yes Select this to ...

Page 37: ...use captions hearing are impaired by showing the sound effects e g phone ringing and footsteps while subtitles do not Before you select this function ensure that the disc contains closed captions information and your TV set also has this function A In Misc press to select Closed Caption then press On Enable closed caption Off Disable closed caption B Use to select a setting and press OK to confirm...

Page 38: ...ed in the DVD player appears on the TV screen To download and install the latest software to the DVD player A Visit the Philips website www philips com support to check the availability of the latest software upgrade B Download the software to a CD R The menu appears Firmware Update Cancel Start Erase and Program C Press to select Start then press OK to confirm Firmware Update Programming please w...

Page 39: ...Stereo Dolby Surround compatible downmix from Dolby Digital multi channel sound AUDIO PERFORMANCE DA Converter 24 bit 192 kHz DVD fs 96 kHz 4Hz 44kHz fs 48 kHz 4Hz 22kHz SVCD fs 48 kHz 4Hz 22kHz fs 44 1kHz 4Hz 20kHz CD VCD fs 44 1kHz 4Hz 20kHz Signal Noise 1kHz 90 dB Dynamic range 1kHz 80 dB Crosstalk 1kHz 70 dB Distortion noise 1kHz 65 dB MPEG MP3 MPEG Audio L3 CONNECTIONS YPbPr Output Cinch 3x V...

Page 40: ...e DVD player You may go to Channel 1 on your TV then press the channel down button on your TV s remote control until you see the TV program Check the video connection between the DVD player and the TV The disc does not match with the TV color system standard PAL NTSC The disc is dirty clean the disc Sometimes a small amount of picture distortion may appear This is not a malfunction To deactivate p...

Page 41: ...ny scratches or smudges on the disc Press SETUP to turn off the setup menu screen You may need to enter the password in order to change the parental rating level or to unlock the disc for playback Moisture may have condensed inside the system Remove the disc and leave the system turned on for about an hour Disconnect the power cord from the power outlet for a few minutes Reconnect the power cord a...

Page 42: ...mpression system MP3 is the abbreviation of Motion Picture Experts Group 1 or MPEG 1 Audio Layer 3 By using MP3 format one CD R or CD RW can contain about 10 times as much data volume as a regular CD can Parental Control A function of the DVD to limit playback of the disc by the age of the users according to the limitation level in each country The limitation varies from disc to disc when it is ac...

Page 43: ...other information is not covered under this Limited Warranty This warranty does not apply a to damage caused by accident abuse misuse misapplication or non Magnavox product b to damage caused by service performed by anyone other than Magnavox or Magnavox Authorized Service Location c to a product or a part that has been modified without the written permission of Magnavox or d if any Magnavox seria...

Reviews: