background image

– 19 –

ES

Español

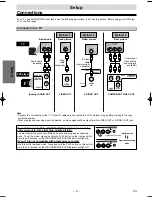
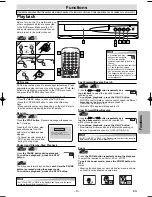
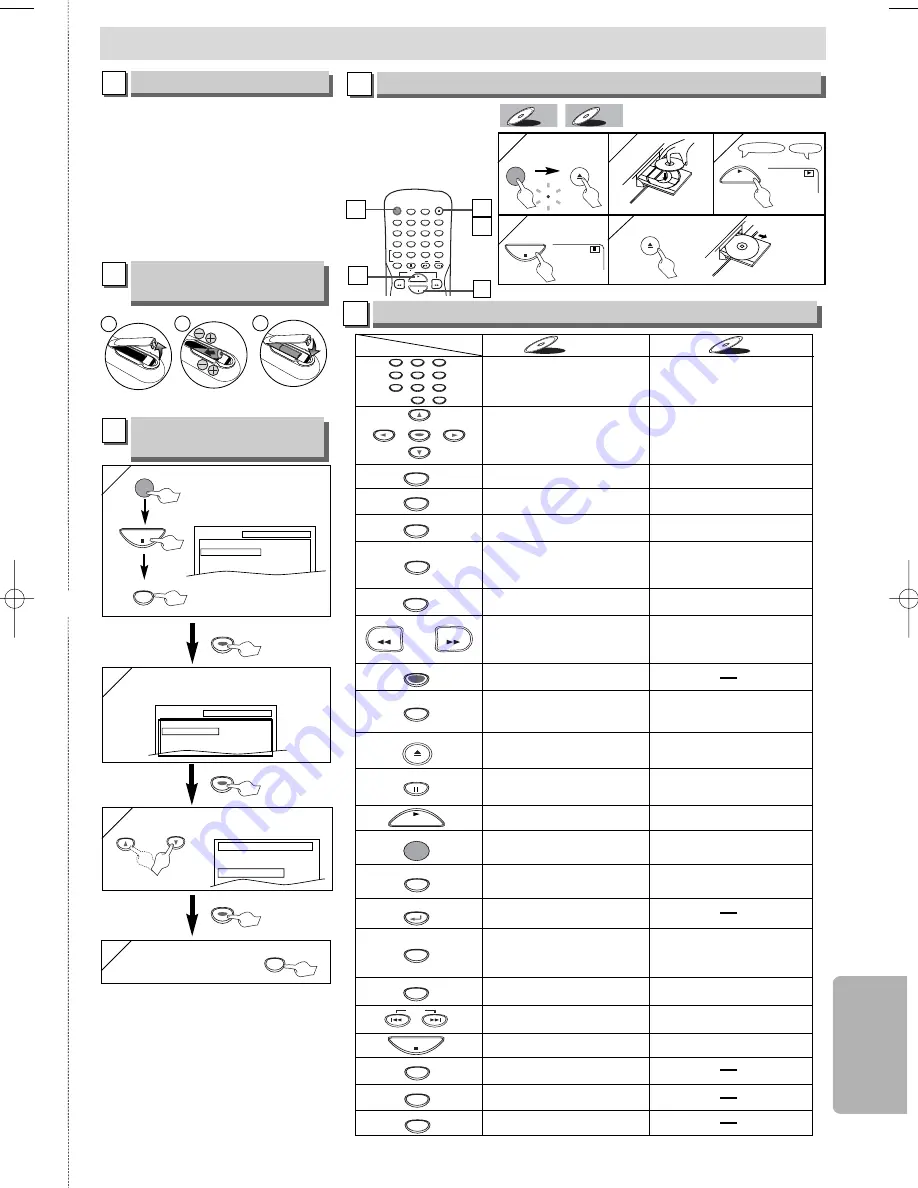
Si su televisor tiene tomas de
entrada AUDIO/VIDEO vea la
sección “Conexiones” en las
páginas 6-7. En caso contrario,
vea la sección “Antes de uti-
lizar su reproductor de DVD”
en la página del frente.

POWER

AUDIO

SUBTITLE

ANGLE

REPEAT

CLEAR

A-B

PAUSE

SLOW

SKIP

OPEN/CLOSE

DISPLAY

SEARCH

MODE

1

2

3

4

5

6

7

8

9

0

+10

PLAY

REV

FWD

STOP

Español

1

1

3

3

Pantalla de TV

Mando a distancia

PLAY

4

4

5

5

STOP

OPEN/CLOSE

POWER

OPEN/CLOSE

CD

CD

CD

DVD-V

DVD-V

POWER

Conexiones

4   

4   

Para salir del menú

3

3

SETUP

or

Seleccione el idioma deseado para

las indicaciones en la pantalla

PLAYER MENU

ENGLISH
FRANÇAIS
ESPAÑOL

1

Para cambiar el idioma
en la pantalla

3

Reproducción

4

2

2

Confirme que ha seleccionado “PLAY-
ER MENU”

SETUP

QUICK

PLAYER MENU
TV ASPECT
DOLBY DIGITAL

ENGLISH
4:3 LETTER BOX
ON

ENTER

ENTER

ENTER

ENTER

ENTER

ENTER

ENTER

ENTER

ENTER

1

1

4

4

3

3

5

5

Antes.

¡

Encienda el televisor, amplificador
y otros equipos conectados a esta
unidad. Asegúrese que el televisor
y el sintonizador de audio (de
venta en los comercios) están en
el canal correcto.

Para activar o desactivar la 
unidad.

Para activar o desactivar la 
unidad.

Para mostrar el modo de 
disco actual.

Para mostrar el modo de 
disco actual.

Para abrir o cerrar la bandeja 
del disco.

Para abrir o cerrar la bandeja 
del disco.

Para hacer una pausa en la 
reproducción del disco.

Para empezar la 
reproducción del disco.

Para empezar la 
reproducción del disco.

Para seleccionar 
directamente el capítulo o 
título.

Para seleccionar 
directamente la canción.

Para seleccionar los ángulos 
de cámara en un disco.

Para seleccionar subtítulos 
en un disco.

Para seleccionar idiomas de 
audio en un disco.

Para seleccionar ESTÉREO 
L-CH o R-CH.

Para repetir entre su punto A 
y B seleccionado.

Para repetir entre su punto A y B 
seleccionado.

Para reproducir 
repetidamente un capítulo o 
título.

Para reproducir repetidamente 
una canción o disco.

Para activar/desactivar el 
nivel del negro.

Para activar/desactivar el 
ambiental virtual.

Para disponer el orden de reproducción 
o la reproducción aleatoria.

Para activar/desactivar el ambiental 
virtual.

Para llamar el Menú en un 
disco.

Para llamar el menú inicial 
en un disco.

Para ampliar la imagen de 
vídeo en DVD.

Para volver a la operación 
anterior en el menú de 
ajustes de DVD.

Para buscar un capítulo, título 
o tiempo.

Para volver rápidamente a un 
lugar del disco.

Busque los marcadores.

Para buscar una canción.

Para buscar el tiempo.

Para volver aleatoriamente  
a un lugar del disco.

Busque los marcadores.

Para borrar los marcadores.

Para borrar los marcadores.

Para eliminar el N

°

 de estado en la 

entrada de programa.

Para borrar los números mal entrados.

Para borrar los números mal 
entrados.

Para buscar en avance/
retroceso por un disco.

Para empezar la reproducción 
en avance lento/retroceso 
durante el modo de pausa.

Para buscar en avance/
retroceso por un disco.

Para avanzar la reproducción un cuadro 
cada vez.

Para hacer una pausa en la reproducción.

• 

Para parar la reproducción.

• 

Para parar la reproducción.

• 

Para saltar capítulos.

• 

Para saltar canciones.

Para llamar el menú de 
ajustes de DVD.

Para llamar el menú de 
ajustes de DVD.

Para mover el cursor y 
determinar la posición.

Para mover el cursor y 
determinar la posición.

POWER

DISPLAY

MENU

TOP MENU

ZOOM

SUBTITLE

MODE

ANGLE

SEARCH

MODE

REPEAT

A-B

AUDIO

CLEAR

1

2

3

4

5

6

7

8

9

0

+10

PAUSE

PLAY

STOP

SETUP

DVD-V

DVD-V

CD

CD

Botón

(Orden alfabético)

Disco

ENTER

RETURN

REV

FWD

OPEN/CLOSE

SKIP

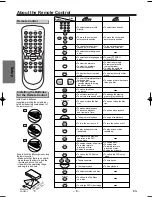
Mando a distancia

5

SETUP

QUICK
CUSTOM
INITIALIZE

SETUP

STOP

Confirme que ha selec-
cionado “QUICK”

Instalación de las pilas
en el mando a distancia

2

1

1

2

3

2

2

1

1

1

POWER

E5950UD_V3.qx33  05.4.19  5:25 PM  Page 19

Summary of Contents for MSD124

Page 1: ... To return the All Selections of SET UP except for PARENTAL to the Default Setting 16 Information Troubleshooting Guide 17 Specifications 18 Language List 18 Limited Warranty 18 Español 19 Quick Use Guide 20 Table of Contents Before Using Your DVD player If your TV has AUDIO VIDEO input jacks see the section Connections on pages 6 7 If not it is still possible to connect this DVD player to your TV...

Page 2: ...uipment does cause harmful interference to radio or television reception which can be determined by turning the equipment off and on the user is encouraged to try to correct the interference by one or more of the following measures 1 Reorient or relocate the receiving antenna 2 Increase the separation between the equipment and receiver 3 Connect the equipment into an outlet on a circuit different ...

Page 3: ...e of the polarized plug 13 Power Cord Protection Power supply cords should be routed so that they are not likely to be walked on or pinched by items placed upon or against them paying particular attention to cords at plugs convenience receptacles and the point where they exit from the product 14 Lightning For added protection for this product during a lightning storm or when it is left unattended ...

Page 4: ...ight Symbol Used in This Manual Manufactured under license from Dolby Laboratories Dolby and the double D symbol are trade marks of Dolby Laboratories SERVICING Please refer to relevant topics on the Troubleshooting Guide on page 17 before you return the product When this unit become inoperative do not try to cor rect the problem by yourself There are no user ser viceable parts inside Turn off unp...

Page 5: ...tandardized discs this unit may not play them back Even if they are played back the sound or video quality will be compromised DVD Video 1 2 4 6 1 2 3 4 5 6 1 2 3 4 5 6 4 6 4 5 6 or DVD R DVD RW DVD R DVD RW Audio CD CD R CD RW Digital video MPEG2 Digital audio Region code Mark logo Playable discs Recorded signals Disc size Disc types 12 cm or 8cm 12 cm or 8cm Example Title 1 Title 2 Chapter 1 Cha...

Page 6: ...e scanning mode is selected no video signal will be output from the VIDEO OUT or S VIDEO OUT jack DVD player Connection to a TV Connections If your TV has AUDIO VIDEO input jacks see the following instructions If not see the section Before using your DVD play er on the front page Setup If your TV is compatible with 525p 480p progressive scanning and you want to enjoy that high quality picture You ...

Page 7: ... to pages 14 15 The audio source on a disc in a Dolby Digital 5 1 channel surround format cannot be recorded as digital sound by an MD or DAT deck Unless connected to a Dolby Digital decoder set DOLBY DIGITAL to OFF for the AUDIO setting in the setup mode Playing a DVD using incorrect settings may generate noise distortion and may also damage the speakers Refer to pages 14 15 Set DOLBY DIGITAL to ...

Page 8: ...ly To clear the numbers entered incorrectly To search forward backward through a disc To begin slow forward reverse playback during the pause mode To search forward backward through a disc To advance playback one frame at a time To pause disc playback To pause disc playback To stop playback To stop playback To skip chapters To skip tracks To begin disc playback To begin disc playback To call up th...

Page 9: ...p the DVD menu Press the TOP MENU button to call up the title menu Note Menu operations may vary depending on the disc Refer to the manual accompanying the disc for details Resume Press the STOP button Resume message will appear on the TV screen Press the PLAY button play back will resume from the point at which playback was stopped To cancel resume press the STOP button one more time during the s...

Page 10: ... setting is active T Track repeat A All Tracks repeat A B A B repeat DISPLAY DISPLAY DISPLAY DISPLAY DISPLAY 11 16 0 00 00 0 03 30 1 3 0 00 00 1 23 45 T L1 DISPLAY BIT RATE The amount of audio and video data currently being read ALL Current track number Total tracks Elapsed time of the current chapter Remaining time of the current chapter Elapsed time of the current title Remaining time of the cur...

Page 11: ...or or press button repeatedly until this screen appears For single digit tracks 1 9 press a single number e g track 3 press 3 To play track 26 press 10 2 6 of the Number buttons Using the SEARCH Using the SEARCH MODE MODE button button 1 1 Track Search Using the number buttons Using the number buttons CD CD CD 1 1 2 2 Within 30 seconds 2 2 2 Title Chapter Search Using the SEARCH Using the SEARCH M...

Page 12: ...hen you follow the above steps Your programs are still stored until either the disc tray is open or power is turned off To repeat the current track in the program press the REPEAT but ton repeatedly until TRACK appears during playback To repeat the entire program press the REPEAT button repeatedly until ALL appears during playback You may determine the order in which tracks will play CD CD CD 1 1 ...

Page 13: ...DIO PLAY Each time you press the AUDIO button Stereo Sound mode Camera Angle This unit allows you to select a subtitle language if available during DVD playback DVD V DVD V 1 1 1 ENG 6 PLAY ENG FRE OFF English subtitles French subtitles no subtitles Each time you press the SUBTITLE button subtitle languages change For example Subtitle Language Some DVD discs may con tain scenes which have been sho...

Page 14: ...QUICK ENTER ENTER ENTER SETUP SETUP PARENTAL PASSWORD Please enter a 4 digit password SETUP AUDIO DRC DOWN SAMPLING DOLBY DIGITAL ON ON ON SETUP DISPLAY TV ASPECT STILL MODE ANGLE ICON AUTO POWER OFF 4 3 LETTER BOX AUTO ON ON SETUP LANGUAGE AUDIO SUBTITLE DISC MENU PLAYER MENU ORIGINAL OFF ENGLISH ENGLISH 2 2 Select the desired item 1 1 SETUP QUICK CUSTOM INITIALIZE SETUP STOP SETUP QUICK PLAYER M...

Page 15: ... ANGLE ICON ON AUTO POWER OFF ON TV ASPECT 4 3 LETTER BOX STILL MODE AUTO ANGLE ICON ON AUTO POWER OFF ON 4 3 LETTER BOX AUTO ON OFF TV ASPECT 4 3 LETTER BOX STILL MODE AUTO ANGLE ICON ON AUTO POWER OFF ON 4 3 LETTER BOX AUTO OFF ON Select the desired setting or ENTER ENTER ENTER STILL MODE Default AUTO See Hint to the right TV ASPECT 4 3 LETTER BOX STILL MODE AUTO ANGLE ICON ON AUTO POWER OFF ON ...

Page 16: ...s 8 DVD softwares of any grades adult general children can be played back Levels 7 to 2 Only DVD softwares intended for general use and chil dren can be played back Level 1 Only DVD softwares intended for children can be played back with those intended for adult and general use pro hibited or Select PARENTAL LEVEL Enter your desired four digit password except for 4737 D PARENTAL menu 1 2 3 4 5 6 7...

Page 17: ...te control directly at the sensor on the front of the player the remote control Reduce the distance to the player Replace the batteries in the remote control Re insert the batteries with their polarities signs as indicated Tune your radio to an empty AM station so that you hear a lot of noises Turn the volume up then if you hear some signal sound from the radio in response to your pressing buttons...

Page 18: ...manship as follows DURATION PARTS FUNAI CORP will provide parts to replace defective parts without charge for one 1 year from the date of original retail purchase Two 2 years for Picture Tube Certain parts are excluded from this warranty LABOR FUNAI CORP will provide the labor without charge for a peri od of ninety 90 days from the date of original retail pur chase LIMITS AND EXCLUSIONS THIS WARRA...

Page 19: ...etir entre su punto A y B seleccionado Para repetir entre su punto A y B seleccionado Para reproducir repetidamente un capítulo o título Para reproducir repetidamente una canción o disco Para activar desactivar el nivel del negro Para activar desactivar el ambiental virtual Para disponer el orden de reproducción o la reproducción aleatoria Para activar desactivar el ambiental virtual Para llamar e...

Page 20: ...o repeat between your chosen point A and B To play a chapter or title repeatedly To play a track or disc repeatedly To set black level on off To set virtual surround on off To arrange the playing order or play randomly To set virtual surround on off To call up the Menu on a disc To call up the Top Menu on a disc To enlarge DVD video image To return to the previous operation in the DVD setup menu T...

Reviews: