background image

– 4 –

EN

Precautions

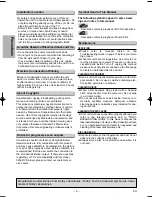
Unauthorized copying, broadcasting, public perfor-
mance and lending of discs are prohibited. 
This product incorporates copyright protection tech-
nology that is protected by method claims of certain
U.S. patents and other intellectual property rights
owned by Macrovision Corporation and other rights
owners. Use of this copyright protection technology
must be authorized by Macrovision Corporation, and
is intended for home and other limited viewing uses
only unless otherwise authorized by Macrovision
Corporation. Reverse engineering or disassembly is
prohibited.

The following symbols appear in some head-
ings and notes in this manual.

: Description refers to playback of DVD-Video discs.

: Description refers to playback of Audio CDs.

CD

CD

CD

DVD-V

DVD-V

For safety and optimum performance of this unit:
• Install the unit in a horizontal and stable position. Do

not place anything directly on top of the unit. Do not
place the unit directly on top of the TV.

• Shield it from direct sunlight and keep it away from

sources of intense heat. Avoid dusty or humid
places. Avoid places with insufficient ventilation for
proper heat dissipation. Do not block the ventilation
holes on the sides of the unit. Avoid locations sub-
ject to strong vibration or strong magnetic fields.

• Do not handle the power cord with wet hands.
• Do not pull on the power cord when disconnecting it

from AC wall outlet. Grasp it by the plug.

• If, by accident, water is spilled on this unit, unplug

the power cord immediately and take the unit to our
Authorized Service Center for servicing.

Moisture condensation may occur inside the unit
when it is moved from a cold place to a warm place,
or after heating a cold room or under conditions of
high humidity. Do not use this unit at least for 2 hours
until its inside gets dry.

Installation Location

About Copyright

Symbol Used in This Manual

Manufactured under license from Dolby Laboratories. “Dolby” and the double-D symbol are trade-
marks of Dolby Laboratories.

SERVICING

¡

Please refer to relevant topics on the
Troubleshooting Guide on page 17 before you return
the product. 

¡

When this unit become inoperative, do not try to cor-
rect the problem by yourself. There are no user-ser-
viceable parts inside. Turn off, unplug this unit and
please call our help line mentioned on the front page
to locate an Authorized Service Center.

CLEANING THE CABINET

¡

Use a soft cloth slightly moistened with a mild deter-
gent solution. Do not use a solution containing alco-
hol, spirits, ammonia or abrasive.

CLEANING DISCS

¡

When a disc becomes dirty, clean it with a cleaning
cloth. Wipe the disc from the center out. Do not wipe
in a circular motion.

¡

Do not use solvents such as benzine, thinner, com-
mercially available cleaners, detergent, abrasive
cleaning agents or antistatic spray intended for ana-
logue records.

CLEANING THE DISC LENS

¡

If this unit still does not perform properly although you
refer to the relevant sections and to “TROU-
BLESHOOTING GUIDE” in this Owner’s Manual, the
laser optical pickup unit may be dirty. Consult your deal-
er or an Authorized Service Center for inspection and
cleaning of the laser optical pickup unit.

DISC HANDLING

¡

Handle the discs so that fingerprints and dust do not
adhere to the surfaces of the discs.

¡

Always store a disc in its protective case when it is
not used.

Maintenance

Moisture Condensation Warning

Avoid the Hazards of Electrical Shock and Fire

Notice for progressive scan outputs

Consumers should note that not all high definition
television sets are fully compatible with this product
and may cause artifacts to be displayed in the picture.
In case of 525 progressive scan picture problems, it is
recommended that the user switch the connection to
the ‘standard definition’ output.  If there are questions
regarding our TV set compatibility with this model
525p DVD player, please contact our customer ser-
vice center.

E5950UD_V3.qx33  05.4.19  5:24 PM  Page 4

Summary of Contents for MSD124

Page 1: ... To return the All Selections of SET UP except for PARENTAL to the Default Setting 16 Information Troubleshooting Guide 17 Specifications 18 Language List 18 Limited Warranty 18 Español 19 Quick Use Guide 20 Table of Contents Before Using Your DVD player If your TV has AUDIO VIDEO input jacks see the section Connections on pages 6 7 If not it is still possible to connect this DVD player to your TV...

Page 2: ...uipment does cause harmful interference to radio or television reception which can be determined by turning the equipment off and on the user is encouraged to try to correct the interference by one or more of the following measures 1 Reorient or relocate the receiving antenna 2 Increase the separation between the equipment and receiver 3 Connect the equipment into an outlet on a circuit different ...

Page 3: ...e of the polarized plug 13 Power Cord Protection Power supply cords should be routed so that they are not likely to be walked on or pinched by items placed upon or against them paying particular attention to cords at plugs convenience receptacles and the point where they exit from the product 14 Lightning For added protection for this product during a lightning storm or when it is left unattended ...

Page 4: ...ight Symbol Used in This Manual Manufactured under license from Dolby Laboratories Dolby and the double D symbol are trade marks of Dolby Laboratories SERVICING Please refer to relevant topics on the Troubleshooting Guide on page 17 before you return the product When this unit become inoperative do not try to cor rect the problem by yourself There are no user ser viceable parts inside Turn off unp...

Page 5: ...tandardized discs this unit may not play them back Even if they are played back the sound or video quality will be compromised DVD Video 1 2 4 6 1 2 3 4 5 6 1 2 3 4 5 6 4 6 4 5 6 or DVD R DVD RW DVD R DVD RW Audio CD CD R CD RW Digital video MPEG2 Digital audio Region code Mark logo Playable discs Recorded signals Disc size Disc types 12 cm or 8cm 12 cm or 8cm Example Title 1 Title 2 Chapter 1 Cha...

Page 6: ...e scanning mode is selected no video signal will be output from the VIDEO OUT or S VIDEO OUT jack DVD player Connection to a TV Connections If your TV has AUDIO VIDEO input jacks see the following instructions If not see the section Before using your DVD play er on the front page Setup If your TV is compatible with 525p 480p progressive scanning and you want to enjoy that high quality picture You ...

Page 7: ... to pages 14 15 The audio source on a disc in a Dolby Digital 5 1 channel surround format cannot be recorded as digital sound by an MD or DAT deck Unless connected to a Dolby Digital decoder set DOLBY DIGITAL to OFF for the AUDIO setting in the setup mode Playing a DVD using incorrect settings may generate noise distortion and may also damage the speakers Refer to pages 14 15 Set DOLBY DIGITAL to ...

Page 8: ...ly To clear the numbers entered incorrectly To search forward backward through a disc To begin slow forward reverse playback during the pause mode To search forward backward through a disc To advance playback one frame at a time To pause disc playback To pause disc playback To stop playback To stop playback To skip chapters To skip tracks To begin disc playback To begin disc playback To call up th...

Page 9: ...p the DVD menu Press the TOP MENU button to call up the title menu Note Menu operations may vary depending on the disc Refer to the manual accompanying the disc for details Resume Press the STOP button Resume message will appear on the TV screen Press the PLAY button play back will resume from the point at which playback was stopped To cancel resume press the STOP button one more time during the s...

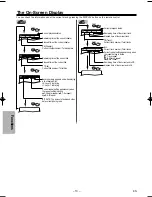
Page 10: ... setting is active T Track repeat A All Tracks repeat A B A B repeat DISPLAY DISPLAY DISPLAY DISPLAY DISPLAY 11 16 0 00 00 0 03 30 1 3 0 00 00 1 23 45 T L1 DISPLAY BIT RATE The amount of audio and video data currently being read ALL Current track number Total tracks Elapsed time of the current chapter Remaining time of the current chapter Elapsed time of the current title Remaining time of the cur...

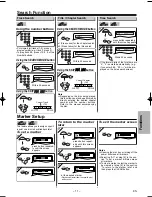
Page 11: ...or or press button repeatedly until this screen appears For single digit tracks 1 9 press a single number e g track 3 press 3 To play track 26 press 10 2 6 of the Number buttons Using the SEARCH Using the SEARCH MODE MODE button button 1 1 Track Search Using the number buttons Using the number buttons CD CD CD 1 1 2 2 Within 30 seconds 2 2 2 Title Chapter Search Using the SEARCH Using the SEARCH M...

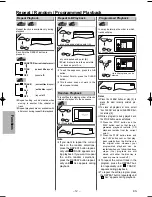
Page 12: ...hen you follow the above steps Your programs are still stored until either the disc tray is open or power is turned off To repeat the current track in the program press the REPEAT but ton repeatedly until TRACK appears during playback To repeat the entire program press the REPEAT button repeatedly until ALL appears during playback You may determine the order in which tracks will play CD CD CD 1 1 ...

Page 13: ...DIO PLAY Each time you press the AUDIO button Stereo Sound mode Camera Angle This unit allows you to select a subtitle language if available during DVD playback DVD V DVD V 1 1 1 ENG 6 PLAY ENG FRE OFF English subtitles French subtitles no subtitles Each time you press the SUBTITLE button subtitle languages change For example Subtitle Language Some DVD discs may con tain scenes which have been sho...

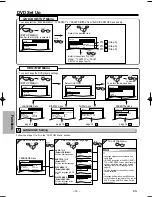
Page 14: ...QUICK ENTER ENTER ENTER SETUP SETUP PARENTAL PASSWORD Please enter a 4 digit password SETUP AUDIO DRC DOWN SAMPLING DOLBY DIGITAL ON ON ON SETUP DISPLAY TV ASPECT STILL MODE ANGLE ICON AUTO POWER OFF 4 3 LETTER BOX AUTO ON ON SETUP LANGUAGE AUDIO SUBTITLE DISC MENU PLAYER MENU ORIGINAL OFF ENGLISH ENGLISH 2 2 Select the desired item 1 1 SETUP QUICK CUSTOM INITIALIZE SETUP STOP SETUP QUICK PLAYER M...

Page 15: ... ANGLE ICON ON AUTO POWER OFF ON TV ASPECT 4 3 LETTER BOX STILL MODE AUTO ANGLE ICON ON AUTO POWER OFF ON 4 3 LETTER BOX AUTO ON OFF TV ASPECT 4 3 LETTER BOX STILL MODE AUTO ANGLE ICON ON AUTO POWER OFF ON 4 3 LETTER BOX AUTO OFF ON Select the desired setting or ENTER ENTER ENTER STILL MODE Default AUTO See Hint to the right TV ASPECT 4 3 LETTER BOX STILL MODE AUTO ANGLE ICON ON AUTO POWER OFF ON ...

Page 16: ...s 8 DVD softwares of any grades adult general children can be played back Levels 7 to 2 Only DVD softwares intended for general use and chil dren can be played back Level 1 Only DVD softwares intended for children can be played back with those intended for adult and general use pro hibited or Select PARENTAL LEVEL Enter your desired four digit password except for 4737 D PARENTAL menu 1 2 3 4 5 6 7...

Page 17: ...te control directly at the sensor on the front of the player the remote control Reduce the distance to the player Replace the batteries in the remote control Re insert the batteries with their polarities signs as indicated Tune your radio to an empty AM station so that you hear a lot of noises Turn the volume up then if you hear some signal sound from the radio in response to your pressing buttons...

Page 18: ...manship as follows DURATION PARTS FUNAI CORP will provide parts to replace defective parts without charge for one 1 year from the date of original retail purchase Two 2 years for Picture Tube Certain parts are excluded from this warranty LABOR FUNAI CORP will provide the labor without charge for a peri od of ninety 90 days from the date of original retail pur chase LIMITS AND EXCLUSIONS THIS WARRA...

Page 19: ...etir entre su punto A y B seleccionado Para repetir entre su punto A y B seleccionado Para reproducir repetidamente un capítulo o título Para reproducir repetidamente una canción o disco Para activar desactivar el nivel del negro Para activar desactivar el ambiental virtual Para disponer el orden de reproducción o la reproducción aleatoria Para activar desactivar el ambiental virtual Para llamar e...

Page 20: ...o repeat between your chosen point A and B To play a chapter or title repeatedly To play a track or disc repeatedly To set black level on off To set virtual surround on off To arrange the playing order or play randomly To set virtual surround on off To call up the Menu on a disc To call up the Top Menu on a disc To enlarge DVD video image To return to the previous operation in the DVD setup menu T...

Reviews: