background image

EN

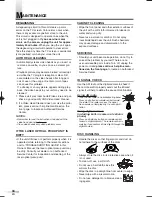
DISC HANDLING

• Handle the discs so that fingerprints and dust do

not adhere to the surfaces of the discs.

• Always store the disc in its protective case when it

is not used.

• To clean-off, use a soft cloth.

• Do not use a hard cloth since this

will mar the disc.

• Wipe the disc in a straight line from center to edge.

• Never wipe with a circular motion.

• Do not use detergent or abrasive clean-

ing agents.

34

M

AINTENANCE

DEGAUSSING

A degaussing circuit in this unit clears up color
errors on the TV screen. Color errors occur when
there is any excess magnetism close to the unit.
This circuit is designed to operate once when the
unit is first plugged in.

If you see minor color

errors on the screen, unplug the unit for approx-
imately 30 minutes.

When you plug the unit again,

the degaussing circuit will operate to clear errors.
Take this step any time the TV screen is accidental-
ly magnetized or when you move the unit.

AUTO HEAD CLEANING

• Automatically cleans video heads as you insert or

remove a cassette, so you can see a clearer pic-
ture.

• Playback picture may become blurred or interrupt-

ed while the TV program reception is clear. Dirt
accumulated on the video heads after long peri-
ods of use or the usage of rental or worn tapes
can cause this problem.
If a streaky or snowy picture appears during play-
back, the video heads in your unit may need to be
cleaned.

1. Please visit your local Audio/Video store and pur-

chase a good quality VHS Video Head Cleaner.

2. If a Video Head Cleaner does not solve the prob-

lem, please call our help line mentioned on the
front page, to locate an Authorized Service
Center.

NOTES:

• Remember to read the instructions included with the

video head cleaner before use.

• Clean video heads only when problems occur.

IF THE LASER OPTICAL PICKUP UNIT IS

DIRTY

• If the unit still does not perform properly when it is

operated, while referring to the relevant sections
and to “TROUBLESHOOTING GUIDE” in this
Owner’s Manual, the laser optical pickup unit may
be dirty. Consult your dealer or an Authorized
Service Center for inspection and cleaning of the
laser optical pickup unit.

CABINET CLEANING

• Wipe the front panel and other exterior surfaces of

the unit with a soft cloth immersed in lukewarm
water and wrung dry.

• Never use a solvent or alcohol. Do not spray

insecticide liquid near the unit. Such chemicals
may cause damage and discoloration to the
exposed surfaces.

SERVICING

• Should your unit become inoperative, do not try to

correct the problem by yourself. There are no
user-serviceable parts inside. Turn off, unplug the
power cord and 

please call our help line men-

tioned on the front page,

to locate an Authorized

Service Center.

IR SIGNAL CHECK

Use the AM radio or the digital camera to check if
the remote control properly sends out the infrared
signal. It will help to define the cause of malfunction.

Using AM radio

• Tune the AM radio to no broadcasting band.

Press any button on remote control toward
the radio. If the radio receives the signal
from remote control properly, the sound will
flutter.

Using digital camera
(including built-in camera of cellular
phone)

• Press and hold any button on remote control

toward a digital camera. The remote control is
working if you confirm infrared light through the
digital camera.

T2223UD_EN.QX4  06.2.28  7:04 PM  Page 34

Summary of Contents for MSD724 G

Page 1: ...Programming Timer Recording 1 year 8 events programmable Daily Weekly recording One Touch Recording Auto Clock Setting Screen Saver Auto Power On and Off Parental Lock Resume Play DVD Closed Caption D...

Page 2: ...s proper ventilation is provided or the manufacturer s instructions have been adhered to 10 Power Sources This unit should be operated only from the type of power source indicated on the marking label...

Page 3: ...utions may result in fire electric shock injury to persons or other haz ards 21 Safety Check Upon completion of any service or repairs to this unit ask the service technician to perform routine safety...

Page 4: ...disc loading tray Do not place anything directly on top of the unit MOISTURE WARNING Moisture condensation may occur inside the unit when it is moved from a cold place to a warm place or after heatin...

Page 5: ...1 AUTO REWIND EJECT 21 COPYING A VIDEO CASSETTE from another source 21 DVD SECTION ABOUT THE DISCS 22 PLAYABLE DISCS 22 UNPLAYABLE DISCS 22 PLAYING A DISC 23 BASIC PLAYBACK 23 DISC MENU TITLE MENU 23...

Page 6: ...era use the AUDIO VIDEO input jacks on the front of the unit Connect the Audio Video output jacks of another source to the AUDIO L R and VIDEO jacks of this unit Then use SELECT or CH K K L L until AU...

Page 7: ...t To connect to a MD or DAT deck set DOLBY DIGITAL to PCM for the audio output in the setup mode and to con nect to a Dolby Digital decoder set to BITSTREAM Refer to AUDIO SETTING on page 30 Playing a...

Page 8: ...L Buttons TV VCR P 9 37 VOL X Y Buttons TV VCR P 9 38 MUTE Button TV VCR P 9 39 SET UP Button TV VCR P 10 DVD P 29 40 FWD D Button TV VCR P 15 DVD P 23 SKIP G Button DVD P 26 41 STOP C Button TV VCR...

Page 9: ...pressing STANDBY ON y y after a desired time 1 Press PICTURE SLEEP to display the Sleep Timer menu 2 Within 5 seconds set your desired sleep time using s B B Increase by 30 min Up to 120 min s Decrea...

Page 10: ...the menu NOTE Once the unit is turned off it will periodically check and set the correct date and time AUTO CLOCK CH SEARCH 08 10 13 _ _ TV VCR SETUP TIMER PROGRAMMING B SETTING CLOCK CHANNEL SET UP...

Page 11: ...L THE CLOSED CAPTION SYSTEM 1 Press SET UP Use K K L L to point to CAPTION 2 Press ENTER repeatedly to select OFF 3 Press SET UP to exit the menu 11 EN TV VCR SETUP TIMER PROGRAMMING B SETTING CLOCK C...

Page 12: ...TV PG TV 14 TV MA D Suggestive Dialog TV PG TV 14 only L Coarse Language S Sexual Situation V Violence Selection Rating Category Explanations TV Y Appropriate for all children TV Y7 Appropriate for ch...

Page 13: ...buttons 4 Press ENTER repeatedly The channel number changes to red deleted or blue added every time you press the button To delete another channel repeat steps 3 to 4 5 Press SET UP to exit the menu N...

Page 14: ...are shown below 1 VCR status Displays the current VCR motion PLAY STOP REC OTR PAUSE FF REW 2 VCR sound mode status during playback Displays HIFI when the tape is recorded in Hi Fi stereo mode 3 Tape...

Page 15: ...Even in the DVD mode you can start the VCR play back if you press PLAY B B on the front panel of the TV VCR side 4 To stop the playback press STOP C C 5 To rewind the tape press REWE To forward the t...

Page 16: ...ng will not change even if you turn off the unit SEARCH FUNCTION ZERO RETURN TV VCR TV VCR This function allows you to search easily a beginning point that you want to review by rewinding or fast forw...

Page 17: ...e tape should be greater than 1 minute for SP recording 2 minutes for LP recording and 3 min utes for SLP recording In some cases the index mark at the beginning of video tape cannot be detected Examp...

Page 18: ...the unit is connected to a cable box or satellite box the unit must be on CH3 or CH4 Select the channel to be recorded on the cable box or satellite box 2 Press SPEED to select the desired tape speed...

Page 19: ...B For weekly recording To record the same channel at the same time every week Press L L until EVRY and your desired day of the week Ex Every Monday appear then press B B TIMER PROGRAMMING CH DATE BEGI...

Page 20: ...then press ENTER 3 Press REC and use K K L L to select the desired program 4 Press REC repeatedly until your desired begin end time appears Each press will shift forward the begin end time for recordi...

Page 21: ...it and a source for playing device as shown the following diagram WARNING Unauthorized recordings of copyrighted video tapes may be an infringement of copyright laws 1 Insert a pre recorded video cass...

Page 22: ...the recording status of a disc the disc may not be played back at all or normally the picture or sound may not be smooth etc 9 If there is too much recording space left on a disc the used portion is l...

Page 23: ...TITLE The DVD main menu the title menu will appear You can call up the menu even during playback 2 Use K K L L s s B B to select an item and press ENTER NOTES If disc menu is available on the disc aud...

Page 24: ...AUDIO STREAM 8 ANGLE 1 ANGLE 8 OFF SUBTITLE STREAM 1 SUBTITLE STREAM 32 OFF ON OFF 1 2 CHAPTER SEARCH TITLE SEARCH TIME SEARCH MARKER SEARCH OFF CHAPTER TITLE OFF A A B OFF ZOOM 1 1 3 ZOOM 2 2 0 ZOOM...

Page 25: ...ears on the TV screen it means this function is not available on the disc 3 Press RETURN to exit the menu STEREO SOUND MODE You can select sound output mode 1 Press MODE during playback 2 Use K K L L...

Page 26: ...from a specific point on a disc TRACK SEARCH 1 During playback press MODE repeatedly until SEARCH menu appears 2 Within 60 seconds use the Number buttons to select the desired track number Playback wi...

Page 27: ...04 23 TOTAL REPEAT PLAYBACK REPEAT TRACK 1 During playback press MODE repeatedly until REPEAT menu appears 2 Use K K L L to select your desired repeat mode OFF Repeat function off TRACK Current track...

Page 28: ...LAY again to show current Title The elapsed and remaining playing time of the current title will be displayed 3 Press DISPLAY again The bit rate and the current repeat setting will be displayed If you...

Page 29: ...AUDIO p30 PARENTAL p30 OTHERS p31 CUSTOM QUICK INITIALIZE Press SET UP twice LANGUAGE SETTING 4 Use K K L L to select the desired item then press ENTER AUDIO Sets the audio language SUBTITLE Sets the...

Page 30: ...ack of DVD discs 4 Use K K L L to select an item then press ENTER repeated ly until your desired setting appears DRC Dynamic Range Control ON To compress the range of soft to loud sound default OFF Ou...

Page 31: ...with parental lock Be sure to check if the parental lock function operates in the way that you have set PASSWORD CHANGE 4 Enter current password with the Number buttons then press ENTER 5 Use K K L L...

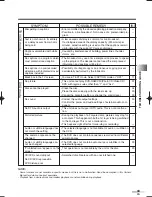
Page 32: ...3m within 15 Check if antenna or cable is connected properly Check for the broken pin or wire of antenna cable Check for source of reception disturbance Press SELECT to select the correct mode Perform...

Page 33: ...mation and captions will be lost Possibility of a illegal copy or an erroneous copying process accidentally performed by the fabricator You are in TEXT mode Select CAPTION mode or OFF This unit cannot...

Page 34: ...our help line mentioned on the front page to locate an Authorized Service Center NOTES Remember to read the instructions included with the video head cleaner before use Clean video heads only when pr...

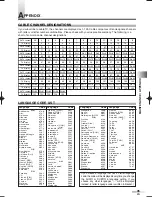
Page 35: ...Greenlandic 5758 Guarani 5360 Gujarati 5367 Hausa 5447 Hebrew 5569 Hindi 5455 Hungarian HUN 5467 I K Icelandic ICE 5565 Indonesian 5560 Interlingua 5547 Interlingue 5551 Inupiak 5557 Irish IRI 5347 I...

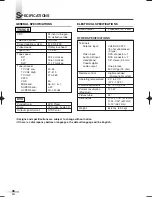
Page 36: ...ound output 2 speakers 1W 8 ohm OTHER SPECIFICATIONS Terminals Antenna input VHF UHF CATV 75 ohm unbalanced F type Video input RCA connector 1 Audio L R input RCA connector 2 Headphone 1 8 stereo 3 5...

Page 37: ...a antena en la toma ANT de la unidad compruebe que la patilla no est doblada Si est doblada enderece la patilla como se indica en la ilustraci n y enchufe la patilla a la toma ANT de la unidad Debe se...

Page 38: ...onecte a un amplificador equipado con tomas de entrada digital tales como una platina MD o DAT Para reproducir un disco DVD en un formato ambiental multicanal Dolby Digital en esta unidad con ctela a...

Page 39: ...s dos d gitos TV VCR PREP COMO PROGRAMAR B AJUSTE RELOJ AJUSTE DE CANAL AJUSTE DE USER AJUSTE DE V CHIP LANGUAGE ENGLISH CAPTION OFF ZERO RETURN TIME SEARCH INDEX SEARCH 5 40 PM Ajuste correctamente e...

Page 40: ...CHIP B IDIOMA ESPA OL T TULO OFF ZERO RETURN TIME SEARCH INDEX SEARCH EJEMPLO Es necesario preseleccionar el canal al principio o en caso de haber movido el televisor a una zona distinta AUTOPROGRAMA...

Page 41: ...g eta de protecci n contra borrado la unidad cambiar en el modo VCR y empezar la reproducci n autom ticamente 3 Para iniciar la reproducci n presione PLAY B B NOTA Incluso en el modo DVD puede iniciar...

Page 42: ...K K L L para seleccionar COMO PROGRAMAR y presione ENTER 3 Confirme los detalles de los programas que aparecen en la pantalla del televisor 4 Presione SET UP para salir del men TV VCR PREP B COMO PRO...

Page 43: ...principal men de t tulo del DVD Puede activar el men incluso durante la reproducci n 2 Utilice K K L L s s B B para seleccionar un elemento y presione ENTER NOTAS SI el disco tiene un men de disco apa...

Page 44: ...acts of God THIS WARRANTY DOES NOT COVER PACKING MATERIALS ANY ACCESSORIES EXCEPT REMOTE CONTROL ANY COSMETIC PARTS COMPLETE ASSEMBLY PARTS DEMO OR FLOOR MODELS FUNAI CORP AND ITS REPRESENTATIVES OR...

Reviews: