background image

1-11-9

H9801BLVD

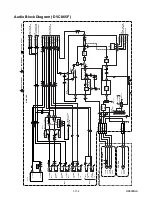
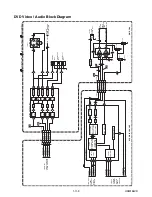
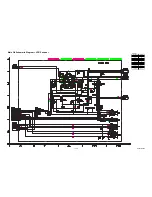
DVD Video / Audio Block Diagram

IC601

(A

UDIO D

A

C)

15

14

16

DIGIT

AL

A

UDIO OUT

JK1202

B

UFFER

Q1351

IC1201

Q1201

Q1202

+5V

(AMP)

CN601

CN1601

13

13

D

V

D-A

UDIO(L)

15

15

D

V

D-A

UDIO(R)

14

14

DVD-A

UDIO(R)-MUTE

7

6

8

4

3

2

5

T

O

 D

VD 

SYSTEM

CONTR

OL 

/SER

V

O

BLOCK

DIA

GRAM

T

O

 DIGIT

AL

SIGNAL

PR

OCESS

BLOCK

DIA

GRAM

SERIAL

POR

T

SERIAL

CONTR

OL

4X/8X

O

VERSAMPLING

DIGIT

AL FIL

TER

/FUNCTION

CONTR

OLLER

ENPHANCED

MUL

TI-LEVEL

DEL

T

A-SIGMA

MODULA

T

O

R

DA

C

LPF+AMP

L-CH

R-CH

LPF+AMP

DA

C

ZER

O DETECT

SYSTEM CLOCK

1

2

6

7

5

D

VD-A

UDIO(L)

D

VD-A

UDIO(R)

PCM-BCK

SPDIF

PCM-DATA

PCM-LRCLK

ADAC-MD

ADAC-MC

ADAC-ML

PCM-SCLK

MAIN CB

A

D

VD MAIN CB

A UNIT

D

VD A

UDIO SIGNAL

D

A

T

A(A

UDIO) SIGNAL

18

18

SPDIF

AUDIO-MUTE

+3.3V

Q1204

WF9

3

WF7

WF8

CN601

88

VIDEO-Y(I/P)

10

10

VIDEO-C

66

VIDEO-Pb/Cb

44

VIDEO-Pr/Cr

VIDEO-Y(I/P)

VIDEO-C

VIDEO-Pb/Cb

VIDEO-Pr/Cr

JK1401

S-VIDEO OUT

CN1601

3

4

2

1

IC1402

(VIDEO DRIVER)

13

4dB

AMP

2dB

AMP

LPF

DRIVER

YC

14

2dB

AMP

DRIVER

4dB

AMP

2dB

AMP

LPF

DRIVER

11

4dB

AMP

2dB

AMP

LPF

DRIVER

6

10

4dB

AMP

2dB

AMP

LPF

DRIVER

8

VIDEO-Pb/Cb

OUT

VIDEO-Y

OUT

VIDEO-Pr/Cr

OUT

JK1403

3

1

15

T

O

 DIGIT

AL

SIGNAL PR

OCESS

BLOCK DIA

GRAM

D

VD VIDEO 

SIGNAL

WF4

WF5

TO

AU

D

IO

BLOCK

DIA

GRAM

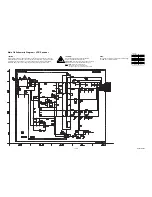
<VCR 

SECTION>

D

V

D-VIDEO

T

O

 VIDEO

BLOCK DIA

GRAM

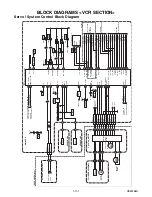
<VCR SECTION>

Summary of Contents for sylvania DVC840F

Page 1: ...r Servicing I Adjustment Procedures I Schematic Diagrams I CBA s I Exploded Views I Parts List When servicing the deck mechanism refer to MK14 Deck Mechanism Section Deck Mechanism Part No N2440FL N2460FL DVD PLAYER VIDEO CASSETTE RECORDER DVC840F MWD2205 DVC865F ...

Page 2: ...mproper service methods may damage the equipment It also is important to understand that these CAUTIONS and NOTICES ARE NOT EXHAUSTIVE Funai could not possibly know evaluate and advice the service trade of all conceivable ways in which service might be done or of the possible hazardous consequences of each way Consequently Funai has not undertaken any such broad evaluation Accordingly a servicer w...

Page 3: ... Player VCR 1 8 1 Firmware Renewal Mode 1 9 1 Function Indicator Symbols 1 10 1 Block Diagrams 1 11 1 Schematic Diagrams CBA s and Test Points 1 12 1 Waveforms 1 13 1 Wiring Diagram VCR Section 1 14 1 Wiring Diagram DVD Section 1 14 2 System Control Timing Charts 1 15 1 IC Pin Function Descriptions 1 16 1 Lead Identifications 1 17 1 Exploded Views 1 18 1 Mechanical Parts List 1 19 1 Electrical Par...

Page 4: ...urst 1 4 Video Color S N AM R P dB 35 41 SP Mode 1 5 Video Color S N PM R P dB 33 36 SP Mode 1 6 Resolution PB Line 230 245 SP Mode 2 Servo 2 1 Jitter Low µsec 0 07 0 12 SP Mode 2 2 Wow Flutter 0 3 0 5 SP Mode 3 Normal Audio 3 1 Output PB dBV 9 6 3 SP Mode 3 2 Output R P dBV 9 6 1 5 SP Mode 3 3 S N R P dB 36 41 SP Mode 3 4 Distortion R P 1 0 4 0 SP Mode 3 5 Freq resp R P at 200 Hz dB 11 4 SP Mode ...

Page 5: ... 100 kΩ 4 Ambient Temperature 25 C Item Conditions Unit Nominal Limit 1 Video Output 75 Ω load Vpp 1 0 0 1 2 Coaxial Digital Out 75 Ω load mVpp 500 50 3 Audio PCM 3 1 Output Level 1 kHz 0 dB Vrms 2 0 3 2 S N dB 100 3 3 Freq Response DVD fs 48 kHz 0 5 dB Hz 20 22 k CD fs 44 1 kHz 0 5 dB Hz 20 20 k 3 4 THD N DVD 1 kHz 0 dB 0 01 CD 1 kHz 0 dB 0 01 ...

Page 6: ... when the diode is turned on Do not look directly at the laser beam CAUTION Use of controls and adjustments or doing procedures other than those specified herein may result in hazardous radiation exposure Location Top of DVD mechanism Do not look directly at the laser beam coming from the pickup or allow it to strike against your skin Drive Mecha Assembly Laser Beam Radiation Laser Pickup Turntabl...

Page 7: ... especially 1 Wires covered with PVC tubing 2 Double insulated wires 3 High voltage leads D Use specified insulating materials for hazardous live parts Note especially 1 Insulation tape 2 PVC tubing 3 Spacers 4 Insulators for transistors E When replacing AC primary side components transformers power cord etc wrap ends of wires securely about the terminals before soldering F Observe that the wires ...

Page 8: ...ongs and externally exposed accessible parts RF terminals antenna terminals video and audio input and output terminals microphone jacks earphone jacks etc is lower than or equal to the specified value in the table below Measuring Method Power ON Insert load Z between B earth ground power cord plug prongs and exposed accessible parts Use an AC voltmeter to measure across the terminals of load Z See...

Page 9: ...machine then apply hot air to the Flat Pack IC about 5 to 6 seconds Fig S 1 1 2 Remove the flat pack IC with tweezers while applying the hot air 3 Bottom of the flat pack IC is fixed with glue to the CBA when removing entire flat pack IC first apply soldering iron to center of the flat pack IC and heat up Then remove glue will be melted Fig S 1 6 4 Release the flat pack IC from the CBA using tweez...

Page 10: ... by one using a sharp pin or wire to which solder will not adhere iron wire When heating the pins use a fine tip soldering iron or a hot air desoldering machine Fig S 1 4 3 Bottom of the flat pack IC is fixed with glue to the CBA when removing entire flat pack IC first apply soldering iron to center of the flat pack IC and heat up Then remove glue will be melted Fig S 1 6 4 Release the flat pack I...

Page 11: ...rs Fig S 1 6 Note When using a soldering iron care must be taken to ensure that the flat pack IC is not being held by glue When the flat pack IC is removed from the CBA handle it gently because it may be damaged if force is applied 2 Installation 1 Using desoldering braid remove the solder from the foil of each pin of the flat pack IC on the CBA so you can install a replacement flat pack IC more e...

Page 12: ...ed to remove any static electricity that may be charged on the body 2 Ground for Workbench Be sure to place a conductive sheet or copper plate with proper grounding 1 MΩ on the workbench or other surface where the semi conductors are to be placed Because the static electricity charge on clothing will not escape through the body grounding band be careful to avoid contacting semi conductors with you...

Page 13: ...into the Deck Mechanism Assembly and press the PLAY button The tape will be loaded into the Deck Mechanism Assembly Make sure the power is on connect TP502 S INH to GND This will stop the function of Tape Start Sensor Tape End Sensor and Reel Sensors If these TPs are connected before plugging in the unit the function of the sensors will stay valid See Fig 1 Note Because the Tape End Sensors are in...

Page 14: ...king or repair work To avoid damage of pickup follow next procedures 1 Disconnect Connector CN301 Remove a Screw S 6 and lift the DVD Main CBA Unit Fig D4 2 Short the three short lands of FPC cable with solder before removing the FFC cable CN201 from it If you disconnect the FFC cable CN201 the laser diode of pickup will be destroyed Fig D4 3 CAUTION 3 When reassembling confirm the FFC cable CN201...

Page 15: ... pin of LD SW the shaft of Cam Gear with the hole of LD SW as shown in Fig D6 S 1 1 Top Case Fig D1 L 1 L 2 L 1 2 Front Assembly Fig D2 S 2 S 2 3 Top Bracket Fig D3 CN401 CN601 S 3 S 3 S 3 S 4 S 5 5 Partition Plate 6 Loader Holder 4 DVD Mecha Assembly CN201 CN301 S 6 7 DVD Main CBA Unit DVD Mecha A S 6 Fig D4 View for A Short the three short lands by soldering Either of two places Connector ...

Page 16: ...1 6 3 H9801DC Fig D5 S 7 S 7 S 7 S 8 8 VCR Chassis Unit ...

Page 17: ...ue stripe From FE Head BOTTOM VIEW Lead connections of Deck Assembly and Main CBA Desolder From Capstan Motor Assembly Printing side Desolder From Cylinder Assembly From ACE Head Assembly Lead with blue stripe Lead with blue stripe Desolder Lead with red stripe 11 Main CBA SW512 LD SW LD SW Pin Hole Hole Shaft Cam Gear 11 Main CBA 9 Deck Assembly Pin ...

Page 18: ...op Bracket 2 Remove four Screws S 3 in Fig D3 Do not disconnect connectors 3 While lifting up the DVD Mecha rotate the roulette in the direction of the arrow as shown below 4 Pull the tray slowly with a hand View for A Rotate this roulette in the direction of the arrow A DVD Mecha ...

Page 19: ...0 001 50 V Div F Range DC AC 20 MHz 2 Alignment Tape FL8A Head Switching Position Adjustment Purpose To determine the Head Switching position during playback Symptom of Misadjustment May cause Head Switching noise or vertical jitter in the picture Note TP751 V OUT TP302 RF SW VR501 Switching Point Main CBA Reference Notes Playback the Alignment tape and adjust VR501 so that the V sync front edge o...

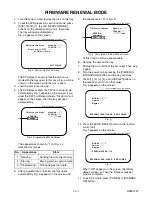
Page 20: ... appears on the screen 2 Press CLEAR C RESET button on the remote control unit Fig b appears on the screen When OK appears on the screen the factory default will be set Then the firmware renewal mode is complete 3 To exit this mode press POWER or STANDBY ON button MODEL Version Region EXIT POWER EEPROM CLEAR CLEAR Fig a differ depending on the models MODEL Version Region EEPROM CLEAR OK EXIT POWER...

Page 21: ...n the power on by pressing the POWER or STANDBY ON button and the tray will close 9 Press 1 2 3 4 and DISPLAY buttons on the remote control unit in that order Fig g appears on the screen 10 Press CLEAR C RESET button on the remote control unit Fig h appears on the screen When OK appears on the screen the factory default will be set Then the firmware renewal mode is complete 11 To exit this mode pr...

Page 22: ...ing mechanism is not functioning correctly When the drum is not working properly Cause Indicator Active When reel or capstan mechanism is not functioning correctly EJECT A R is displayed on a TV screen Refer to Fig 1 When tape loading mechanism is not functioning correctly EJECT A T is displayed on a TV screen Refer to Fig 2 When cassette loading mechanism is not functioning correctly EJECT A C is...

Page 23: ... YCA SDA 15 YCA CS 16 YCA SCL YCA SDA YCA CS SW511 REC SW TO VIDEO BLOCK DIAGRAM TO AUDIO BLOCK DIAGRAM TO Hi Fi AUDIO BLOCK DIAGRAM CLOCK DATA TU701 TUNER UNIT 11 12 VCR TV 5 DVD H IND 71 TIMER IND 75 REC IND 72 D567 DVD D566 VCR D571 POWER D564 TIMER D565 REC AL 5V Q563 Q565 Q566 Q567 LD SW 68 AL 12V 1 AL 5V DVD L IND 70 AL 5V SW512 AL 12V AL 18V P ON 5V LD SW AL 5V D555 S LED TO POWER SUPPLY BL...

Page 24: ... Y C MIX CCD 1H DELAY R P YNR COMB FILTER CHROMINANCE SIGNAL PROCESS IC301 VIDEO SIGNAL PROCESS HEAD AMP 26 57 32 30 QV QH 6dB AMP TO SERVO SYSTEM CONTROL BLOCK DIAGRAM TO SERVO SYSTEM CONTROL BLOCK DIAGRAM CYLINDER ASSEMBLY RF SW RF SW 59 V ENV H A SW H A COMP H A COMP TP302 VIDEO L 2 HEAD VIDEO R 2 HEAD TP301 C PB D V SYNC C SYNC D V SYNC 25 53 24 YCA SCL 14 36 37 39 34 Q301 BUFFER 28 58 60 SP E...

Page 25: ...1 FE H 2 FE H GND CN501 MAIN CBA PB AUDIO SIGNAL REC AUDIO SIGNAL Mode SP REC 58 55 53 54 D REC H AUDIO MUTE H TO SERVO SYSTEM CONTROL BLOCK DIAGRAM FULL ERASE HEAD YCA CS YCA SCL YCA SDA IC301 JK752 AUDIO IN JK755 AUDIO IN TO DVD VIDEO AUDIO BLOCK DIAGRAM DVD SECTION FRONT REAR IC751 OUTPUT SELECT DVD AUDIO L DVD AUDIO R 3 2 4 5 TP753 Q763 A OUT R BUFFER Q762 BUFFER TP754 A OUT L SW CTL DVD VCR D...

Page 26: ...AUDIO MUTE H TO SERVO SYSTEM CONTROL BLOCK DIAGRAM FULL ERASE HEAD YCA CS YCA SCL YCA SDA IC301 SIF MOD AUDIO AUDIO R IN F AUDIO L IN F AUDIO L IN AUDIO R IN AUDIO R OUT AUDIO L OUT N A OUT N A IN JK752 AUDIO R IN AUDIO L IN JK754 AUDIO L IN JK755 AUDIO R IN TO Hi Fi AUDIO BLOCK DIAGRAM TO Hi Fi AUDIO BLOCK DIAGRAM TO DVD VIDEO AUDIO BLOCK DIAGRAM DVD SECTION FRONT REAR IC751 OUTPUT SELECT DVD AUD...

Page 27: ... 27 SIF AUDIO R IN AUDIO L IN N A OUT AUDIO R IN F AUDIO L IN F DVD AUDIO L DVD AUDIO R LIM 49 MUTE AUDIO L OUT MOD AUDIO AUDIO R OUT N A IN Hi Fi H SW AUDIO MUTE H NORMAL L 40 ST SAP MODE TO AUDIO BLOCK DIAGRAM IIC BUS SDA IIC BUS SCL P ON 9V TO SERVO SYSTEM CONTROL BLOCK DIAGRAM MAIN CBA Hi Fi AUDIO R 7 Hi Fi COM 8 Hi Fi AUDIO L 9 CN253 IC451 MTS SAP Hi Fi AUDIO PROCESS Hi Fi HEAD AMP REC AUDIO ...

Page 28: ...IAGRAM P ON L P DOWN L Q057 HOT COLD A V F CAUTION Fixed voltage or Auto voltage selectable power supply circuit is used in this unit If Main Fuse F1001 is blown check to see that all components in the power supply circuit are not defective before you connect the AC plug to the AC power supply Otherwise it may cause some components in the power supply circuit to fail NOTE The voltage for parts in ...

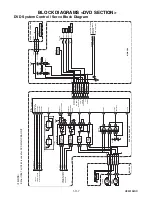
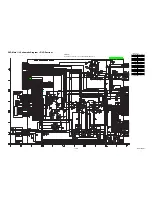
Page 29: ...A UNIT DRIVE CBA IC301 SERVO DRIVE CN301 M SLED MOTOR M SPINDLE MOTOR IC101 MICRO CONTROLLER SLED MOTOR DRIVE FOCUS ACTUATOR DRIVE SPINDLE MOTOR DRIVE TRACKING ACTUATOR DRIVE 147 TRAY IN SLD 75 SPDL 76 TRACKING DRIVE 148 FOCUS DRIVE 66 TO DIGITAL SIGNAL PROCESS BLOCK DIAGRAM FS FS TS TS TO DVD VIDEO AUDIO BLOCK DIAGRAM 57 ADAC MD 56 ADAC MC ADAC MC PCM SCLK 88 AUDIO MUTE ADAC MD AUDIO MUTE 163 PCM...

Page 30: ... WATCH DOG TIMER CPU I F TIMER DECODER I F CPU I F READ MEMORY DATA RAM DSP DECODER I O PROCESSOR INST ROM DATA RAM INST ROM SERIAL D A GENERAL I O INTERRUPT CONTROLLER TIMER WATCH DOG TIMER REMOTE CONTROL 32BIT CPU STREAM I F EXTERNAL MEMORY I F SDRAM ECC UMAC 114 115 116 117 132 131 134 133 129 130 126 124 125 123 83 DEBUG BCU INST RAM DATA RAM D A D A D A TO DVD VIDEO AUDIO BLOCK DIAGRAM 149 15...

Page 31: ... DVD AUDIO R PCM BCK SPDIF PCM DATA PCM LRCLK ADAC MD ADAC MC ADAC ML PCM SCLK MAIN CBA DVD MAIN CBA UNIT DVD AUDIO SIGNAL DATA AUDIO SIGNAL 18 18 SPDIF AUDIO MUTE 3 3V Q1204 W F 9 3 W F 7 W F 8 CN601 8 8 VIDEO Y I P 10 10 VIDEO C 6 6 VIDEO Pb Cb 4 4 VIDEO Pr Cr VIDEO Y I P VIDEO C VIDEO Pb Cb VIDEO Pr Cr JK1401 S VIDEO OUT CN1601 3 4 2 1 IC1402 VIDEO DRIVER 13 4dB AMP 2dB AMP LPF DRIVER Y C 14 2d...

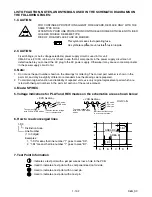
Page 32: ...k in the schematic diagram and the parts list Before replacing any of these components read the parts list in this manual carefully The use of substitute replacement parts that do not have the same safety characteristics as specified in the parts list may create shock fire or other hazards Notes 1 Do not use the part number shown on these drawings for ordering The correct part number is shown in t...

Page 33: ...of repaired units use only original replacement parts which are listed with their part numbers in the parts list section of the service manual 4 Mode SP REC 5 Voltage indications for PLAY and REC modes on the schematics are as shown below 6 How to read converged lines 7 Test Point Information A V F This symbol means fast operating fuse Ce symbole represente un fusible a fusion rapide 2 3 1 5 0 2 5...

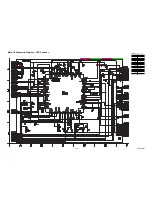
Page 34: ... 1 8 Schematic Diagram VCR Section H9801SCM1 MAIN 1 8 Ref No Position IC501 C 3 Q501 D 1 Q506 A 2 CN501 A 4 CN502 F 4 CN504 A 4 VR501 B 4 TP505 B 2 TP513 B 4 IC CONNECTORS TEST POINTS VARIABLE RESISTOR TRANSISTORS ...

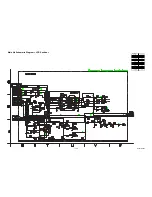
Page 35: ...1 12 4 Main 2 8 Sensor Schematic Diagram VCR Section H9801SCM2 MAIN 2 8 Ref No Position Q563 H 3 Q565 H 3 Q566 H 2 Q567 I 2 TP502 I 4 TP506 K 1 TP507 K 1 TEST POINTS TRANSISTORS ...

Page 36: ...in 3 8 Schematic Diagram VCR Section H9801SCM3 MAIN 3 8 Ref No Position IC301 O 2 Q301 Q 3 Q302 Q 4 Q303 Q 4 Q421 N 1 Q422 N 1 Q425 N 1 Q426 N 1 CN253 M 4 TP301 P 1 TP302 O 4 CONNECTOR TEST POINTS IC TRANSISTORS ...

Page 37: ...1 12 6 Main 4 8 Schematic Diagram VCR Section H9801SCM4 MAIN 4 8 Ref No Position IC1201 T 1 IC1402 U 3 Q1201 U 1 Q1202 U 1 Q1204 U 1 Q1351 V 1 Q1385 S 2 CN1601 S 3 CONNECTOR TRANSISTORS ICS ...

Page 38: ...1 12 7 Main 5 8 Schematic Diagram VCR Section H9801SCM5 MAIN 5 8 Ref No Position IC751 Z 3 Q391 AA 3 Q762 Z 2 Q763 Z 2 TP751 AA 2 TP753 AA 2 TP754 AA 2 IC TRANSISTORS TEST POINTS ...

Page 39: ...tic Diagram VCR Section H9801SCM6 MAIN 6 8 Ref No Position IC1002 AD 4 IC1004 AD 3 Q052 AG 4 Q055 AF 3 Q056 AG 3 Q057 AE 3 Q1004 AE 2 Q1005 AF 2 Q1006 AG 2 Q1011 AD 2 Q2002 AF 1 Q2013 AD 1 CN1001 AC 3 CN2003 AG 1 CONNECTORS TRANSISTORS ICS ...

Page 40: ...nents in the power supply circuit to fail NOTE The voltage for parts in hot circuit is measured using hot GND as a common terminal Ce symbole reprèsente un fusible à fusion rapide CAUTION For continued protection against fire hazard replace only with the same type fuse ATTENTION Pour une protection continue les risqes d Incele n utiliser que des fusible de même type Risk of fire replace fuse as ma...

Page 41: ...1 12 10 H9802SCM8 Main 8 8 Schematic Diagram VCR Section DVC865F ...

Page 42: ...ram DVD Section DVD MAIN 1 3 Ref No Position IC201 C 1 IC202 D 4 IC301 D 3 IC461 F 1 IC462 E 1 Q251 C 2 Q252 B 2 Q253 C 2 Q254 B 2 CN201 A 3 CN301 A 1 CN401 F 3 TRANSISTORS CONNECTORS ICS 1 NOTE Either IC461 or IC462 is used for DVD MAIN CBA UNIT ...

Page 43: ...1 12 12 H9801SCD2 DVD Main 2 3 Schematic Diagram DVD Section DVD MAIN 2 3 Ref No Position IC101 H 4 CN702 G 2 IC CONNECTOR ...

Page 44: ...Y STOP PIN NO PLAY STOP PIN NO PLAY STOP PIN NO PLAY STOP 129 2 3 2 3 161 3 4 3 4 193 225 3 4 3 4 130 2 3 2 3 162 0 0 194 226 131 2 3 2 3 163 1 8 1 8 195 227 132 2 4 2 3 164 0 0 196 3 4 3 4 228 133 2 4 2 4 165 1 7 1 8 197 229 0 0 134 2 4 2 4 166 1 7 1 7 198 230 135 2 3 2 3 167 3 4 3 4 199 231 3 4 3 4 136 2 3 2 3 168 0 0 200 232 1 3 1 6 137 2 3 2 3 169 1 8 1 8 201 0 0 233 138 2 3 2 3 170 1 7 1 7 20...

Page 45: ...1 12 14 H9801SCD3 DVD Main 3 3 Schematic Diagram DVD Section DVD MAIN 3 3 Ref No Position IC103 N 3 IC501 O 4 IC502 Q 4 IC601 P 1 CN601 R 1 ICS CONNECTOR ...

Page 46: ...t is measured using hot GND as a common terminal Ce symbole reprèsente un fusible à fusion rapide CAUTION For continued protection against fire hazard replace only with the same type fuse ATTENTION Pour une protection continue les risqes d Incele n utiliser que des fusible de même type Risk of fire replace fuse as marked This symbol means fast operating fuse A V F Because a hot chassis ground is p...

Page 47: ...ction continue les risqes d Incele n utiliser que des fusible de même type Risk of fire replace fuse as marked This symbol means fast operating fuse A V F Because a hot chassis ground is present in the power supply circut an isolation transformer must be used Also in order to have the ability to increase the input slowly when troubleshooting this type power supply circuit a variable isolation tran...

Page 48: ...1V 0 5ms 0 5ms WF8 AUDIO R AUDIO R 1V 1V WF9 SPDIF SPDIF 1V 1V 0 1 0 1µs s Pin 8 of CN1601 Pin 10 of CN1601 Pin 13 of CN1601 Pin 15 of CN1601 Pin 18 of CN1601 0 5ms 0 5ms V OUT E E V OUT E E 0 2V 0 2V 20 20µs V OUT V OUT 10V 10V 50 50µs C PB C PB RF SW RF SW 0 2V 0 2V 5m 5ms RF SW RF SW 0 5V 0 5V 10V 10V NOTE Input VCR COLOR BAR SIGNAL WITH 1KHz AUDIO SIGNAL WF1 WF3 WF10 WF15 DVD POWER ON STOP MOD...

Page 49: ...1 of TU701 Pin 6 of TU701 Pin 18 of TU701 NOTE Input VCR COLOR BAR SIGNAL WITH 1KHz AUDIO SIGNAL WF1 WF3 WF10 WF15 DVD POWER ON STOP MODE WF4 WF6 CD 1kHz PLAY WF7 WF9 MOD A 0 5V 0 2ms MOD V 0 5V 20µs PLL CLK 2V 2ms PLL DATA 2V 2ms TU AUDIO 0 5V 0 2ms TU VIDEO 0 2V 20µs H9801WF 1 13 2 ...

Page 50: ...I P SW NU 2 3 7 8 9 10 11 12 CN1601 DVD AUDIO R MUTE DVD AUDIO L AUDIO 5V DVD AUDIO R AUDIO 5V SPDIF 13 14 15 16 17 18 REMOTE 21 22 DVD POWER 23 DVD PLAY DVD OPEN CLOSE 24 25 DVD STOP 26 CAPSTAN MOTOR FULL ERASE HEAD FE HEAD VIDEO R 1 HEAD VIDEO L 1 HEAD FRONT VIDEO L 2 HEAD VIDEO R 2 HEAD Hi Fi AUDIO R HEAD Hi Fi AUDIO L HEAD MAIN CBA DECK ASSEMBLY SENSOR CBA DVD OPEN CLOSE CBA SENSOR CBA TO WIRI...

Page 51: ... 20 21 REMOTE 22 23 DVD POWER 24 DVD PLAY DVD OPEN CLOSE 25 26 DVD STOP 27 CN401 PICK UP UNIT CN201 1 2 3 4 5 6 7 8 9 10 11 12 13 14 15 16 17 18 19 20 TS TS FS CD LD FS GND DVD PD GND CD PD PD MONI DVD LD VREF E GND B DVD P ON 5V CD DVD D A C F GND LD DETECTOR FS TS 7 9 11 2 3 6 5 4 GND VODEO Pr Cr GND VIDEO Pb Cb VIDEO Y I P GND VIDEO C GND GND 4 5 6 I P SW NU 2 3 7 8 9 10 11 12 CN601 DVD AUDIO R...

Page 52: ...00 V 5 00 V CL 0 00 V 0 25 V 0 00 V SB 1 06 V 1 50 V 1 21 V TL 0 66 V 1 05 V 0 91 V FB 1 99 V 2 60 V 2 17 V SF 1 51 V 1 98 V 1 80 V SM 3 20 V 3 75 V 3 40 V AU 0 26 V 0 65 V 0 44 V AL 4 51 V 5 00 V 5 00 V SS 2 61 V 3 19 V 2 97 V RS Note Symbol Loading Status EJ Eject CL Eject REW Reel SB REW Reel Stop B TL Stop B Brake Cancel FB Brake Cancel FF REW SF FF REW Stop M FF REW SM Stop M FF REW Stop A AU...

Page 53: ...de Fig 1 18 RF SW F AD Internal Signal C DRIVE PB CTL 27 C F R 79 H A SW 78 C ROTA The first rise of RF SW after a rise in F AD signal Acceleration Detection T1 AT H Z H L L Stop detection T2 ST Slow Tracking Value BL Reversal Limit Value STILL FRAME ADVANCE STILL 20ms ...

Page 54: ...D Internal Signal C DRIVE PB CTL 27 C F R 79 H A SW 78 C ROTA H Z H L L STILL STILL AT ST BL Stop detection T2 Acceleration Detection T1 Slow Tracking Value Reversal Limit Value FRAME ADVANCE The first rise of RF SW after a rise in F AD signal 20ms ...

Page 55: ... REV LD REV LD REV 0 2S 0 5S PIN NO CL EJ SS SS AU AU TL LD SW CL SS LM FWD M REV C DRIVE Z ON ON C F R DRUM ROTATION P ON L A MUTE H D REC H D PB PAUSE SLOW AU AL AL AU SF SM EJ AU RS SF SM TL FB AL SB 68 21 27 22 7 24 VCR TV 77 POWER OFF STOP PLAY RS FS STILL SLOW PLAY STOP PLAY DISPLAY 0 1S SB TL SB FB SM SM SF AL AL RS AU AL SS AU AL SM 0 8S 0 2S 0 3S 1 0S 0 2S 1 5S 2H 2 5S 4H 0 5S 0 2S 0 8S 2...

Page 56: ... EJECT STOP A LD REV FF LD REV LD REV LD FWD LD FWD LD FWD LD FWD LD FWD LD FWD LD FWD REC PAUSE REC REC REW LD REV LD REV LD REV LD REV LD REV LD REV LD REV PAUSE REC or PAUSE STOP EJECT STOP EJECT STOP EJECT 2 STOP A FF STOP A REW STOP A REC PAUSE PAUSE or REC STOP A EJECT STOP FF STOP REW STOP REC REC REC PAUSE STOP TL TL SM SM SF SF AL AL SM AL AL AL AU AU SM TL SB EJ RS RS SM SM SF FB SM AU A...

Page 57: ... Section Tray IN TL221 Sled Drive TP303 Disc Drive TP301 Focus Drive TP304 Tracking Drive TP302 0V 3 3V 0V 1 65V 0V 0V 0V 1 65V 1 65V 1 65V Tray Close Play Play Tray Open Tray Close Disc Rotation Play Disc Stop Tray Open ...

Page 58: ...ck H L 15 OUT YCA SDA YCA IC Control Data H L 16 OUT YCA CS YCA IC Control Chip Select H L 17 N U Not Used 18 OUT RF SW Video Head Switching Pulse H L 19 OUT D V SYNC Dummy V sync Output H Hi z 20 IN RESET System Reset Signal Reset L L 21 OUT LM FWD REV Loading Motor FWD REV Output H Z L 22 OUT P ON L Power On Signal to Low L 23 N U Not Used 24 OUT D REC H Delayed Record Signal H 25 A B N U Not Us...

Page 59: ...udio Mode Input HiFi L Normal H A D Pin No Mark IN OUT Signal Name Function Active Level 60 IN DVD POW MONITOR DVD Power Monitor Signal P off L P on H H L 61 A B N U Not Used C IN ST SAP IN Tuner Stereo Sap Detector Signal Input A D 62 IN END S Tape End Position Detect Signal A D 63 IN AFC Automatic Frequency Control Signal A D 64 IN V ENV VideoEnvelope Comparator Signal A D 65 IN PG DELAY Video H...

Page 60: ... Analog Digital Converter 77 OUT VCR TV IND RF Conv ON OFF Signal TV L VCR H H L 78 OUT C ROTA Color Phase Rotary Changeover Signal H L 79 OUT H A SW Video Head Amp Switching Pulse H L 80 IN H A COMP Head Amp Comparator Signal H L Pin No Mark IN OUT Signal Name Function Active Level ...

Page 61: ...VREF 2 GND 3 VC 4 VIN 5 VOUT BA5888FP E2 LA72670BM MPB E MN101D08DEK Note A Anode K Cathode E Emitter C Collector B Base R Reference S Source G Gate D Drain KRA103M KRC103M KTA1266 GR KTA1267 Y KTC3193 Y KTC3199 Y BL 2SC1815 GR TPE2 KTC3198 Y KTC3203 Y EL817A PT204 6B 12 KIA4558P CD4053BNSR RN1511 TE85R 16 9 8 1 MM1637XVBE G D S 2SK3757 Q ...

Page 62: ...CBA A4 A5 AC1001 2B11 2B15 2B15 RM2001 DVD Open Close CBA W002 W011 2L091 2L054 A10 A14 2L012 2L082 B Main CBA 2B15 2L021 2L062 A B A F1001 W004 A C W006 B 2B15 2B16 Comparison Chart of Models and Marks Model Mark DVC840F MWD2205 DVC865F A B C A1X A8 A9 A18 A C A3 See Electrical Parts List for parts with this mark Some Ref Numbers are not in sequence 2B15 B A23 These FFC cables are included in 1B2...

Page 63: ...1 18 2 H9801PEX Packing S2 S2 S2 S2 S1 Unit A14 S3 X1 X4 X20 X5 X2 X3 ...

Page 64: ...15 A23 B LABEL EAS L0951UB 1B1 A B DECK ASSEMBLY CZD014 VM2440 N2440FL 1B1 C DECK ASSEMBLY CZD014 VM2460 N2460FL 1B2 DVD MECHA E6160 FG LESS N79F0JVM N79F0JVM 2B2 TOP BRACKET H9600UD 0VM204470 2B3 RODER HOLDER H9600UD 0VM306676 2B16 TAPE HIMELON H9206JD 0VM413956 2B40 PARTITION PLATE H9600UD 0VM306677 2L011 P TIGHT SCREW 3X8 BIND GBMP3080 2L012 SCREW S TIGHT M3X6 BIND HEAD GBMS3060 2L021 SCREW P T...

Page 65: ...ECTROLYTIC CAP 22µF 6 3V M H7 CE0KMAVSL220 C319 CHIP CERAMIC CAP B K 0 01µF 50V CHD1JKB0B103 C320 CHIP CERAMIC CAP B K 0 01µF 50V CHD1JKB0B103 C321 C CHIP CERAMIC CAP B K 0 01µF 50V CHD1JKB0B103 C322 C CHIP CERAMIC CAP CH J 68pF 50V CHD1JJBCH680 C324 CHIP CERAMIC CAP B K 0 01µF 50V CHD1JKB0B103 C327 ELECTROLYTIC CAP 47µF 6 3V M H7 CE0KMAVSL470 C328 ELECTROLYTIC CAP 1µF 50V M H7 CE1JMAVSL1R0 C329 C...

Page 66: ...IC CAP B K 1000pF 50V CHD1JKB0B102 C537 CHIP CERAMIC CAP B K 1000pF 50V CHD1JKB0B102 C540 CHIP CERAMIC CAP B K 0 01µF 50V CHD1JKB0B103 Ref No Mark Description Part No C541 CHIP CERAMIC CAP F Z 0 1µF 50V CHD1JZB0F104 C544 ELECTROLYTIC CAP 100µF 6 3V H7 CE0KMAVSL101 C560 A B CHIP CERAMIC CAP CH J 100pF 50V CHD1JJBCH101 C701 C ELECTROLYTIC CAP 0 47µF 50V M CE1JMASDLR47 C703 ELECTROLYTIC CAP 100µF 6 3...

Page 67: ...ITCHING DIODE 1N4148M NDTZ01N4148M D1031 PCB JUMPER D0 6 P5 0 JW5 0T D1036 RECTIFIER DIODE 1N4005 NDQZ001N4005 D1037 RECTIFIER DIODE 1N4005 NDQZ001N4005 D1038 RECTIFIER DIODE 1N4005 NDQZ001N4005 D1058 RECTIFIER DIODE 1N4005 NDQZ001N4005 Ref No Mark Description Part No D1301 ZENER DIODE DZ 5 6BSBT265 NDTB0DZ5R6BS D2001 LED GREEN 204 10GD S957 NPQZ10GDS957 D2002 LED GREEN 204 10GD S957 NPQZ10GDS957 ...

Page 68: ...1 4W J 560 Ω RCX4JATZ0561 R395 PCB JUMPER D0 6 P5 0 JW5 0T R397 CHIP RES 1608 1 10W J 100 Ω RRXAJB5Z0101 R401 A B CHIP RES 1608 1 10W J 27k Ω RRXAJB5Z0273 R401 C CHIP RES 1608 1 10W J 6 8k Ω RRXAJB5Z0682 R402 A B CHIP RES 1608 1 10W J 4 7k Ω RRXAJB5Z0472 R402 C CHIP RES 1608 1 10W J 8 2k Ω RRXAJB5Z0822 R403 A B CHIP RES 1608 1 10W J 27k Ω RRXAJB5Z0273 R404 A B CHIP RES 1608 1 10W J 4 7k Ω RRXAJB5Z...

Page 69: ...k Ω RRXAJB5Z0104 R784 A B CHIP RES 1608 1 10W J 4 7k Ω RRXAJB5Z0472 Ref No Mark Description Part No R786 A B CHIP RES 1608 1 10W J 100k Ω RRXAJB5Z0104 R787 A B CHIP RES 1608 1 10W J 4 7k Ω RRXAJB5Z0472 R1004 METAL OXIDE FILM RES 2W J 82k Ω RN02JZLZ0823 R1005 CARBON RES 1 4W J 1M Ω RCX4JATZ0105 R1006 CARBON RES 1 4W J 1M Ω RCX4JATZ0105 R1008 CARBON RES 1 6W G 1k Ω RCX6GATZ0102 R1010 CARBON RES 1 6W...

Page 70: ...ORD PB8B2F9110A 05A WAC0172LW013 AC1001 C AC CORD PB8B2F9110A 05A WAC0172LW013 F1001 A B FUSE SIC 1A 250V U C T PAGG20CW3102 F1001 C FUSE SIC 1A 250V U C T PAGG20CW3102 FH1001 FUSE HOLDER MSF 015 XH01Z00LY001 FH1002 FUSE HOLDER MSF 015 XH01Z00LY001 JC01 CHIP CERAMIC CAP CH J 100pF 50V CHD1JJBCH101 JC05 CHIP RES 1608 1 10W 0 Ω RRXAZB5Z0000 JC06 CHIP RES 1608 1 10W 0 Ω RRXAZB5Z0000 JC08 CHIP RES 160...

Page 71: ...DVC840F MWD2205 DVC865F H9801UD H98K0UD H9802UD 2005 01 28 ...

Reviews: