


BB
ss
TIME SEARCH
2 : 5 0
TIME SEARCH
– : – –
BB
INDEX SEARCH
0 3
INDEX SEARCH
– –
– 11 –
EN
VCR Functions
Hint
Hint
• When a tape without record tab is inserted, the unit will start playback automatically.
• Tracking will be automatically adjusted upon playback. To adjust the tracking manually, press
[SKIP/CH.
G
G
/
K
K H
H
/
L
L
]
(or
[CHANNEL
K
K
/
L
L
]
).
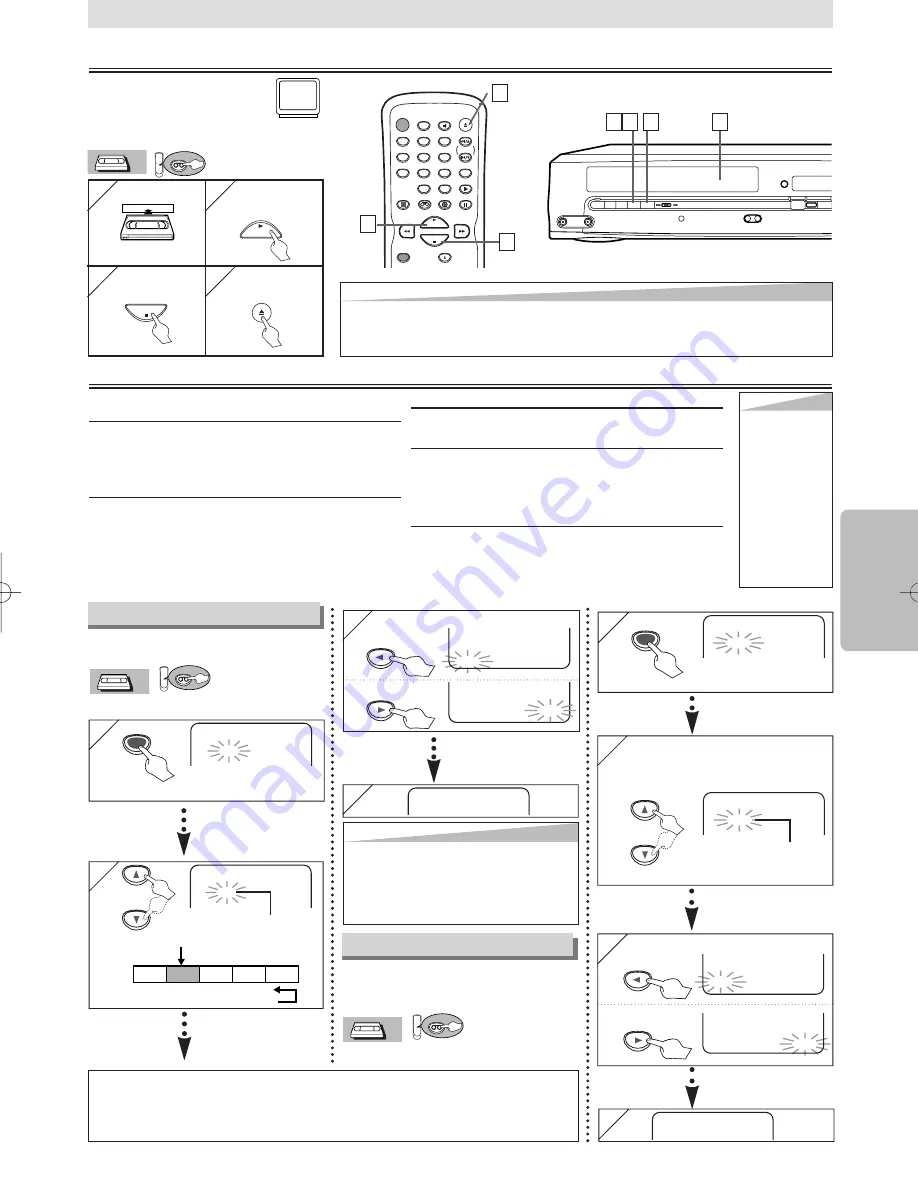
Playback
STANDBY-ON
DISPLAY
VCR
DVD
PAUSE
SLOW
VCR/TV
SKIP/CH.
PLAY
STOP
RECORD
MENU
ENTER
OPEN/CLOSE
/EJECT
SPEED
AUDIO
1
2
3
4
5
6
7
8
9
0
+10
Before:
Turn on the TV and set it to
channel 3.
• If channel 3 is already occupied for broad-
casting, see “RF Output Channel” section.
1
1
2
2
3
3
4
4
4
4
PLAY
STOP
OPEN/CLOSE
/EJECT
3
3
2
2
Other Operations
Hint
Hint
• Still/Slow mode
will be automati-
cally cancelled
after 5 minutes
to prevent dam-
age to the tape
and the video
head.
• To return to
playback from
the Picture
Search/Still/
Slow mode, hit
[PLAY
B
B
]
.
VCR Functions
VCR
VCR
VCR
A
H
Y
X
y
AUDIO
VIDEO
REW
F.FWD
STOP/EJECT
RECORD
IR
REC
TIMER
B
C
C
A
D
E
CHANNEL
OPEN/
CLOSE
SOURCE
X
Y
VCR
DVD
DISC
PREV
STANDBY-ON
PLAY
STOP
1
1
4
4
After searching,
PLAY
B
3
3
To rewind
To fast forward
You can skip the program backward
and forward by the Index Mark.
• Insert a tape into this unit.
VCR
VCR
VCR
1
1
Index Search
Hit once.
SEARCH
MODE
2
2
Pro.1
Pro.2
Pro.3
Pro.4
Pro.5
02
01
01
02
03
Beginning
of the tape
End of
the tape
CURRENT PROGRAM
INDEX MARK
01 ~ 20
or
4
4
After searching,
Hint
Hint
• The Index Mark will be made automatically
at the beginning of each recording.
• The time gap between Index Marks should
be greater then 1 minute for SP mode, 2
minutes for LP mode and 3 minutes for
SLP mode.
To rewind
To fast forward
Hint f
Hint f
or Inde
or Inde
x Sear
x Sear
c
c
h &
h &
Time Sear
Time Sear
c
c
h
h
• These functions are not available during recording.
• Hit
[STOP
C
C
]
to stop the search.
• If a tape ends during a search, your search will be cancelled and the tape will rewind to the
beginning.
PLAY
B
Time Search
You can search backward and for-
ward a specific length of time on a
tape.
• Insert a tape into this unit.
VCR
VCR
VCR
1
1
SEARCH
MODE
2
2
Select the desired length of
time for fast forwarding or
rewinding.
Hit twice.
0:01~ 9:59
(1 minute~9 hours
and 59 minutes)
or
ss
3
3
To cue or review picture during playback
(Picture Search)
Press
[
g
]
or
[
h
h
]
(
[F.FWD
g
g
]
or
[REW
h
h
]
)
.
• Press it again and the unit will search in super high
speed. (in the SLP mode only)
To freeze the picture on TV screen during play-
back (Still mode)
Hit
[PAUSE
k
k
]
. Each time you hit the button, the
picture will be forwarded by one frame.
• If the picture begins to vibrate vertically during the still
mode, stabilize the picture by pressing
[SKIP/CH.
G
G
/
K
K H
H
/
L
L
]
(or
[CHANNEL
K
K
/
L
L
]
).
• If the picture is distorted or rolling vertically, adjust
the vertical hold control on your TV if equipped.
Counter Reset
Hit
[CLEAR/C.RESET].
To play back in slow motion
Hit
[SLOW]
during playback or the still mode.
• If the noise bars appear on the TV screen, you can
reduce it by pressing
[SKIP/CH.
G
G
/
K
K H
H
/
L
L
]
(or
[CHANNEL
K
K
/
L
L
]
).
Auto Rewind
When a tape reaches its end during playback, fast-for-
ward or recording (except Timer Recording and One
Touch Recording), the tape will automatically rewind
to the beginning. After rewinding finishes, the unit will
eject the tape.
4
4
2
2
3
3
To start
playback
To stop
playback
To eject
H98K0UD_EN/SP.qx3 04.12.20 13:23 Page 11


