


– 17 –
EN
D
VD Functions
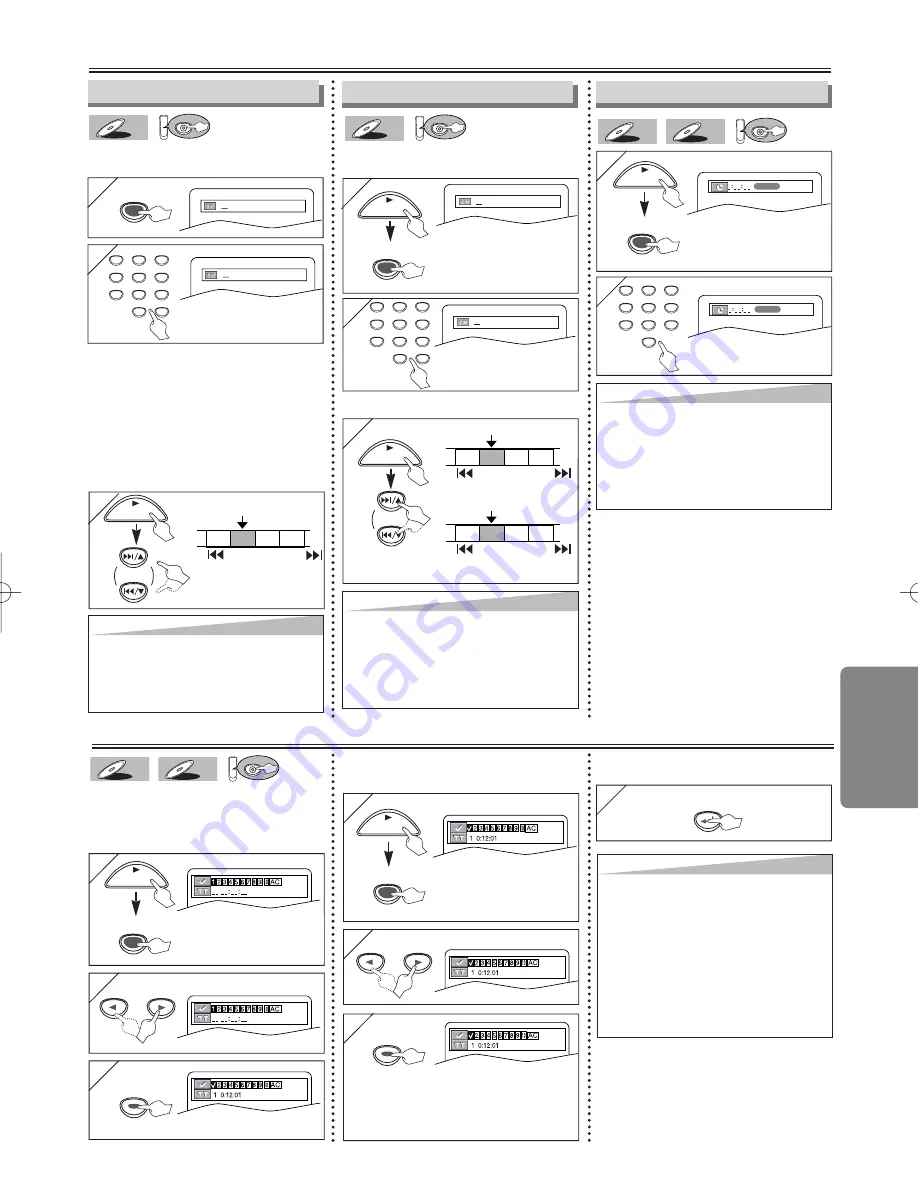
Time Search
DVD
CD
CD
DVD-V
DVD-V
1
1
2
2
Within 30 seconds
1:29:00
TOTAL
1
2
3
4
5
6
7
8
9
0
Marker Setup
This feature allows you to assign a spe-
cific point on a disc to be called back
later.
T
T
o set a marker
o set a marker
DVD
CD
CD
DVD-V
DVD-V
1
1
Hit repeatedly until
this marker display
appears.
2
2
3
3
T
T
o return to the marker
o return to the marker
later
later
1
1
Hit repeatedly until
this marker display
appears.
2
2
3
3
at the desired marker
• Playback will restart from the specific
point which you set.
T
T
o e
o e
xit the marker screen
xit the marker screen
1
1
Hit repeatedly until
the Time Search dis-
play appears.
Track Search
DVD
CD
CD
1
1
2
2
Within 30 seconds
/29
/29
Title / Chapter Search
DVD
DVD-V
DVD-V
1
1
2
2
Within 30 seconds
/12
/12
Hit once for the
Chapter Search.
Hit twice for the Title
Search.
1
2
3
4
5
6
7
8
9
0
+10
1
2
3
4
5
6
7
8
9
0
+10
1
1
CH 1 CH 2 CH 3 CH 4
Current Chapter
(CH)
or
SKIP
T 1 T 2 T 3 T 4
Current Title
(T)
SKIP
SKIP
SKIP
Using [SKIP
Using [SKIP
H
H
H
H
,
,
G
G
G
G
]
]
1:29:00
TOTAL
Search Function
Hint
Hint
• When there is no need to enter a number,
“0” appears automatically.
For example, “0: 0_: __” appears in the
Time Search display if the total time of the
title or track is less than 10 minutes.
• Hit
[CLEAR/C.RESET]
to erase the incor-
rect input at step 2).
Hint
Hint
• The Marker display will disappear in about
30 seconds when there is no output.
• To clear a marker, select the marker to be
cleared at step 2) in the section “To set a
marker” or “To return to the marker later”
and then hit
[CLEAR/C.RESET]
.
• Opening the disc tray or turning off the
power will erase all markers.
• Selecting “AC” at step 2) in the section “To
set a marker” or “To return to the maker
later” will also erase all markers.
SEARCH
MODE
SEARCH
MODE
SEARCH
MODE
SEARCH
MODE
SEARCH
MODE
PLAY
SKIP/CH.
PLAY
PLAY
PLAY
or
or
ENTER
ENTER
ENTER
ENTER
RETURN
•
For the disc with less than 10 tracks,
hit the track number directly.
•
For discs with more than 10 but less
than 99 tracks, to play single-digit
track, hit
[0]
first, then the track num-
ber (e.g. for track 3, hit
[0]
,
[3]
). To
play a double-digit track, hit the track
number.
PLAY
(If the disc has no chapters)
Using [SEARCH MODE]
Using [SEARCH MODE]
Using [SEARCH
Using [SEARCH
MODE]
MODE]
Hint
Hint
•
[+10]
button can also bring the Track
Search display, except for the disc with
less than 10 tracks. For such a disc, track
search can be done by just hitting the track
number.
Using [SKIP
Using [SKIP
H
H
H
H
,
,
G
G
G
G
]
]
1
1
PLAY
TR 1 TR 2 TR 3 TR 4
Current Track
(TR)
SKIP
SKIP
SKIP/CH.
Hint
Hint
• Depending on the disc being played, this
function can also be performed by directly
entering the desired chapter number with
the Number buttons
. Refer to the manual
accompanying the disc.
• For CDs, Track Search is not available for
Programmed or Random Playback.
H98K0UD_EN/SP.qx3 04.12.20 13:23 Page 17


