background image

Setup

About the Video Cassettes and Discs
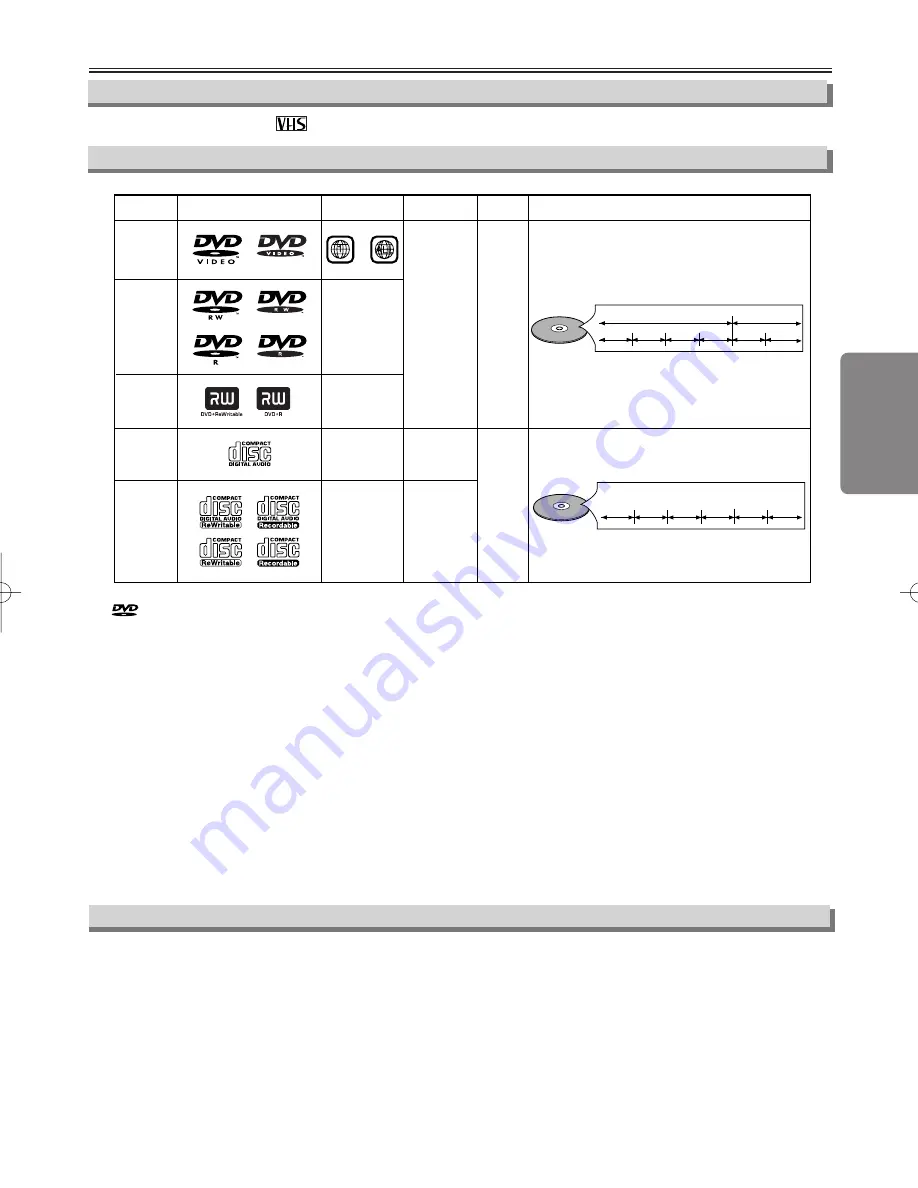
Playable Discs

Unplayable Discs

¡

NEVER play back the following discs. Otherwise, malfunction may result!

DVD-RAM / CD-I / Photo CD / Video CD / DVD with region codes other than 1 or ALL /
DTS-CD / DVD-ROM for personal computers / CD-ROM for personal computers

¡

On the following disc, the sound MAY NOT be heard.

Super Audio CD

NOTE:

Only the sound recorded on the normal CD layer can be delivered.
The sound recorded on the high density Super Audio CD layer cannot be delivered.

¡

Any other discs without compatibility indications.

– 5 –

EN

Use only cassettes marked 

with this unit.

Playable Video Cassettes

If you cannot play back a disc which bears one of the marks above, check the following notes.

*1: This unit conforms to the NTSC color system. Discs recorded in other color systems such as PAL cannot be played back.
*2: Certain DVD-Video discs do not operate as described in this manual due to the intentions of the disc’s producers.
*3: Discs recorded in the VR (Video Recording) format cannot be played back.
*4: Scratched or stained discs may not be played back.
*5: Some discs cannot be played back because of incompatible recording conditions, characteristics of the recorder or spe-

cial properties of discs.

*6: You can play back discs which bear the marks above. If you use nonstandardized discs, this unit may not play them back.

Even if they are played back, the sound or video quality will be compromised.

*7: You may play back the unfinalized DVD-R/RW disc recorded in the video format on our brand’s DVD recorder. However,

depending on the recording status of a disc, the disc may not be played back at all or normally (the picture or sound may
not be smooth, etc.). In this case, you need to finalize the disc with the DVD recorder. Refer to the manual accompanying
the DVD recorder.

*8: Only the discs recorded in the video format and finalized can be played back.

Unfinalized discs cannot be played back. Depending on the recording status of a disc, the disc may not be played back at
all or normally (the picture or sound may not be smooth, etc.).

*9: If there is too much recording space left on a disc (the used portion is less than 55 mm across), it may not play back properly.

*10: Do not glue paper or put stickers on to the disc. These may damage the disc, and the unit may not read it correctly.

DVD-Video

* 1, 2, 4, 6

* 1, 3, 4, 

5, 6, 8 

* 1, 3, 4, 5,
 6, 7, 9, 10

* 4, 6

* 4, 5, 6,

 9, 10

or

DVD-RW

DVD-R

DVD+RW

DVD+R

Audio CD

CD-RW

CD-R

Digital video

(MPEG2)

-

-

-

Region code

Mark (logo)

Playable

discs

Recorded

signals

Disc size

Disc types

12 cm

or

8cm

Example

Title 1

Title 2

Chapter 1 Chapter 2

Chapter 1 Chapter 2

Chapter 3 Chapter 4

Digital audio

12 cm

or

8cm

Example

Track 1

Track 2

Track 5

Track 6

Track 3

Track 4

Digital audio

is a trademark of DVD Format/Logo Licensing Corporation.

 H98K0UD_EN/SP.qx3  04.12.20 13:23  Page 5

Summary of Contents for sylvania mwd2205

Page 1: ...settes 5 Playable Discs 5 Unplayable Discs 5 Setup Connections 6 RF Output Channel 6 Hint for Cable Box or Satellite Box 6 Connection to an Audio System 6 Connection to a TV 7 Front Rear Terminals 7 P...

Page 2: ...e by one or more of the following measures 1 Reorient or relocate the receiving antenna 2 Increase the separation between the equipment and receiver 3 Connect the equipment into an outlet on a circuit...

Page 3: ...a Grounding If an outside antenna or cable system is connected to the video product be sure the antenna or cable system is grounded so as to provide some protection against voltage surges and built up...

Page 4: ...ll our help line mentioned on the front page to locate an Authorized Service Center CLEANING THE CABINET Use a soft cloth slightly moistened with a mild deter gent solution Do not use a solution conta...

Page 5: ...f you use nonstandardized discs this unit may not play them back Even if they are played back the sound or video quality will be compromised 7 You may play back the unfinalized DVD R RW disc recorded...

Page 6: ...IGITAL PCM SETUP AUDIO menu DOLBY DIGITAL Connecting to a Dolby Digital decoder for Dolby Digital audio output Connecting to the other equipment an MD deck or DAT deck etc without Dolby Digital decode...

Page 7: ...UT2 Kenwood AUX LXI Series 00 Magnavox AUX CHANNEL Panasonic TV VIDEO RCA INPUT TV VCR 00 90 91 92 93 Samsung TV VIDEO Sanyo VIDEO IN MENU Sharp 00 Sony VIDEO1 VIDEO2 VIDEO3 Toshiba TV GAME Zenith 00...

Page 8: ...0 0 3 HOUR MINUTE AM PM Select the current month Select the current day If the clock is not set the CLOCK SET screen appears when you hit MENU In this case go to step 2 VCR VCR VCR or or or or or MANU...

Page 9: ...light VCR OUTPUT light DVD button VCR button STANDBY ON DISPLAY VCR DVD PAUSE SLOW VCR TV SKIP CH PLAY STOP RECORD MENU SETUP TOP MENU MODE ZOOM SUBTITLE T SET ANGLE ENTER RETURN SEARCH MODE REPEAT A...

Page 10: ...playback To pause tape playback or recording To stop playback To stop playback To stop playback or recording To skip chapters To skip tracks To change channels To adjust the tracking manually during p...

Page 11: ...1 minute for SP mode 2 minutes for LP mode and 3 minutes for SLP mode To rewind To fast forward Hint f Hint for Inde or Index Sear x Searc ch h Time Sear Time Searc ch h These functions are not avail...

Page 12: ...C A D E CHANNEL OPEN CLOSE SOURCE X Y VCR DVD DISC IN PLAY PREV NEXT STANDBY ON PLAY STOP PLAY 6 6 2 2 OTR One Touch Recording 1 1 M E N U TIMER PROGRAMMING B AUTO REPEAT OFF CHANNEL SET UP CLOCK SET...

Page 13: ...VCR TV to choose the VCR position Select either VCR or DVD mode then continue with the other features as described in this manual After an OTR or a Timer Recording has been set this unit operates as f...

Page 14: ...ect the L1 or L2 position on the recording unit To use the input jacks on the back of this unit select L1 position by pressing 0 0 1 on the remote control or CHANNEL K K L L To use the input jacks on...

Page 15: ...Approximate speed is 1 1 16 2 1 8 3 1 2 Set STILL MODE to FIELD in the Display menu if pictures in the slow playback mode are blurred Refer to pages 20 21 Zoom 1 Hit ZOOM during playback 2 Hit ZOOM re...

Page 16: ...of the entire disc Current playback status 1 1 2 2 3 3 Hint Hint When you are playing a disc in PROGRAM or RANDOM mode PROGRAM or RANDOM will be displayed instead of 2 2 CH Chapter Current chapter nu...

Page 17: ...ect input at step 2 Hint Hint The Marker display will disappear in about 30 seconds when there is no output To clear a marker select the marker to be cleared at step 2 in the section To set a marker o...

Page 18: ...track Repeat playback are not available with all discs or during repeat A B playback Hint Hint Hit CLEAR C RESET at step 2 to erase the most recently entered track To erase all programmed tracks at o...

Page 19: ...D V 1 1 1 8 ANGLE ON OFF Black Level Setting Adjust the Black Level Setting to make the dark areas of the TV picture brighter DVD DVD V DVD V Virtual Surround You can enjoy stereophonic virtual world...

Page 20: ...TV ASPECT or DOLBY DIGITAL section on page 20 or 21 SETUP MENU Confirm that QUICK is selected You can select the PLAYER MENU TV ASPECT or DOLBY DIGITAL from the QUICK SETUP menu quickly ENTER ENTER Se...

Page 21: ...ect the desired setting or STILL MODE Default AUTO See Hint to the right TV ASPECT 4 3 LETTERBOX STILL MODE AUTO STILL MODE AUTO FIELD FRAME Select the desired setting or 5 5 6 6 To exit the menu SETU...

Page 22: ...current password Enter your desired four digit password except for 4737 or SETUP PARENTAL PASSWORD Please enter a 4 digit password PARENTAL menu 5 5 OTHERS Setting You can change the other functions...

Page 23: ...rol for a better picture by pressing CHANNEL L L K K on the unit or SKIP CH G G K K H H L L on the remote control Cannot view a tape but the Head cleaning may be necessary Refer to AUTO HEAD CLEANING...

Page 24: ...or workmanship as follows DURATION PARTS FUNAI CORP will provide parts to replace defective parts without charge for one 1 year from the date of original retail purchase Certain parts are excluded fro...

Page 25: ...R VCR 1 1 M E N U PROGRAMAR AUTOREPETIR OFF AJUSTE CANAL B AJUSTE DE RELOJ SELEC IDIOMA AJUSTE DE RELOJ MES DIA A O 1 0 HORA MINUTO AM PM AJUSTE DE RELOJ MES DIA A O 1 0 0 3 HORA MINUTO AM PM Seleccio...

Page 26: ...borrar los n meros entrados incorrectamente Para borrar el punt para la repetici n A B Para salir del men de la grabadora de v deo Para reponer el contador de cinta Para buscar en avance retroceso en...

Page 27: ...t DVD MODE 2 2 LANGUAGE SELECT B ENGLISH ON FRAN AIS ESPA OL 1 1 Turn on the TV and set it to channel 3 If channel 3 is already occupied for broadcasting see RF Output Channel section 3 3 CH 01 AUTO S...

Page 28: ...lear the markers To remove status number in program input To clear the numbers entered incorrectly To cancel the point for A B repeat To clear the numbers entered incorrectly To cancel the point for A...

Reviews: