background image

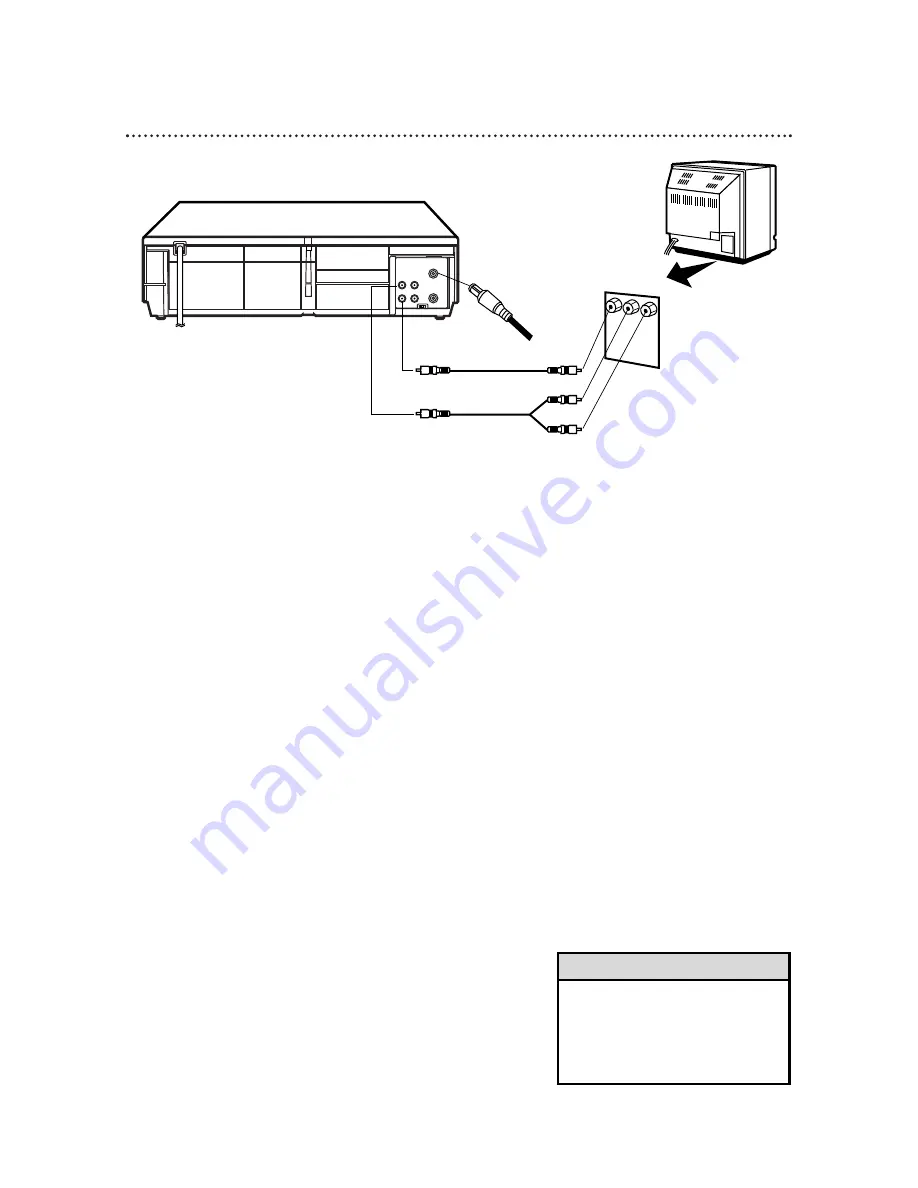
10  Hookups With a Stereo TV

VIDEO

IN

OUT

CH3 CH4

AUDIO

OUT

IN

ANT

antenna or

cable to

ANT(enna)

IN Jack

Video Cable

Audio Cable

VIDEO (yellow) and

AUDIO (white) OUT Jacks

Audio and Video

IN Jacks on TV

Audio and Video cables are not supplied.

1

Connect the antenna or cable to the ANT(enna) IN Jack
on the back of the VCR.

2

Connect a video cable to the yellow VIDEO OUT Jack on
the back of the VCR. Then, connect the other end of the
video cable to the VIDEO IN Jack on your TV.

3

Connect an audio cable to the white AUDIO OUT Jack
on the back of the VCR. Then, connect the other end of
the audio cable to the AUDIO IN Jack on your TV.
(If your TV has Right and Left AUDIO IN Jacks, you must use a
“Y” splitter audio cable as illustrated to deliver audio to the TV’s
right and left channels.)

4

Turn on your TV, making sure it is in Line Input mode. Please
refer to your TV owner’s manual for details.

•  This hookup will not give you stereo

sound. To get stereo sound, use the
connections on pages six-seven and
select the channel to be viewed at
the TV (with the VCR turned off).

Helpful Hint

1

2

3

Summary of Contents for VR400BMG

Page 1: ...VCR VR400BMG Video Cassette Recorder Video Cassette Recorder Owner s Manual Owner s Manual...

Page 2: ...easy access to accessories from our convenient home shopping network And most importantly you can count on our uncompromising com mitment to your total satisfaction All of this is our way of saying w...

Page 3: ...nding system of the building as close to the point of cable entry as possible Declaration of Conformity Model Number VR400BMG Trade Name Magnavox Responsible Party Philips Consumer Electronics P O Box...

Page 4: ...te Control Buttons 18 19 VCR Display Panel 20 Front Panel 21 Rear Panel 22 Basic Operations Playing 23 Recording 24 Recording One Touch Recording 25 Timer Recording 26 30 Auto Satellite Link Using a S...

Page 5: ...l by sliding the lid in the direction of the arrow 2 Insert two AA batteries inside the battery compartment with their and ends aligned as indicated 3 Replace the battery compartment lid Using the Rem...

Page 6: ...low If you have a Cable Box or a Direct Broadcast System please see pages eight nine If you have a Stereo TV please see page 10 After you hook up the VCR go to page 11 to turn on the VCR ANTENNA IN Ja...

Page 7: ...se either a snap on type supplied or screw on type of coaxial cable whichever you prefer 5 Set the CH3 CH4 switch on the back of the VCR to CH3 or CH4 whichever channel is not used or least used in yo...

Page 8: ...e 28 Leave the Cable Box DBS on for a timer recording VIDEO IN OUT CH3 CH4 AUDIO OUT IN ANT OUT IN 75V ANT CABLE TV s ANTENNA IN Jack Cable Box DBS VCR Recording Viewing Any Channel Connections 1 With...

Page 9: ...o record at the VCR Start the recording 2 Press the VCR TV button once to put the VCR in TV position The VCR TV light will disappear 3 Select the channel you want to watch at the Cable Box DBS TV s AN...

Page 10: ...e to the VIDEO IN Jack on your TV 3 Connect an audio cable to the white AUDIO OUT Jack on the back of the VCR Then connect the other end of the audio cable to the AUDIO IN Jack on your TV If your TV h...

Page 11: ...you still do not see any on screen displays follow the steps under Automatic Channel Setup on page 12 and Language Selection on page 16 If you try to set up channels when there is no antenna or cable...

Page 12: ...the F FWD button 3 Press the PLAY button or the STOP button repeatedly to select AUTO SET UP 4 Press the F FWD button The VCR will memorize all available channels When setup is complete the lowest cha...

Page 13: ...ll be added or deleted whichever was flashing on the screen when you exited the menu 2 3 Adding Deleting Channels The channels you no longer receive or seldom watch can be deleted from the memory You...

Page 14: ...WD button The day of the week will appear automatically If the clock has never been set the CLOCK SET menu may appear immediately when you press the MENU button If this happens fol low the instruction...

Page 15: ...hen press the F FWD button 9 Press the COUNTER RESET EXIT button or the F FWD button to start the clock 6 7 To reset the clock follow steps 1 2 on page 14 Select the information you want to change usi...

Page 16: ...5 6 7 8 9 0 100 CHANNEL INDEX SLOW SPEED QUICK FIND TIME EXIT COUNTER DISPLAY MENU RESET MEMORY REWIND PLAY F FWD RECORD PAUSE STILL STOP SEARCH 1 2 3 If you accidentally select Spanish and need Engl...

Page 17: ...ive seconds After five seconds only the current time will appear on the screen the clock must be set If you are watching TV the current channel number will also appear on the screen Press the DISPLAY...

Page 18: ...pic ture stays on screen Details are on page 35 Press to erase a timer recording Details are on page 29 Press to go back one step when setting the clock or a timer recording Press to add or delete ch...

Page 19: ...ress to scan up or down through the VCR s channels after the channels have been set up Details are on page 12 During slow motion playback press to adjust the tracking Details are on page 41 COUNTER RE...

Page 20: ...light appears when the VCR is in VCR position REC ord Light This light appears during a recording It flashes when a recording is paused CST IN Light This light appears when a tape is in the VCR POWER...

Page 21: ...Function During normal tape playback or slow motion tape playback press the CHANNEL o p buttons to adjust the tracking Details are on page 41 PLAY Button Press to play a tape Also press to release Sl...

Page 22: ...th your VCR Set your TV to the same chan nel Details are on page seven OUT Jack Use the supplied RF coax ial cable to connect this jack to the Antenna In Jack on your TV or Cable Box DBS Details are o...

Page 23: ...utton Turn on the TV Insert a tape 3 1 2 If the tape you want to play is already in the VCR make sure the VCR power is on and the VCR is in VCR position Press the VCR TV button so that the VCR TV ligh...

Page 24: ...n Each mark equals one minute remaining During the last minute of paused recording the mark will flash If any menu is activated on the TV screen the RECORD button on the remote control does not functi...

Page 25: ...To stop an OTR before recording is finished press the STOP but ton on the remote control To cancel the OTR but continue recording press the REC ord OTR button on the VCR repeat edly until REC appears...

Page 26: ...TIMER PROGRAMMING Then press the F FWD button Program numbers that do not have a timer recording stored will flash 2 Press the PLAY button or the STOP button repeatedly to select a program number The...

Page 27: ...sired day appears Then press the F FWD button The day of the week will appear automatically You can not pro gram the VCR to record more than one year in advance Timer Recording cont d 27 6 Repeat the...

Page 28: ...M NUMBER 1 DATE 0 5 0 4 THU START TIME 0 7 3 0 P M END TIME 0 8 3 0 P M CHANNEL 1 6 REC SPEED S P B SP SLP 8 Press the PLAY button or the STOP button repeatedly to select a tape speed The arrow will a...

Page 29: ...EXIT button to exit Timer Recording cont d 29 VCR TV POWER EJECT 1 2 3 4 5 6 7 8 9 0 100 CHANNEL INDEX SLOW SPEED QUICK FIND TIME EXIT COUNTER DISPLAY MENU RESET MEMORY REWIND PLAY F FWD RECORD PAUSE...

Page 30: ...in VCR position The VCR TV light will appear If it does not press the VCR TV button once 2 Press the PLAY button or the STOP button to select the timer recording you want to correct NOTE If some empt...

Page 31: ...K will be cancelled If the start time for a timer record ing comes up during an Auto Satellite Link recording the timer recording has priority Helpful Hints 1 Set the program to be recorded on the sat...

Page 32: ...he channel you want to watch at the TV 4 To return to the channel being recorded use the TV remote control to select channel 3 or 4 whichever chan nel the CH3 CH4 switch on the back of the VCR is set...

Page 33: ...SLP 6 Press the PLAY button on VCR 1 and the REC ord OTR button on VCR 2 at the same time 7 To stop recording press the STOP EJECT button on VCR 2 once then stop the tape on VCR 1 Unauthorized record...

Page 34: ...on the screen briefly If you are fast forwarding or rewinding the tape you must first press the COUNTER RESET EXIT button to exit then press the PLAY button to begin tape playback The VCR will play t...

Page 35: ...layback press the PLAY button Viewing a Still Picture 1 During tape playback press the SLOW button The tape will play in slow motion NOTE You can control the speed of slow motion playback by pressing...

Page 36: ...ture quality of a tape Make sure The VCR is on and is in VCR position The VCR TV light will appear If it does not press the VCR TV button once There is a tape in the VCR 1 During tape playback press t...

Page 37: ...as reset to zero press the REWIND button or the F FWD button when playback is stopped When the tape reaches the point at which the real time counter was reset to zero the tape will stop Press the PLAY...

Page 38: ...begin at program 3 Within 30 seconds press the REWIND button or the F FWD button The VCR begins rewinding or fast forwarding to the beginning of the desired program When the program is reached the VCR...

Page 39: ...s press the REWIND button or the F FWD button The VCR begins rewinding or fast forwarding to the specified point The time counts down on screen beneath TIME SEARCH as the searching progresses When the...

Page 40: ...d for 30 sec onds then go to the next recording To skip immediately to the beginning of the next recording on the tape press the QUICK FIND button on the remote control 2 To resume normal tape playbac...

Page 41: ...ording is programmed a tape can only be ejected with the power on Be sure to insert a tape for the Timer Recording then turn off the VCR power Automatic Tracking Adjustment The VCR automatically adjus...

Page 42: ...the cylinder will rotate for about five minutes This is normal The quick play mechanism switches the tape mechanism from Stop to Play in just one second A TV program cannot be recorded Check the conn...

Page 43: ...he VCR in TV position The VCR TV light will disappear Check the connections between the VCR TV antenna cable and Cable Box DBS if applicable Details are on pages six 10 The reception on all channels i...

Page 44: ...n briefly press the CHANNEL o p buttons or use the Number buttons to select another channel Mode a VCR operation OTR One Touch Recording programming a timed recording that starts immediately and recor...

Page 45: ...le 75 ohms unbalanced Power Requirement 120V AC 60Hz Power Consumption 12W Operating Temperature 41 F 5 C to 104 F 40 C Relative Humidity 10 to 80 Weight 5 3 lbs 2 4 kg Dimensions 14 3 16 W x 3 5 8 H...

Page 46: ...RENEWED 90 DAY LIMITED WARRANTY...

Page 47: ...en status displays 17 one touch recording 25 out jack 7 9 22 33 pause button 21 pause still button 19 24 35 picture select 36 play button 18 21 23 35 playing 23 power button 18 21 cord 7 22 light 20 q...

Page 48: ...3 4 5 6 7 8 9 0 100 CHANN EL INDEX SLOW SPEED QUICK FIND TIME EXIT COUNT ER DISPLA Y MENU RESET MEMOR Y REWIN D PLAY F FWD RECOR D PAUSE STILL STOP SEARC H Remote Control 4835 218 37276 Two AA Batter...

Reviews: