(E)
13
SQ57-Z Series, CH22 Series
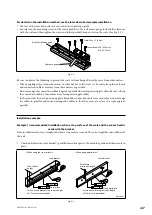
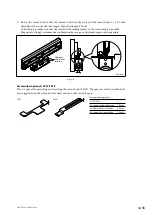
5. Fasten the sensor head so that the clearance between the scale and the sensor head is 1 ± 0.5 mm
throughout the entire eff ective length. (Specifi ed torque: 9 N·m)
When doing so, make sure that the scale and the reading surface of the sensor head are parallel.
Magnescale strongly recommends confi rmation by using an adjustment spacer, sold separately.
1
±0.5
Clearance
adjustment
location
Unit: mm
Fig. 3-13
Accessories (optional) SZ27/SZ28
Th
is is a spacer for mounting and verifying the sensor head of SQ57. Th
e spacer is used to establish the
1 mm-gap between the scale and scale head, and can easily verify the gap.
t
SZ27
t
SZ28
Track positioning spacer
SZ27 / SZ28
t
For center value verifi cation
1.0 mm
For lower limit verifi cation
0.8 mm
For upper limit verifi cation
1.2 mm
Summary of Contents for SmartSCALE SQ57
Page 3: ...SQ57 Z Series CH22 Series J 1...
Page 4: ...SQ57 Z Series CH22 Series 2 J...
Page 6: ...SQ57 Z Series CH22 Series ii J...
Page 10: ...SQ57 Z Series CH22 Series 4 J 1 6 2006 42 EC...
Page 12: ...SQ57 Z Series CH22 Series 6 J 3 7 3 1 CH22 SQ57 M6 M4 M6 M8 B A 3 2 L 3 1 3 1 7...
Page 20: ...SQ57 Z Series CH22 Series 14 J 3 3 5 mm 1 0 N m 242 2 3 1 1 0 N m 3 14 1 0 N m O SQ57 Z O 3 15...
Page 23: ...SQ57 Z Series CH22 Series J 17 5 SIEMENS DRIVE CLiQ 3 5 DRIVE CLiQ...
Page 28: ...SQ57 Z Series CH22 Series 22 J 8 3 2...
Page 32: ...ii E SQ57 Z Series CH22 Series...
Page 58: ...ii G SQ57 Z Series CH22 Series...
Page 82: ......
Page 83: ...1 SQ57 Z Series CH22 Series...


