background image

Motorized Cable Reel Technical Manual

September 2021

Page 28 of 86

5.2.3 Installing the reel body on the drive unit

3

The reel body has been assembled.

3

Strain relief clamps on the reel body do not point towards the gearbox (

|

 Figure 15).

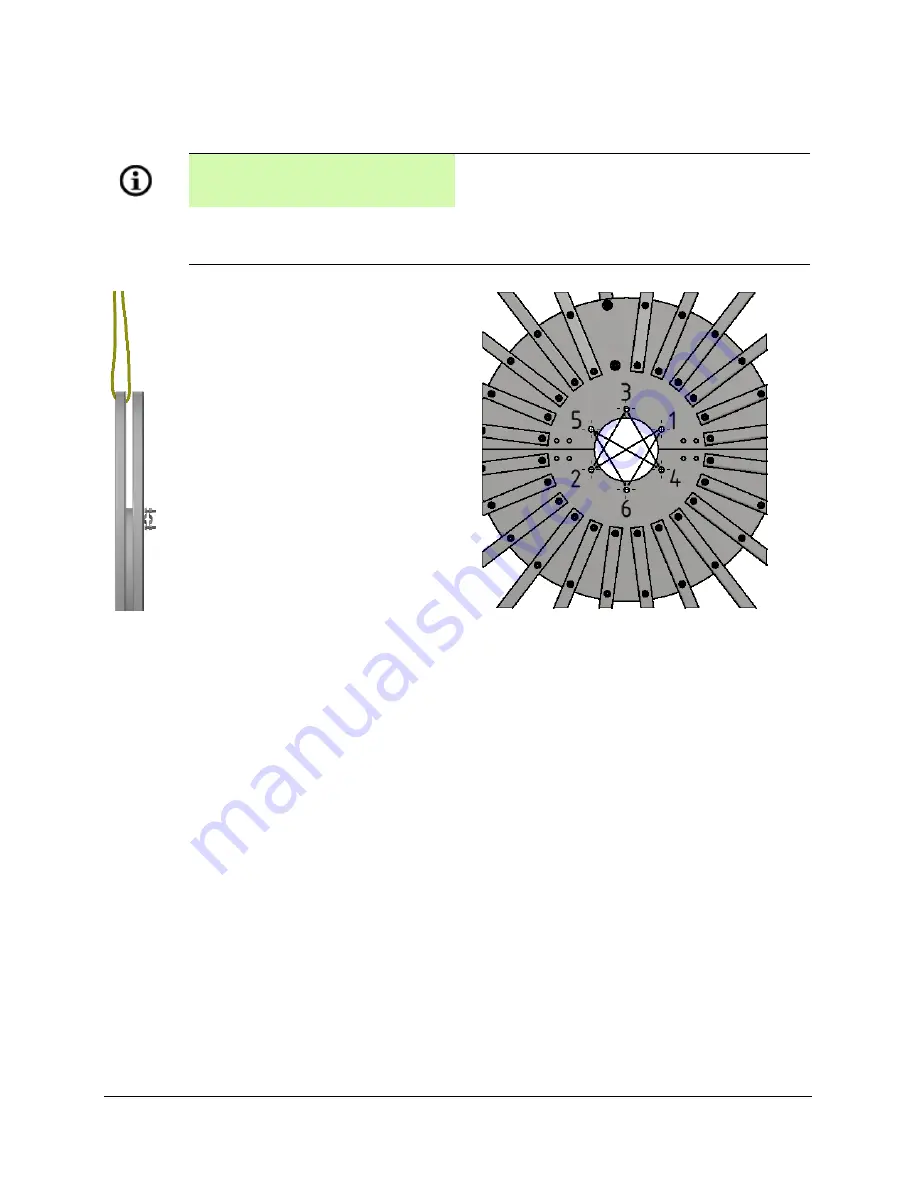
1. Attach the reel body to the lifting equipment using round loops.
2. Tighten the round loop and maintain its tension.
3. Ensure that the weight of the reel body is evenly distributed.
4. Lift the reel body by means of lifting equipment.

INFORMATION

Throughout the installation, the reel body must be suspended and secured to the lifting 
equipment.

Figure 15 Reel body on the lifting equipment

Figure 16 Tightening the screws and nuts on the reel 
body

Summary of Contents for G Series

Page 1: ...Motorized Cable Reel Technical Manual Type Series G Part Number 121 58068 R00 September 2021 Copyright 2021 Magnetek ...

Page 2: ...Motorized Cable Reel Technical Manual September 2021 Page 2 of 86 Page Intentionally Left Blank ...

Page 3: ...renda Road Unit 1 Brampton Ontario L6W 1W3 Canada Telephone 800 792 7253 Fax 905 828 5707 416 424 7617 24 7 Service pager Website www columbusmckinnon com magnetek 2021 Columbus McKinnon Corporation All rights reserved This notice applies to all copyrighted materials included with this product including but not limited to this manual and software embodied within the product This manual is intended...

Page 4: ...instructions and safety warnings of these manufacturers or any of the other requirements listed above It is the responsibility of the owners users and operators of the Magnetek Products to know understand and follow all of these requirements It is the responsibility of the employer to make its employees aware of all of the above listed requirements and to make certain that all operators are proper...

Page 5: ...ion of personnel and equipment NOTE A NOTE statement is used to notify people of installation operation programming or maintenance information that is important but not hazard related DANGERS WARNINGS and CAUTIONS SHOULD NEVER BE DISREGARDED Registered Trademarks Trademarks are the property of their respective owners DANGER DANGER indicates an imminently hazardous situation which if not avoided wi...

Page 6: ...ging loads 16 2 4 5 Hot surfaces 16 2 4 6 Gear oil 16 3 Description 17 3 1 Type key 17 3 1 1 Spiral version 17 3 1 2 Cylindrical version 17 3 2 Layout 18 3 2 1 Spiral version 18 3 2 2 Cylindrical version 19 3 3 Function 19 3 4 Device usage types 19 3 4 1 Vertical power supply 20 3 4 2 Horizontal power supply 20 4 Transport and storage 22 4 1 Checking the delivery 22 4 2 Transporting the device 22 ...

Page 7: ...cable to the terminal strip 55 6 4 Connecting the permanently routed cable to the brush holders 56 6 5 Gear cam limit switch optional 57 6 6 Heater optional 58 7 Commissioning 59 7 1 Aligning the device 59 7 1 1 Spiral version 59 7 1 2 Cylindrical version 59 7 2 Test run 60 7 3 Checks during commissioning 60 8 Operation 61 8 1 Operating the device according to intended use 61 8 1 1 Malfunctions 61...

Page 8: ...sal and recycling 80 17 Appendix 81 17 1 Cable screw connection 81 17 2 Tightening torques 82 17 2 1 Gear plate 82 17 2 2 Reel flange Nord Lock wedge locking washers 82 17 2 3 Slip ring assembly 83 17 2 4 Motor terminal board connection 83 17 3 Replacing the brush holders 84 ...

Page 9: ...o observing these operating instructions observe the following Installation instructions for the permanent magnetic coupling Motor supplier documentation Limit switch supplier documentation Data sheet for heater Date Version Revision Note 23 02 2017 V1 First edition 01 08 2017 V2 Adjustment of warning notes according to ANSI Z535 Adjustments according to in house terminology Revised Section Symbol...

Page 10: ...nical Manual September 2021 Page 10 of 86 1 3 Additional information X In addition to observing these operating instructions observe the following Order confirmation Declaration of incorporation Dimension sheet Circuit diagram ...

Page 11: ...result in serious injuries or death CAUTION A danger that may result in minor or moderate injuries NOTICE A note that helps avoid property damage INFORMATION A note that facilitates general understanding or serves to improve workflows Marking Meaning Bulleted list p Cross reference 1 2 3 Key Additional information to a component Instructions or a legend 3 Prerequisite for an action X Action instru...

Page 12: ...ional information Consider other uses for example all kinds of load movement unintended use 2 2 Duties of the operator Read understand and observe the operating instructions in particular the safety chapter page 12 when performing all kinds of work on and with the device When operating the device always consider the following documents and regulations Operating instructions Applicable documents Ad...

Page 13: ...relevant standards and regulations can competently perform assigned tasks and can detect and avoid hazards 2 2 2 2 Qualified personnel Qualified personnel have completed training They have also demonstrated knowledge and experience In addition they know relevant standards and regulations can competently perform assigned tasks and can detect and avoid hazards Safety goggles Safety shoes Hard hat Sa...

Page 14: ...ils to operate properly shut it down and resolve the problem 2 2 4 Maintenance Regularly maintaining the device can contribute to optimal performance and help boost its safety and reliability Resolve all technical problems as soon as you discover them While maintaining this device only replace parts on the device using the same parts or the same parts of the original device 2 2 5 Conversion Improp...

Page 15: ...risk but not all of the risk of personal injury and or property damage 2 4 1 Electric current An electric current powers this device To avoid death by shock and other personal injuries never touch electrically conductive components on this device Observe the five safety rules page 12 Check the electrical insulation of the device Check the protective conductor system for electrical continuity Do no...

Page 16: ...ent Train operators and maintenance personnel about the risks associated with the reeling cable on this device the need for keeping limbs away from the device and the importance of using good judgment Always leave two safety windings for strain relief on the device 2 4 4 Swinging loads Loads sometimes swing when operators lift the device Lifting the device while the load is swinging can pose some ...

Page 17: ...identifies the device and appears on the rating plate 3 1 1 Spiral version G2 M7 T12231 36P7 IP55 example G2 bevel gear size 2 M7 permanent magnetic coupling size 7 1 5 kW brake motor T12231 reel body 1 200 inner diameter 2 300 external diameter 1 winding chamber 36P7 36 A 7 pole IP55 protection class 3 1 2 Cylindrical version G2 M7 T03001 36P7 IP55 example G2 bevel gear size 2 M7 permanent magnet...

Page 18: ...18 of 86 3 2 Layout 3 2 1 Spiral version Figure 1 Device layout spiral version 1 Drive unit with bevel gear permanent magnetic coupling and motor 2 Reel body with reeling cable 3 Cable enclosure with slip ring assembly optional with accessories 4 Covering hood ...

Page 19: ...or The reeling cable is kept under constant tensile stress during operation When the reeling cable unwinds from the reel body it unwinds from the device against the tensile stress The motor brake prevents the reeling cable from unintentional unwinding when the higher level system is at a standstill or when the drive is in a voltage free state 3 4 Device usage types The device supplies a mobile uni...

Page 20: ... reeling cable connects to the fixed supply unit The cable is unwound by the mobile unit Figure 5 Cable unwinding horizontal The device is fixed mounted and the reeling cable unwinds in one direction by a mobile unit on which the supply unit is located Cable deposit occurs on cable deposit rollers Figure 6 Cable unwinding horizontal with cable deposit rollers Figure 3 Cable unwinding vertically up...

Page 21: ...a mobile unit and the cable routes via the guide rollers The mobile unit crosses a central feed The reeling cable routes under the mobile unit and the cable unwinds in two directions Figure 7 Horizontal cable unwinding crossing of central feed with cable deflection rollers and cable entry guide ...

Page 22: ...ng the device with a lifting cart Transport the device to its installation location secured on a wooden pallet Transporting the device with lifting equipment Figure 8 Position of the round loops on the device Transport the device to its installation location suspended from the lifting equipment as follows 1 Attach the device to the lifting equipment using round loops Figure 8 2 Tighten the round l...

Page 23: ... 9 Transporting the drive unit with cable enclosure Figure 10 Transporting the reel body Transport the device to its installation location secured on a wooden pallet or wooden frame 4 3 Storing the device Store the device as follows In a dry environment Protected from dust and humidity In an area free of vibration ...

Page 24: ...en the device is at a standstill Choose an installation location that remains free from resonance induced vibrations does not transfer vibrations resists warpage adequately handles the weight of the device withstands the forces acting on the gearbox shows no height offset in a two part installation location Prevent displacement by external forces resulting from side impacts NOTICE Stress cracks in...

Page 25: ...n the device in its installation location 6 Align the device 7 Attach the device to its installation location 8 Check the tightening torques of the screw connections 17 2 page 82 5 2 Installing the drive unit and reel body in the installation location 5 2 1 Installing the drive unit Figure 12 Drive unit with round loops Transport the drive unit to its installation location suspended from the lifti...

Page 26: ...l body is divided into two halves and requires assembly at the installation location Figure 13 Assembly of reel body detail A B and C part 1 1 Circular blank 2 Lug with hexagon screws and hexagon nuts 3 Reel rim 4 Outer rim 5 Abutting surface INFORMATION Lubricate the abutting surface of the circular blank ...

Page 27: ...utting surface of the circular blank has been lubricated 3 The hexagon screws washers and hexagon nuts provided are ready 1 Join and align the reel body halves Ensure that the reel body halves are aligned Figure 14 detail C 2 Screw the reel body halves in place on the circular blank with M20 x 25 mm hexagon screws with washers 3 Screw the reel rim in place with hexagon screws M12 x 25 mm washers a...

Page 28: ...ttach the reel body to the lifting equipment using round loops 2 Tighten the round loop and maintain its tension 3 Ensure that the weight of the reel body is evenly distributed 4 Lift the reel body by means of lifting equipment INFORMATION Throughout the installation the reel body must be suspended and secured to the lifting equipment Figure 15 Reel body on the lifting equipment Figure 16 Tighteni...

Page 29: ...g a round loop 1 Slide the reel flange onto the hollow shaft of the gearbox 2 Slide the lock washer onto the hollow shaft 3 Install the locknut 4 Slide the reel body onto the reel flange 5 Align the reel body 6 Insert the hexagon screws with Nord Lock wedge locking washers through the holes on the reel body and reel flange 7 Fasten the hexagon screws with Nord Lock wedge locking washers and hexago...

Page 30: ...Gearbox 2 Reel flange 3 Lock washer 4 Locknut 5 Reel body 6 Terminal strip cable enclosure 7 Hexagon screw with Nord Lock wedge locking washers 8 Hexagon nut with Nord Lock wedge locking washers 9 Sealing flange 10 Internal hexagon screw 11 Spacer bolt 12 Mounting rail with terminal strip 13 Hexagon nut with washer 14 Cover 15 Clamping ring INFORMATION Route the slip rings connection cable to the ...

Page 31: ...tall the locknut 5 Slide the reel body onto the reel flange 6 Align the reel body 7 Slide the terminal strip cable enclosure onto the hollow shaft 8 Align the terminal strip cable enclosure 9 Insert the hexagon screws with Nord Lock wedge locking washers through the holes on the terminal strip cable enclosure reel body and reel flange 10 Fasten the hexagon screws with Nord Lock wedge locking washe...

Page 32: ...rea is clear 3 Two people are available 1 Manually rotate the reel body to remove the transport lock 2 Have one person secure or mechanically fix the reel body to protect against unintentional rotation 3 Remove the transport lock 4 Remove the mechanical fixing 5 Repeat the action instructions 1 to 4 until all transport locks have been removed INFORMATION Remove the transport locks after successful...

Page 33: ...Pre wired by the manufacturer Not present DANGER Electric current Electric shock Observe the five safety rules page 12 Check the electrical isolation of the device Check the protective conductor system for electrical continuity Do not use the PE protective conductor system as a PEN system Observe EN VDE and locally applicable safety regulations NOTICE Incorrect tightening torques Damage to the scr...

Page 34: ...ting end disc 2 Brush holder phase 11 Slip ring phase 3 Brush holder PE 12 Filister screw with disc 4 Short insulating pipe brush holder 13 Insulating pipe slip ring 5 Long insulating pipe brush holder 14 Threaded rod slip ring 6 Threaded rod brush holder 15 Slip ring carrier ring 7 Long insulating pipe brush holder 16 Slip ring carrier flange 8 Hexagon nut flat disc spring ring 17 Cylinder screw ...

Page 35: ...isc spring ring 8 Hexagon nut flat disc spring ring 2 Brush holder phase 9 Short insulating pipe slip ring 3 Brush holder PE 10 Slip ring phase 4 Long insulating pipe brush holder 11 Long insulating pipe slip ring 5 Short insulating pipe brush holder 12 Threaded rod slip ring 6 Brass pipe 13 Slip ring PE 7 Threaded rod brush holder 14 Slip ring carrier ...

Page 36: ...them 3 Disassemble the hexagon nuts flat washers and spring rings on the threaded rods brush holder 4 Loosen the clamping screws on the brush holders 5 Disassemble the brush holder phase 6 Disassemble the brush holder phase insulating pipes 7 Disassemble the brush holder PE 8 Disassemble the brass pipe 9 Disassemble the threaded rod brush holder 10 Disassemble the hexagon nuts flat washers and spr...

Page 37: ...lip ring assembly and electrically connecting it INFORMATION See Figure 21 on page 34 Figure 23 Aligning the brush holder 1 Strain relief clamp unwinding direction to the left 2 Strain relief clamp unwinding direction to the right Figure 24 Routing the reeling cable for connection to the slip rings ...

Page 38: ...ipes slip ring 12 Install the slip ring phase at a 120 degree offset Figure 25 13 Strip the wire phases and fit them with ring cable lugs 14 Connect the wire phase of the reeling cable with a Filister screw and disc to the slip ring phase 15 Repeat action instructions 11 to 14 three times The slip ring phase and insulating discs have been installed The wire phases of the reeling cable are connecte...

Page 39: ...ush holder 24 Install the brush holder phase and center it 25 Install the hexagon nuts flat washers and spring rings on the threaded rods brush holder 26 Check the continuity of the PE connection 27 Check the continuity of the phases and all other connections 28 Install the covering hood on the cable enclosure 14 1 page 76 item 3 5 ...

Page 40: ...terminal strip cable enclosure 3 Route the reeling cable along the reel rim onto the reel body 4 Route the reeling cable through the strain relief clamp 5 Route the reeling cable through the cable screw connection into the terminal strip cable enclosure 6 Route the reeling cable through the hollow shaft into the reel body 7 Strip the cable according to the required connection length 8 Strip the wi...

Page 41: ... 5 Disassemble the brush holder phases 6 Disassemble the long insulating pipes brush holder 7 Disassemble the brush holder PE 8 Disassemble the short insulating pipe brush holder 9 Disassemble the brass pipe 10 Disassemble the threaded rod brush holder 11 Disassemble the hexagon nuts flat washers and spring rings on the threaded rods slip ring 12 Disassemble the short insulating pipe slip ring 13 ...

Page 42: ...lip ring assembly and electrically connecting it INFORMATION See Figure 22 on page 35 Figure 27 Aligning the brush holder 1 Strain relief clamp unwinding direction to the left 2 Strain relief clamp unwinding direction to the right Figure 28 Routing the reeling cable for connection to the slip rings ...

Page 43: ...p ring 8 Strip the cable end to the required connection length 9 Strip the wire and fit it with a ring cable lug 10 Connect the PE wire of the permanently routed cable with a cylinder screw and a disc to the slip ring PE 11 Slide the short insulating pipes slip ring over the long insulating pipes slip ring 12 Install the slip ring phase at a 120 degree offset Figure 29 13 Strip the wire phase and ...

Page 44: ...r the threaded rod brush holder 19 Install the brush holder PE and center it Figure 27 page 42 20 Slide the short insulating pipe over the threaded rod brush holder 21 Install the brush holder phase 22 Slide the long insulating pipe over the other threaded rod brush holder 23 Install the brush holder phase and center it 24 Install the hexagon nuts flat washers and spring rings on the threaded rods...

Page 45: ...e cable screw connection on the terminal strip cable enclosure 3 Route the reeling cable along the reel rim onto the reel body 4 Route the reeling cable through the strain relief clamp 5 Route the reeling cable through the cable screw connection into the terminal strip cable enclosure 6 Strip the reeling cable according to the required connection length 7 Strip the wires and fit them with ferrules...

Page 46: ...isconnect them 3 Disassemble the hexagon nuts flat washers and spring rings on the threaded rods brush holder 4 Loosen the clamping screws on the brush holders 5 Disassemble the brush holder phase 6 Disassemble the brush holder phase insulating pipes 7 Disassemble the brush holder PE 8 Disassemble the brass pipe 9 Disassemble the threaded rod brush holder 10 Disassemble the hexagon nuts flat washe...

Page 47: ...mber 2021 Page 47 of 86 6 3 2 Installing the blocked slip ring assembly and electrically connecting it INFORMATION See Figure 21 on page 34 Figure 31 Aligning the brush holder Figure 32 Routing the reeling cable for connection to the slip rings ...

Page 48: ...ng 12 Install the slip ring phase at a 120 degree offset Figure 33 13 Strip the wire phase and fit them with ring cable lugs 14 Connect the wire phases of the reeling cable with a Filister screw and a disc to the slip ring phase 15 Repeat action instructions 11 to 14 three times The slip ring phase and insulating discs have been installed The wire phases of the reeling cable are connected to the s...

Page 49: ...der 24 Install the brush holder phase and center it 25 Install the hexagon nuts flat washers and spring rings on the threaded rods brush holder 26 Check the continuity of the PE connection 27 Check the continuity of the phases and all other connections 28 Install the covering hood on the cable enclosure 14 2 page 77 item 3 5 29 Install the cover on the reel body item 2 5 ...

Page 50: ...te the reeling cable onto the reel body all the way to the cable entry 3 Route the reeling cable through the cable screw connection into the terminal strip cable enclosure 4 Strip the cable according to the required connection length 5 Strip the wires and fit them with ring cable lugs 6 Connect the wires to the terminal strip according to the assembly 7 Check the continuity of the PE connection 8 ...

Page 51: ...sassemble the brush holder phase 6 Disassemble the long insulating pipe brush holder 7 Disassemble the brush holder PE 8 Disassemble the short insulating pipe brush holder 9 Disassemble the brass pipe 10 Disassemble the threaded rod brush holder 11 Disassemble the hexagon nuts flat washers and spring rings on the threaded rods slip ring 12 Disassemble the short insulating pipe slip ring 13 Number ...

Page 52: ...mber 2021 Page 52 of 86 6 3 5 Installing the air gap slip ring assembly and electrically connecting it INFORMATION See Figure 22 on page 35 Figure 35 Aligning the brush holder Figure 36 Routing the reeling cable for connection to the slip rings ...

Page 53: ...uired connection length 9 Strip the wire and fit it with a ring cable lug 10 Connect the wire PE of the reeling cable with a cylinder screw and a disc to the PE slip ring 11 Slide the short insulating pipes slip ring over the long insulating pipes slip ring 12 Install the slip ring phase at a 120 degree offset Figure 37 13 Strip the wire phase and fit a ring cable lug 14 Connect the wire phase of ...

Page 54: ...er the threaded rod brush holder 19 Install the brush holder PE and center it Figure 35 page 52 20 Slide the long insulating pipe over the threaded rod brush holder 21 Install the brush holder phase 22 Slide the long insulating pipe over the other threaded rod brush holder 23 Install the brush holder phase and center it 24 Install the hexagon nuts flat washers and spring rings on the threaded rods...

Page 55: ... Route the reeling cable onto the reel body all the way to the cable entry 3 Route the reeling cable through the cable screw connection into the terminal strip cable enclosure 4 Strip the reeling cable according to the required connection length 5 Strip the wires and fit them with ferrules 6 Connect the wires to the terminal strip according to the assembly 7 Check the continuity of the PE connecti...

Page 56: ...ction into the cable enclosure 3 Strip the permanently routed cable according to the required connection length 4 Strip the wires and fit them with ring cable lugs 5 Use a brass screw to connect the wire PE to the brush holder PE 6 1 page 34 and 6 2 page 36 6 Connect the wire phases to the brush holder phase 7 Check the continuity of the PE connection 8 Check the continuity of the phases and other...

Page 57: ...drive off when the cable has fully wound or unwound Two safety windings always remain on the reel body to relieve the strain from the cable The gear cam limit switch does not have the function of an emergency off emergency stop or safety switch INFORMATION The description of the gear cam limit switch setting appears in the installation chapter of the applicable document page 54 Figure 39 Gear cam ...

Page 58: ...of 86 6 6 Heater optional A thermally controlled stationary heater prevents the formation of condensate Always switch the heater on when the device is in continuous operation INFORMATION The data sheet describes how to connect the heater Figure 40 33 watt heater ...

Page 59: ... to the supply unit or to the first cable deflection 7 1 2 Cylindrical version Figure 42 Cable routing from the device to the supply unit or to the first cable deflection Unwind the reeling cable in alignment with the supply unit Unwind the reeling cable in alignment with the first cable deflection INFORMATION Always follow the deflection angle It is α 4 for the cable feed from the device to the f...

Page 60: ... 43 Cable strain when unwinding and winding the reeling cable 7 3 Checks during commissioning When commissioning the device check any bearing noise and vibrations the proper winding ability of the reeling cable unwinding and winding safety windings the taut position of the reeling cable on the reel body cable tensile force when unwinding and winding the reeling cable NOTICE Air pockets between the...

Page 61: ...must always be switched on during operation Keep the drive of the device switched on during brief interruptions in operation 8 1 1 Malfunctions The following malfunctions create alerts on an interface on the device or in the higher level system by various accessories and trigger a quick stop Slack cable signalled by the proximity switch of the roller payout guide Tight cable signalled by the proxi...

Page 62: ...boost safety and reliability of the device Figure 44 shows the effect of interacting components Figure 44 Block diagram of device drive unit with reel body 1 Brake rectifier 2 Motor brake 3 Motor 4 Primary side permanent magnetic coupling 5 Secondary side permanent magnetic coupling 6 Gearbox 7 Reel shaft 8 Cable reel with reeling cable 9 External unwinding force ...

Page 63: ... with manual ventilation on the motor 9 1 1 Button Set up the manual mode level 9 1 2 Manual ventilation Figure 45 Manual ventilation on the motor example 1 Motor 2 Manual ventilation 1 Engage the manual ventilation lever with the return against the spring The reel body will move 2 Release the manual ventilation lever with the return The reel body will stop moving ...

Page 64: ...inding and winding of the cable Inspect the safety windings Listen and watch for bearing noise and vibration 1 week 3 weeks Drive Components Check for visible damage Check cable screw connections 1 week 6 months Gearbox Inspect the oil level Check gearbox for leaks Check the consistency of the oil Replace the oil Clean the pressure release valve Exchange the pressure release valve after commission...

Page 65: ...ve any moisture with a clean cloth To clean the permanent magnetic coupling Remove any dirt from the housing To clean the motor Remove dirt with dry compressed air Remove any soiling from the condensate drain holes Clean the cooling fins NOTICE Improper external cleaning Damage to device Wipe the outside of the device with a damp cloth Use a mild cleaning agent ...

Page 66: ...ngage four persons One person operates the pendant control panel for touch control mode One person is on the slip ring assembly side Two people are on the side of the reel body Use the cable unwinder with cable reel Figure 46 Use the following aids depending on the installation location Crane with work cage or platform Lifting equipment Clamp holders and eyelet Cable pulling grip CAUTION Cable und...

Page 67: ...hollow shaft is not perfectly horizontal or right angled to the unwinding winding direction Align the device 7 1 page 59 Reeling cable is twisted Untwist the reeling cable Faults of electric current and data transmission Loose screws on the brush holders slip rings Check the screws Tighten screws if necessary Very soiled brush holders slip rings Clean with contact spray Worn carbon brushes Replace...

Page 68: ...ervice Oil leak Overpressure due to missing pressure release valve Install the pressure release valve Overpressure due to soiled pressure release valve Clean the pressure release valve Shaft sealing ring is damaged Contact customer service Cover flange screws are not tightened properly Tighten the screws and nuts Transport damage e g hairline cracks Examine the gearbox Oil leak from the gearbox ve...

Page 69: ...s are worn e g in the case of couplings Contact customer service Positive connection disconnected by overload Contact customer service Unusual noise from motor Increased bearing play and or damaged bearings Contact customer service Wrong converter parameter settings Correct the parameter settings Output shaft does not rotate with running motor Excessively high load on drive output unit Contact cus...

Page 70: ...Motorized Cable Reel Technical Manual September 2021 Page 70 of 86 11 September 2021 motor Observe other applicable document see supplier documentation ...

Page 71: ...Motorized Cable Reel Technical Manual September 2021 Page 71 of 86 12 Permanent magnetic coupling Observe other applicable document see installation instructions for the permanent magnetic coupling ...

Page 72: ...tely filled with oil The gearbox is supplied filled with synthetic oil For storage periods longer than 24 months we recommend that you replace the oil 000001_WA 13 1 Design 13 1 1 Symbols Figure 47 Design M1 Figure 48 Design M4 Figure 49 Ventilation Figure 50 Oil level oil inspection glass Figure 51 Oil drainage Figure 52 Oil filling ...

Page 73: ...not underestimate or exceed the recommended oil quantity NOTICE Incorrect oil quantity Damage to the gearbox Do not underestimate or exceed the recommended oil quantity Gearbox Size Design M1 M4 Gear oil quantity I 1 SK 9022 1 3 3 8 2 SK 9032 1 8 6 8 3 SK 9042 4 4 10 7 4 SK 9052 6 5 21 5 5 SK 9072 10 0 36 0 6 SK 9082 17 0 71 5 WARNING Hot surface hot oil Touching hot surfaces and hot oil can burn ...

Page 74: ...il inspection glass again 13 4 Checking the quality Conduct a visual inspection of the oil to determine its quality Fresh oil is visually clear has a typical smell and a product specific color Clouding or a flaky appearance indicates the presence of water and or soiling A dark or black color indicates residue formation a strong thermal decomposition or soiling 3 The drive was switched on shortly a...

Page 75: ...tional reasons oil mist might escape from a pressure release valve or labyrinth seal During the first 24 operating hours of the gearbox run in phase minor quantities of oil can escape on the shaft sealing ring Condition Description Actions Notes Moisture film on the shaft sealing ring Moisture film due to functional reasons apparent leak Wipe off the moisture film Keep the moisture film under obse...

Page 76: ...ange 2 3 Strain relief clamp 2 4 Cable enclosure terminal strip 2 5 Cable screw connection 2 6 Terminal strip 2 7 Cover 2 8 Clamping ring 3 0 Slip ring assembly 3 1 Cable enclosure 3 2 Cable screw connection 3 3 Limit switch 3 4 Heater 3 5 Covering hood 3 6 Clamping ring INFORMATION When ordering spare parts please state the name of the spare part from the key below as well as the serial number of...

Page 77: ...ing cylinder version 1 0 Drive 1 1 Gearbox 1 2 Permanent magnetic coupling 1 3 Brake motor 2 0 Reel body 2 1 Reel body 2 2 Reel flange 2 3 Cable screw connection 2 4 Terminal strip 2 5 Cover 3 0 Slip ring assembly 3 1 Cable enclosure 3 2 Cable screw connection 3 3 Limit switch 3 4 Heater 3 5 Covering hood 3 6 Clamping ring ...

Page 78: ...ip ring assembly spare parts drawing example 1 Slip ring carrier 2 Slip ring PE 60 A 3 Slip ring phase 60 A 4 Brush holder PE 60 A 5 Brush holder phase 60 A 6 Slip ring phase 36 A 7 Brush holder phase 36 A 8 Gear cam limit switch INFORMATION When replacing a brush holder also replace its insulating pipe ...

Page 79: ...vidual components 3 A voltage free state has been established 1 Disconnect the existing cables from the supply unit 2 Remove the permanently routed cable from the device 3 Remove the reeling cable from the device 4 Attach the reel body to the lifting equipment using round loops Figure 8 page 22 5 Tighten the round loops and maintain tension 6 Ensure that the weight of the reel body is evenly distr...

Page 80: ...device Dispose of recycle the device components cables and packaging materials according to local regulations CAUTION Improper disposal of gear oil Possible risks to human health and environmental damage Wear personal protective equipment Avoid contact with the skin Dispose of gear oil according to its waste code Oil Type Description Waste Code Mineral oil CLP ISO VG220 130205 Polyglycols CLP ISO ...

Page 81: ...e screws according to proper tightening torques NOTICE Fixture faces not flush Property damage Make sure that the faces of the fixture are flush with the installation location when screwing the device in place Cable Screw Connection Type Cable Diameter mm M 12 x 1 5 3 6 M 16 x 1 5 5 9 M 20 x 1 5 8 13 M 25 x 1 5 11 17 M 32 x 1 5 15 21 M 40 x 1 5 19 28 M 50 x 1 5 26 35 M 63 x 1 5 32 56 ...

Page 82: ...1 557 M 24 675 960 M 30 1 450 2 100 M 36 2 528 3 700 Thread Size öl GF 71 µth 0 15 µh 0 13 CU C Paste 75 µth 0 13 µh 0 14 Torque Nm Preloading kN Torque Nm Preloading kN M 8 37 23 37 25 M 10 73 37 73 39 M 12 126 54 126 57 M 14 201 74 201 78 M 16 307 100 306 106 M 18 430 123 429 130 M 20 602 126 600 165 M 22 821 194 818 205 M 24 1 036 225 1 034 238 CU C Paste Copper graphite paste Molykote 100 öL W...

Page 83: ...of 86 17 2 3 Slip ring assembly 17 2 4 Motor terminal board connection Thread Size Tightening Torques Nm M 3 5 0 8 M 4 1 2 M 5 2 M 6 3 M 8 6 M 10 10 M 12 15 5 M 16 30 Thread Size Tightening Torques Nm M 4 1 0 M 5 2 2 M 6 3 5 M 8 7 0 M 10 11 0 M 12 17 0 M 16 34 0 ...

Page 84: ...57 Dimensions of the new B and worn carbon A Carbon brush dimensions When the wear limit dimension A has been reached replace the brush holder Current Strength A Dimension A 1 Nm 1 Dimension for worn carbon brush Dimension B 2 Nm 2 Dimension for new carbon brush 26 12 18 32 36 12 18 40 9 13 42 9 13 60 14 20 125 14 20 150 14 20 220 16 25 265 16 25 500 16 25 ...

Page 85: ......

Page 86: ...Motorized Cable Reel Technical Manual September 2021 ...

Reviews: