7
58-601 Pulsar
®
Radar Transmitter
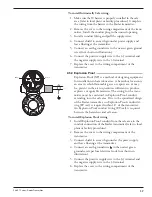
1. Remove the cover of the wiring compartment.
2. Attach a conduit fitting and mount the conduit plug in the
spare opening. Pull the power supply wire through the con-
duit fitting.
3. Connect shield to an earth ground at power supply and
leave floating at the transmitter.
4. Connect the positive supply wire to the (+) terminal and the
negative supply wire to the (-) terminal. For Explosion
Proof Installations, see Wiring, Section 2.5.3.
5. Replace the cover and tighten.
1.4
QuickStart Configuration
The Radar transmitter comes factory-calibrated and can be
configured in minutes for specific applications. Bench con-
figuration provides a convenient and efficient way to set up
the transmitter before going to the tank site to complete the
installation (disregard Fault messages due to unattached
antenna). The minimum configuration instructions follow.
Use the information from the operating parameters table
before beginning configuration. See Configuration
Information, Section 1.1.2.
1. Power-up the transmitter.
Upon initial start-up, NO FALSE TARGET REJECTION
error message will be displayed. Once in the vessel the
FALSE TARGET routine must be run for proper operation.
During normal operation the display changes every 5 sec-
onds to show one of the four measured values: Level,
Quality, %Output, and Loop.
2. Remove the cover of the electronic compartment.
3. Use the Up or Down Arrow (
) keys to move from one
step of the configuration program to the next step.
4. Press the Enter Arrow (
) key. If a PASSWORD is active,
enter it here. The default=0 (no password necessary). The
last character in the first line of the display
changes to an exclamation point (!).
5. Use the Up or Down Arrow (
) keys to increase or
decrease the value in the display or to scroll through the
choices.
6. Press the Enter Arrow (
) key to accept a value and move
to the next step of the configuration program.
Units!
xxx
Enter
Down
Up
Red (+)
Black (-)
(+)
(-)


