background image

© 

2010 Magnum Energy, Inc

.

Mounting

The remote control panel can be 

fl

 ush mounted through an 

opening in a wall; or, if there is insuf

fi

 cient room behind the wall 

— or no desire to cut into the wall — the remote can be surface 

mounted. 

CAUTION:

 Always check for hidden electrical wires, 

pipes, and cables BEFORE drilling, cutting, or screwing 

into walls or cabinets.

Flush Mounting

To 

fl

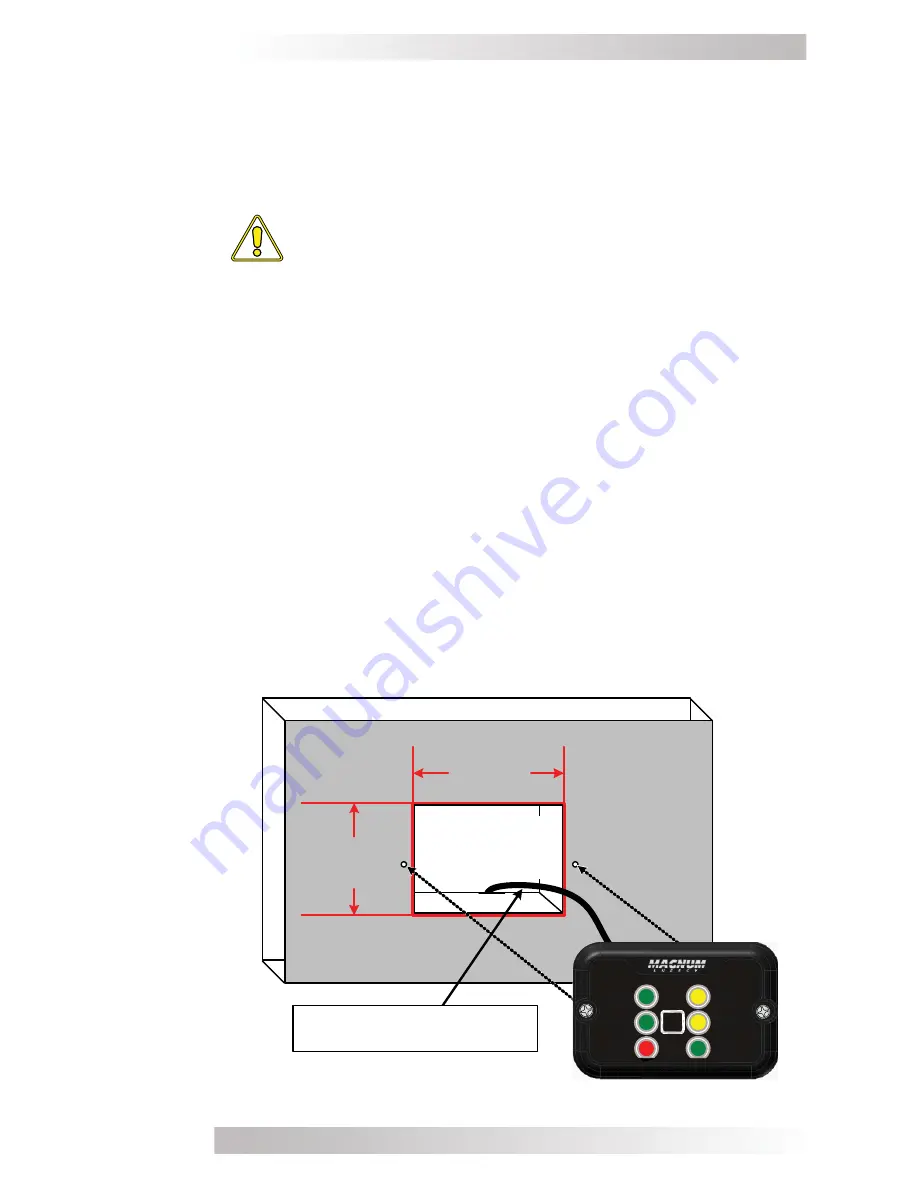
 ush mount the remote, the unit’s display panel will need to be 

placed into an opening. This opening must have at least a 2” depth 

to allow room for the remote’s rear circuit board and cables. 
1. Cut an opening in a wall – see Figure 2 to determine the correct 

opening dimensions. DO NOT cut the opening too big to ensure 

there are no openings around the display, and that there is enough 

material for the screws to secure the display. Remove any wall 

insulation (if applicable) that may contact the back of the remote.
2. Route the communications cable from the inverter up into the 

opening in the wall. 
3. Connect the communications cable to the RJ11 jack at the rear 

of the remote control (see Figure 2). 
4. Position the remote into the opening in the wall.
5. Secure the remote to the wall with the 2 screws provided. 
6. After ensuring the inverter is OFF, plug the communications 

cable into the REMOTE port on the front of the inverter.

Figure 3, Flush Mounting

3

2.0 Installation

M IN  1 1/2"

M A X   1  5 /8 "

M IN   2 "

M A X  2  1/8 "

CUT THIS

AREA OUT

Communication Cable 

(routed in the wall)

BU L K

ABSO R B

FAU L T

FL O AT

AC  IN

IN VER T

O N/ O FF

Summary of Contents for M-RC

Page 1: ...Owner s Manual MM R and M RC Remote Controls ...

Page 2: ... 2010 Magnum Energy Inc ...

Page 3: ...833 fax 425 353 8390 web www magnumenergy com Product Safety Instructions Read and follow all instructions and safety information contained in this manual before installing or using this product All electrical work must be performed in accordance with local state and federal electrical codes This product is designed for indoor compartment installation It must not be exposed to rain snow moisture o...

Page 4: ...s 6 Operation 7 ON OFF Switch 7 Monitoring the LED Indicators 8 MM R and MM RC Remotes 8 MM RC Remote Only 9 4 0 Warranty and Service Information 11 List of Figures Figure 1 MM R and MM RC Remote Controls 1 Figure 2 Communications Cable Connections 2 Figure 3 Flush Mounting 3 Figure 4 Surface Mounting 4 Figure 5 Remote Display Dimensions 5 Figure 6 Mounting Ring Dimensions 5 Figure 7 LED Indicator...

Page 5: ...tch The unit comes with 25 cable This remote is for the MM612 model requires serial number L1 201 or higher MM RC Provides six LED indicators for inverter and charger sta tus and includes a remote ON OFF switch The unit comes with 25 cable This remote is for the MM1212 MM612AE MM1512AE and MM1524AE models Figure 1 MM R and MM RC Remote Controls M M R M M R C B U LK A B S O R B FA U LT FLO A T A C ...

Page 6: ...n the cable route from the remote to the inverter before you do any cutting or drilling to ensure there are no obstructions that can t be overcome Allow ample room to access the ON OFF switch view the LEDs for the inverter s operational status and for any troubleshooting Connecting the Communications Cable The communications cable is a 25 4 conductor cable wired like a normal telephone type cable ...

Page 7: ...ns DO NOT cut the opening too big to ensure there are no openings around the display and that there is enough material for the screws to secure the display Remove any wall insulation if applicable that may contact the back of the remote 2 Route the communications cable from the inverter up into the opening in the wall 3 Connect the communications cable to the RJ11 jack at the rear of the remote co...

Page 8: ...break the appropriate tab on the mounting ring 4 Pull the cable through the mounting ring and place the ring side with the removed tab over the communication cable against the wall 5 Position the mounting ring over the drilled holes and screw the mounting ring to the wall 6 Connect the communications cable routed through the mounting ring opening to the RJ11 connector on the rear of the remote dis...

Page 9: ... 2010 Magnum Energy Inc Figure 5 Remote Display Dimensions Figure 6 Mounting Ring Dimensions 2 0 Installation 5 BULK ABSORB FLOAT INVERT AC IN FAULT ON OFF Side Front Side Front ...

Page 10: ...wner s Manual to help clear the fault condition Factory Default Settings Your MM MM AE Series inverter has many functions that have changeable settings These settings are preset and loaded by the inverter when turned on However if the MM remote control is con nected to the inverter the settings from the remote override any default settings in the inverter The settings in the remote are saved in th...

Page 11: ...er feature this switch can also be used to disable the charger Charger Standby so that all the incoming power can be used exclusively for the AC loads To turn the charger off press and hold the ON OFF switch for three seconds you must be in the Charge Mode When this happens the charging indicators BULK ABSORB and FLOAT will go off To turn the charger back on press and hold the ON OFF switch for th...

Page 12: ...ergy from the battery to supply AC power to the loads connected to the inverter and AC IN LED indicator is On solid The inverter is in Standby The external AC power utility or generator connected to the inverter s input is passing through the inverter to power the AC loads The inverter will automatically turn on to power the AC loads if the external AC power is lost or disconnected Blinks On once ...

Page 13: ...en above acceptable limits This is caused by loads too great for the inverter to operate continuously or by a lack of ventilation to the inverter When the unit has cooled it will automatically reset and resume operation Blinks On 4 times every 4 seconds AC Overload the inverter has turned off because the connected loads are larger than inverter s output capacity or there is a short on the output w...

Page 14: ...uces charge rate to help stabilize the incoming AC voltage Off charger is not in Absorption Charge mode FLOAT green On solid Float Charging at the end of the absorb charging time the charger reduces the charge voltage to maintain the batteries at 13 4 VDC per Battery Type selection Blinks On 1 time every 4 seconds Charger Back off charger current is reduced This occurs if 1 The internal temperatur...

Page 15: ... repair determined by the price paid by the original purchaser Magnum Energy shall not be liable for any other losses or damages 4 Upon request from Magnum Energy the original purchaser must prove the product s original date of purchase by a dated bill of sale itemized receipt 5 The original purchaser shall return the product prepaid to Magnum Energy in Everett WA After the completion of service u...

Page 16: ... 2010 Magnum Energy Inc Magnum Energy Inc 2211 West Casino Rd Everett WA 98204 Phone 425 353 8833 Fax 425 353 8390 Web www magnumenergy com PN 64 00012 Rev A ...

Reviews: