background image

212

21

1

213

216

147

147

216

214

215

147

208

209

91

125

121

120

122

120

121

119

118

117

116

148

172

170

171

72

169

173

168

163

165

166

164

158

160

161

162

159

151

149

150

148

157

27

154

155

152

153

43

156

116

117

167

114

126

127

126

127

114

174

175

176

177

178

179

180

142

204

142

206

131

129

130

227

133

132

140

17

135

44

146

145

139

146

147

144

139

132

132

139

139

138

132

139

*

143

207

205

210

124

119

44

165

223

222

224

225

226

.2

.4

.5

.3

.1

182

181

Summary of Contents for MI-31450

Page 1: ...MODEL NO MI 31450 MI 31453 OPERATING MANUAL...

Page 2: ...e 8 3 20 210m m 508m m Max 0 12 3m m1 Feed Rates 16 20 FPM 4 96 6 33 mirnin Cutterhead Number of Knives 58 Diameter 3 15 80m m Speed 5 000 RPM Cuts Per Minute 20 000 Feed Rolls Spiral in feed 2 Dia 50...

Page 3: ...as bits blades cutters etc disconnect from power 9 USE RECOMMENDED ACCESSORIES Consult the owner s manual for recommended accessories The use of improper accessories may cause risk of injuries 10 CHEC...

Page 4: ...tting operation is dusty Every day eyeglasses only have impact resistant lenses they ARE NOT safety glasses 18 DO NOT OVERREACH Keep proper footing and balance at all times 19 NEVER STAND ON TOOL Seri...

Page 5: ...sting tools and loose articals from machine before operating UNPACKING AND CLEANUP To ensure maximum performance from your planer clean it properly and install it accurately before use As soon as you...

Page 6: ...e be sure to attach to lifting handles only Be sure that machine is kept in level position while lifting as shown in Fig 2 Stand Assembling For best planing performance locate planer on solid level fo...

Page 7: ...e 6 5 Lead Screw Frequently Grease 6 6 Column Frequently Clean and SAE 30 6 7 Chain Frequently Grease 7 8 Bushing Frequently SAE 30 8 Lubrication Guide of Gear Box The gear box lubricant must be repla...

Page 8: ...as shown in Fig 10 4 Assemble the belts to the two pulleys as shown in Fig 11 And adjust for the proper belt tension by raising or lowering the motor plate as shown in Fig 12 then tighten the nuts A F...

Page 9: ...ow position NOTE The raising range between 0 003 0 006 when raising the roller higher above table as shown in Fig 14 The Table Rollers on your planer are set for average planing and are parallel to th...

Page 10: ...scale is a combination inch metric scale A Fig 18 cutting range from 0 to 8 204mm The distance of upward or downward movement is controled by Handwheel B Fig 18 for one evolution is 0 059 1 5mm Before...

Page 11: ...nd not disturb the setting of the knives 5 Using the knife gage adjust the knife that must be reset by loosening all six locking screws D Fig 22 by turning them into the knife locking bar As the knife...

Page 12: ...raising table as shown in Fig 23 3 Move the gage block A to opposite end of the working table as shown in Fig 24 IMPORTANT DISTANCE FROM THE WORKING TABLE TO EDGE OF THE HEAD CASTING SHOULD BE THE SA...

Page 13: ...utfeed Rollers Spring Tension To adjust the spring tension of the Weed Outfeed roller turn the screw G H Fig 28 and also the screw on the opposite end of the Infeed Outfeed roller Anti Kick Back Finge...

Page 14: ...ed properly as previously explained under CHECKING AND ADJUSTING OF KNIVES 3 Place the gage block G on the table directly underneath the cutterhead as shown in Fig 31 Using a 0 02 0 5mm feeler gage H...

Page 15: ...re three kinds of operations of gear box by using shaft handle to pull or push In the position A feed roll is operating on rate 20 FPM Shown as Fig 16 In the position 13 feed roll is operating on rate...

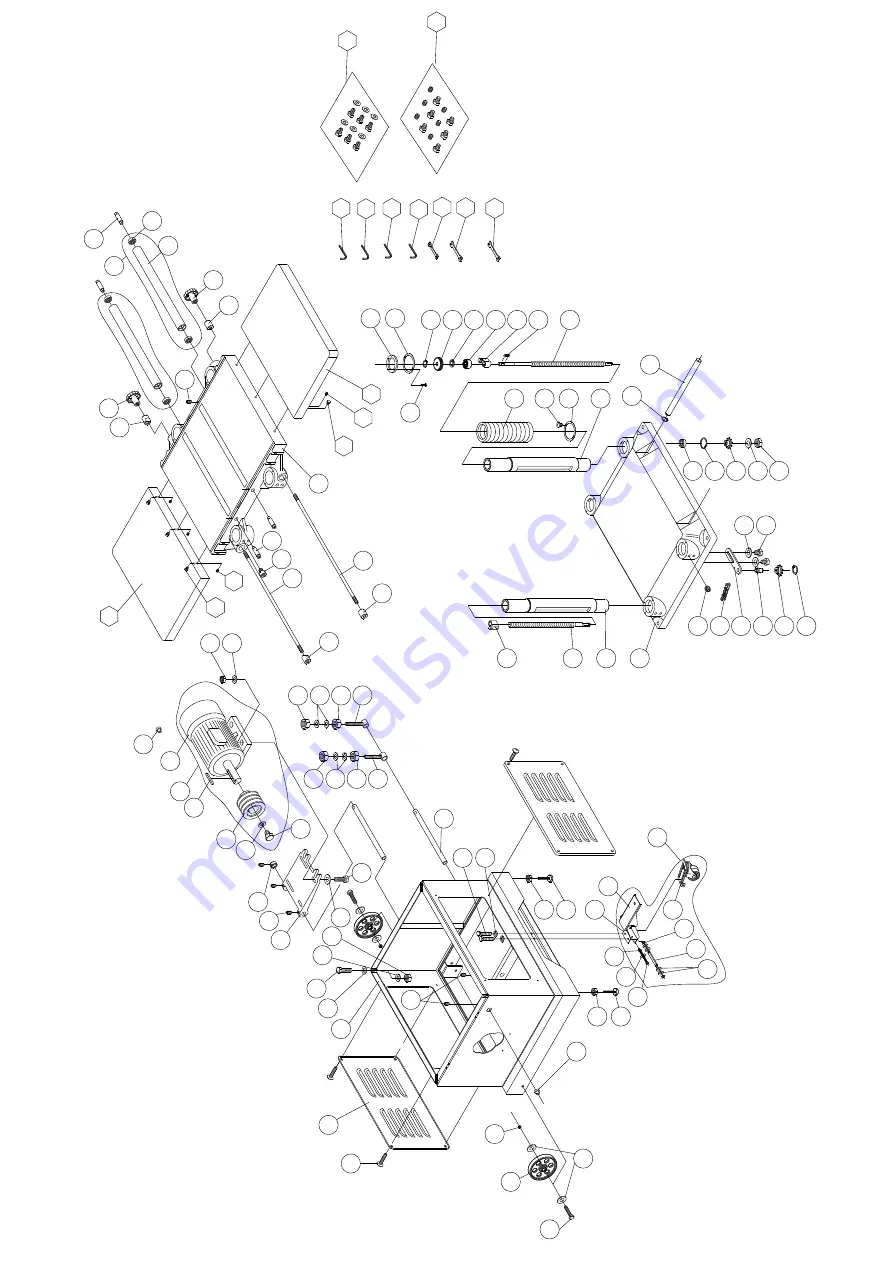
Page 16: ...48 25 24 46 16 43 58 44 8 7 5 60 24 48 5 61 62 59 219 4 2 1 3 6 13 17 63 7 47 83 82 84 87 86 85 15 66 81 89 85 88 84 90 99 100 101 99 102 123 103 105 106 107 108 109 113 112 111 7 123 95 94 93 92 123...

Page 17: ...63 165 166 164 158 160 161 162 159 151 149 150 148 157 27 154 155 152 153 43 156 116 117 167 114 126 127 126 127 114 174 175 176 177 178 179 180 142 204 142 206 131 129 130 227 133 132 140 17 135 44 1...

Page 18: ...HAND WHEEL 1 MI 31450 20 230114 906 HANDLE 1 MI 31450 21 200021 000 SPONGE 1 MI 31450 22 250172 617 CHIP DEFLECTOR PLATE 1 MI 31450 23 270015 901 SPRING PLATE 3 MI 31450 24 000203 106 SET SCREW M6 1...

Page 19: ...ER 58 MI 31450 56 5 30300H 05 CARBIDE INSERT 30 12 1 5MM 58 MI 31450 58 280051 000 SPRING 4 MI 31450 59 130039 000 BUSHING 4 MI 31450 60 170408 902 PLATE 4 MI 31450 61 006305 100 SPRING WASHER 8 2 15...

Page 20: ...4 19 2 MI 31450 100 043608 000 OIL SEAL TC28 40 8 1 MI 31450 101 050281 000 GEAR BOX 1 MI 31450 102 340012 615 PACKING PIECE 1 MI 31450 103 922351 000 GEAR 1 MI 31450 104 010102 000 RETAINING RING RT...

Page 21: ...P 19B 10H 8 MI 31450 140 000003 208 HEX HD SCREW M8 1 25P 40 4 MI 31450 142 021602 000 CORD PROTECTOR 5 8 2 MI 31450 143 920306 000 CASTER 1 MI 31450 144 006001 046 FLAT WASHER 8 5 16 1 5t 4 MI 31450...

Page 22: ...8 050299 000 ROLLER SEAT 3 MI 31450 189 360398 902 ROLLER 2 MI 31450 190 050300 000 WORM GEAR BOX 1 MI 31450 191 000103 113 CAP SCREW M6 1 0P 50 3 MI 31450 192 320204 000 WORM GEAR 1 MI 31450 194 1900...

Page 23: ...I 31453 ITEM NO PART NO DESCRIPTION SPEC QTY MI 31450 225 030304 000 BEARING 6201Z A 2 MI 31450 226 PEDAL ASSY 1 MI 31450 227 050321 008 MOTOR BASE 1 MI 31450 228 KEY 2 MI 31450 229 171404 904 SWITCH...

Reviews: