background image

Shutdown and Cleaning 

16

312082B

Shutdown and Cleaning

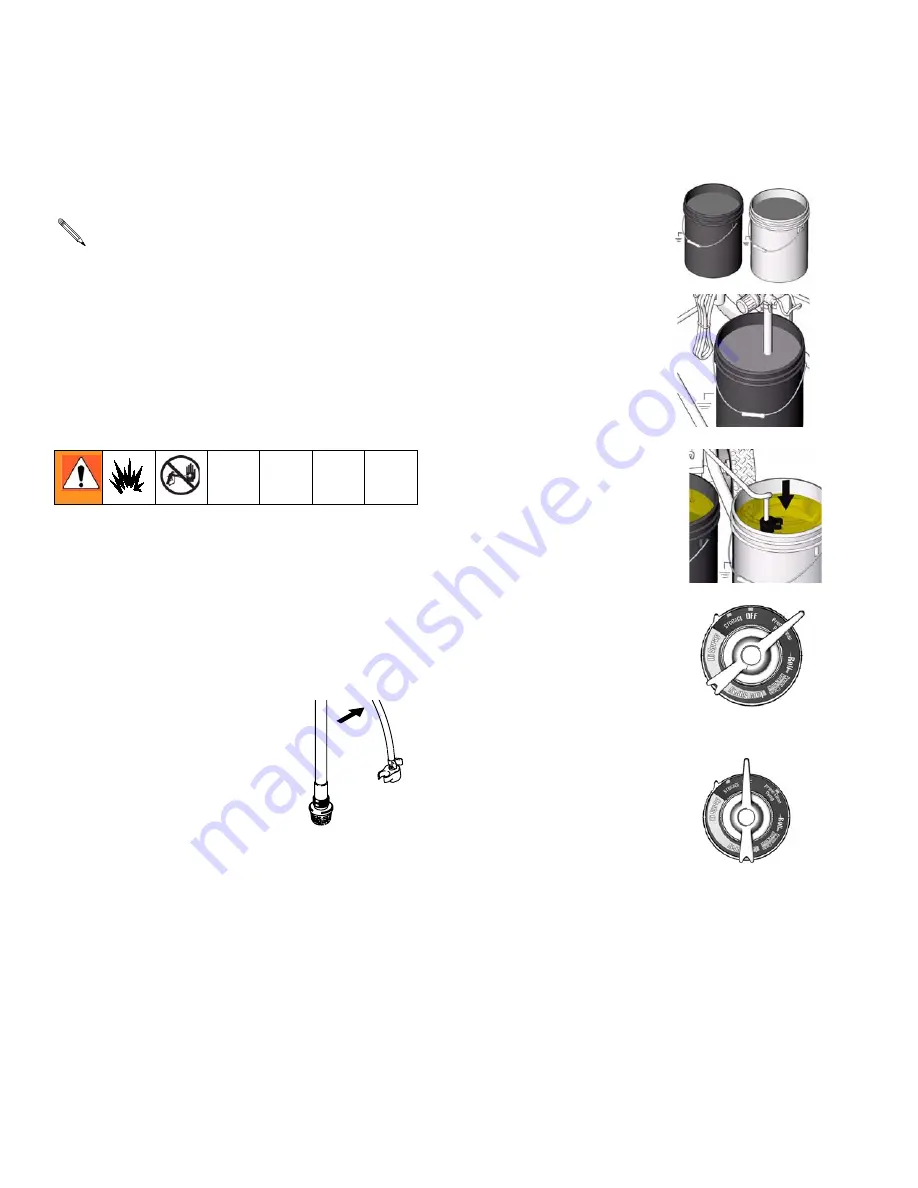
Pail Flushing

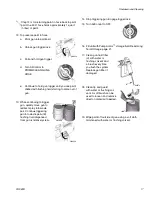
1.

Relieve pressure, page 7. 

2.

If you used a spray gun, remove tip and guard 
assembly from gun and place in flushing fluid.

If you used a roller, leave roller assembly attached 
to gun.

3.

Lift Suction tube and prime tube from paint pail. Let 
them drain into paint for a while.

4.

Separate prime tube (smaller) 
from Suction tube (larger).

5.

Place waste and paint 
pail side by side.

6.

Submerge Suction tube in 
water or flushing solvent.

7.

Place prime tube in waste pail.

8.

Set AllControl to 
PRIME/CLEAN PUMP.

9.

Flush until approximately 1/3 of the flushing fluid is 
emptied from the pail.

10. Turn AllControl to OFF.

11.

a.

If you used a spray 

gun only, continue 

Pail Flushing, Step 12.

b.

If you used a roller follow Cleaning Roller 

instructions beginning on page 18.

For short term shutdown periods (overnight to 
two days) refer to Short Term Storage, page 21.

For flushing after spraying water-based 
coatings, use water. Read Priming and 
Flushing Storage Fluid, page 8 or Power Flush, 
page 19.

For flushing after spraying oil-based coatings, 
use compatible oil-based flushing fluid or 
mineral spirits. Read Priming and Flushing 
Storage Fluid, page 8.

TIA

ti9726a

ti9651a

ti9652a

ti9169a

ti9168a

Summary of Contents for 261805

Page 1: ... more information about your mate rial request MSDS from distributor or retailer Includes Gun SG10 Hose 1 4 inch x 35 ft 6 4 mm x 11 m 9 inch Pressure Roller Attachment 312082B Operation Project Painter 7 Airless Sprayers The manual provided with this sprayer contains English Español and Français Visit our website http MAGNUM Graco com ti9194a ti9208a ti9338a Specifications This equipment is not i...

Page 2: ... lights on or off when flammable fumes are present Ground equipment and conductive objects in work area Read Grounding instructions If there is static sparking or you feel a shock stop operation immediately Do not use equipment until you identify and correct the problem Keep a fire extinguisher in the work area ELECTRIC SHOCK HAZARD Improper grounding setup or usage of the system can cause electri...

Page 3: ... work area Do not operate the unity when fatigued or under the influence of drugs or alcohol PRESSURIZED ALUMINUM PARTS HAZARD Do not use 1 1 1 trichloroethane methylene chloride other halogenated hydrocarbon solvents or fluids containing such solvents in pressurized aluminum equipment Such use can cause serious chemical reaction and equipment rupture and result in death serious injury and propert...

Page 4: ...pump Fluid supply container follow local code Solvent pails used when flushing follow local code Use only conductive metal pails placed on a grounded surface such as concrete Do not place the pail on a nonconductive surface such as paper or cardboard which interrupts grounding continuity Grounding the metal pail connect a ground wire to the pail by clamping one end to pail and other end to ground ...

Page 5: ...storage J Storage compartment Provides onboard storage for spray tips and or tools L Sample spray shield Introduces benefits of a spray shield Blocks paint from surfaces you do not want to spray M SpillGuard tray Protective tray to set sprayer and paint pail on during operation N Practice spray board Instructs user on how to perform basic spraying techniques and provides surface to practice techni...

Page 6: ...ComponentIdentification 6 312082B B H G L C D E F J A R S T U W N ti9724a ti9312a ti9310a V X P M ti9307a ti9309a ti9257a ti9208a ti9168a ti9338a ...

Page 7: ... has not been fully relieved after following the previous steps VERY SLOWLY loosen tip guard retain ing nut or hose end coupling to relieve pressure gradu ally then loosen completely Clear hose or tip obstruction Read Unclogging Spray Tip page 11 AllControl Settings Locked Unlocked ti8923a ti8922a ti9168a ti9207a STORAGE long term and overnight shutdown PRIME CLEAN PUMP ROLL directs low pressure f...

Page 8: ...en spraying water based materials flush the system thoroughly with water When spraying oil based materials flush the system thoroughly with mineral spirits or compatible oil based flushing solvent To spray water based materials after spraying oil based materials flush the system thoroughly with water first The water flowing out of prime tube should be clear and solvent free before you begin sprayi...

Page 9: ...tarting to come out of prime tube a point gun into waste pail b unlock gun trigger lock c pull and hold gun trigger d set AllControl to PRIME CLEAN GUN HOSE 12 Continue to trigger into waste pail until you see only paint coming out of gun 13 Release trigger Engage trigger lock 14 Transfer drain tube to paint pail and clip prime tube to Suction tube 15 If spraying install tip and guard on gun page ...

Page 10: ...zes paint If maximum sprayer pressure is not enough for a good spray pattern tip is too worn See Reversible Spray Tip Selection Chart page 12 Adjusting Pressure Align setting indicator on AllControl with function page 7 LOW SPRAY provides the lowest pressure HIGH SPRAY increases pressure ti8923a retaining nut black rubber gasket and guard tip ti8911a metal seat TI A Use tip to align seat in guard ...

Page 11: ... Tip Selection Selecting Tip Hole Size Tips come in a variety of hole sizes for spraying a range of fluids Your sprayer includes an 0 015 in 0 38 mm tip for use in most spraying applications Use the following table to determine the range of recommended tip hole sizes for each fluid type If you need a tip other than the one supplied see the Reversible Tip Selection Chart on page 12 HINTS As you spr...

Page 12: ...verage on broad open surfaces Narrower fans provide better control on small con fined surfaces Understanding Tip Number The last three digits of tip number i e 221413 contain information about hole size and fan width on surface when gun is held 12 in 30 5 cm from surface being sprayed Reversible Tip Selection Chart Example For an 8 to 10 in 203 to 254 mm fan width and 0 013 0 33 mm hole size order...

Page 13: ...gun at bottom edge of previous stroke over lapping each stroke by half Spray Shield Use Sample Spray Shield to help shield ceilings and floor boards from spray The Sample Spray Shield is intended to introduce you to the benefits of a spray shield Visit your local paint supplier for larger spray shield solutions 1 Apply a layer of masking tape approximately 4 inches wide to edge of spray shield Cha...

Page 14: ...afety Trigger gun Roll surface until paint is fully dispersed on roller This may take a minute 7 Increase pressure only if triggering gun does not supply enough paint for your rolling speed 8 Whenever you stop painting relieve pressure page 7 and elevate roller end of extension tube to prevent paint from draining out 9 Flush the pump gun and pressure roller immedi ately after each use to prevent p...

Page 15: ...ly the width of your paint brush where the walls and ceiling meet 2 With the roller apply paint to the ceiling working the short way of the room and applying as wide a strip as possible 1 Walls and Woodwork Using a brush paint woodwork first Apply a starting row of paint approximately the width of the paint brush around the woodwork and where the walls meet the ceiling 2 With the roller apply pain...

Page 16: ...ste pail 8 Set AllControl to PRIME CLEAN PUMP 9 Flush until approximately 1 3 of the flushing fluid is emptied from the pail 10 Turn AllControl to OFF 11 a If you used a spray gun only continue Pail Flushing Step 12 b If you used a roller follow Cleaning Roller instructions beginning on page 18 For short term shutdown periods overnight to two days refer to Short Term Storage page 21 For flushing a...

Page 17: ...y clear 14 Stop triggering gun Engage trigger lock 15 Turn AllControl to OFF 16 Fill unit with Pump Armor storage fluid Read Long Term Storage page 21 17 Clean gun fluid filter d with water or flushing solvent and a brush every time you flush the system Replace gun filter if damaged 18 Clean tip and guard with water or flushing sol vent A soft brush can be used to loosen and remove dried on materi...

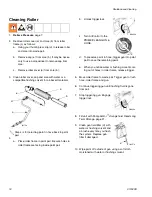
Page 18: ...IME CLEAN GUN HOSE d To preserve paint in hose trigger gun into paint pail to save the remaining paint e When you notice water or flushing solvent com ing out of holes in roller frame release trigger 5 Move roller frame to waste pail Trigger gun to flush hose roller frame and gun 6 Continue triggering gun until flushing fluid is gone from pail 7 Stop triggering gun Engage trigger lock 8 Fill unit ...

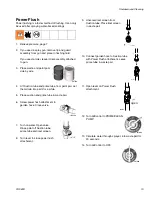
Page 19: ...for a while 5 Place suction and prime tube in waste pail 6 Screw power flush attachment to garden hose Close valve 7 Turn on water Open valve Rinse paint off Suction tube prime tube and inlet screen 8 Turn lever to close power flush attachment 9 Unscrew inlet screen from Suction tube Place inlet screen in waste pail 10 Connect garden hose to Suction tube with Power Flush attachment Leave prime tub...

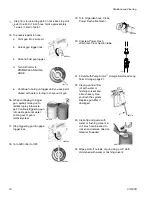
Page 20: ...F 19 Turn off garden hose Close Power Flush attachment 20 Unscrew Power Flush attachment from Suction tube 21 Fill unit with Pump Armor storage fluid Read Long Term Storage page 21 22 Clean gun fluid filter d with water or flushing solvent and a brush every time you flush the system Replace gun filter if damaged 23 Clean tip and guard with water or flushing solvent A soft brush can be used to loos...

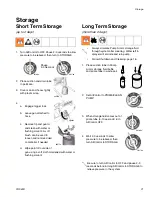
Page 21: ... or flushing solvent Long Term Storage more than 2 days 1 Place suction tube in Pump Armor storage fluid bottle and prime tube in waste pail 2 Set AllControl to PRIME CLEAN PUMP 3 When storage fluid comes out of prime tube 5 10 seconds turn AllControl OFF 4 Wait 2 3 seconds to allow pressure to be relieved then turn AllControl to STORAGE ti9168a Pause 2 3 Seconds ti9174a ti9578a ti8923a ti9671a Al...

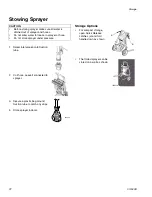
Page 22: ... any drips 4 Store sprayer indoors Storage Options For compact storage open Quick Release Latches a and fold handle down as shown The folded sprayer can be stored on a wall as shown CAUTION Before storing sprayer make sure all water is drained out of sprayer and hoses Do not allow water to freeze in sprayer or hose Do not store sprayer under pressure WL D a a ti9311a ...

Page 23: ...e the motor control board and or drivetrain Make sure AllControl is in OFF position Place sprayer in a warm area for several hours Then plug in power cord and turn AllControl to PRIME CLEAN PUMP Slowly increase pressure setting to see if motor will start If paint is hardened in sprayer pump packings valves drivetrain or pressure switch may need to be replaced Take sprayer to Graco MAGNUM authorize...

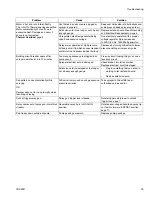
Page 24: ...Pressure is set too low Turn AllControl clockwise to increase pressure Spray tip is worn beyond capability of sprayer Replace spray tip Pressure is set at maximum but cannot achieve a good spray pattern Spray tip is too large for sprayer Select smaller spray tip Spray tip is worn beyond capability of sprayer Replace spray tip Extension cord is too long or not heavy enough gauge Replace extension c...

Page 25: ...ze Building circuit breaker opens after sprayer operates for 5 to 10 minutes Too many appliances are plugged in on same circuit Free up circuit unplug things or use a less busy circuit Sprayer electrical cord is damaged Check broken insulation or wires Replace electrical cord if damaged Extension cord is damaged or too long or not a heavy enough gauge Plug in something that you know is working to ...

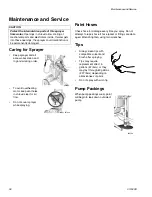
Page 26: ... two wrenches Tips Always clean tips with compatible solvent and brush after spraying Tips may require replacement after 15 gallons 57 liters or they may last through 60 gallons 227 liters depending on abrasiveness of paint Do not spray with worn tip Pump Packings When pump packings wear paint will begin to leak down outside of pump CAUTION Protect the internal drive parts of this sprayer from wat...

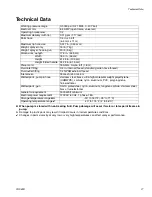
Page 27: ...ting 1 4 NPSM external thread Inlet screen 35 mesh 450 micron Wetted parts pump hose stainless steel brass ultra high molecular weight polyethylene UHMWPE carbide nylon aluminum PVC polypropylene fluroelastomer Wetted parts gun SG10 plated steel nylon aluminum tungsten carbide stainless steel brass fluroelastomer Generator requirement 1500 Watt minimum Electrical power requirement 120VAC 60 Hz 1 p...

Page 28: ...le obligation and buyer s sole remedy for any breach of warranty shall be as set forth above The buyer agrees that no other remedy including but not limited to incidental or consequential damages for lost profits lost sales injury to person or property or any other incidental or consequential loss shall be available Any action for breach of warranty must be brought within two 2 years of the date o...

Reviews: