background image


When you receive your 

Magnum Corn/Pellet Furnace, 

be careful to inspect all parts and components to 

make sure that nothing was damaged or lost in shipment.  If there was shipping damage, be sure to report 
it to your Magnum reseller, and the shipping company that delivered your unit.  

Freight damage claims 

must  be  made  to  the  Freight  Company  (not  the  AES  factory)  immediately.

    If  parts  are  missing 

contact  your  local 

Magnum 

reseller  or  contact  the  factory  right  away.   

Your  satisfaction  is  our  top 

priority

. If damage is not reported to the freight company before signing for it, you will not receive re-

imbursement for freight damage. 


To uncrate your 

Magnum Corn/Pellet Furnace:


1)


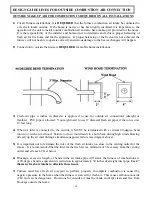
Cut the banding straps and open the carton lid. The carton is stapled to the wood pallet so it will be 
necessary to pull the cardboard loose from the pallet. Remove the crating box carefully lifting up over 
the top  of the unit. Be careful not  to  scratch the unit with the staples.  Remove the wood blocks and  
plastic.  We  strongly  urge  you  to  recycle  the  packaging  materials  to  help  protect  the  environment. 


IMPORTANT:

  Proper installation of this furnace is crucial for proper and safe operation.  Installing this 

product improperly may result in a house fire and personal injury.  All applicable building codes for your 
location  must  be  followed.    In  areas  where  building  codes  require  additional  steps  to  the  installation  of 
this  product  not  included  in  this  manual,  the  building  codes  will  take  precedent  and  must  be  followed.  
Contact  your  local  building  inspector  to  obtain  any  necessary  permits  or  inspection  guidelines  before 
installing  the  product. 

(This  appliance  must  be  installed  and  serviced  by  a  trained  licensed  heating 

contractor to assure proper installation and warranty of this product) The label located on the back 
of  the  appliance  must  be  filled  out  by  a  Licensed  HVAC  contractor.  Warranty  Labor,  parts, 
shipping or any other costs will not be covered if a trained installer does not install the unit. 
Consult your local heating contractor for proper heating requirements, placement of your Magnum  
Corn/Wood Pellet Furnace and duct sizing. 
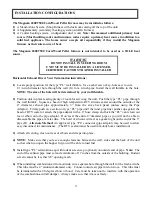
OUTSIDE AIR HOOKUP TO THE FURNACE IS REQUIRED  (4” required) 
This  furnace  has  to  be  exhausted  with  4”  class  L  vent.  Furnace  cannot  be  vented  with  another 
appliance. 4” venting is recommended on the model 7500 and required on the model 6500 furnace. 


DISCONNECT  THE  POWER  CORD  BEFORE  SERVICING  THIS  FURNACE.    A  power 
surge


protector is required.

 The unit must be plugged in to a 

grounded

 120 -volt power source. 


Always  route  the  power  cord  away  from  the  unit.    Do  not  route  cord  in  foot  traffic  areas.    Do  not 
pinch cord under furniture. Do not add any additional length to the power cord. 


This product requires simple periodic maintenance for proper operation and long life of the furnace.  
Read and follow the maintenance schedule closely. 


The Magnum Biomass furnace is designed, approved and tested to burn shelled corn, wheat, or 
Premium quality wood pellets.

  The burning of other solid fuels such as cord wood in this furnace is 

not permitted. If you are burning fuels not approved for this appliance it will void the warranty and no 
service/warranty  will  be  allowed.   

When  burning  fuels  other  than  corn,  consult  your  dealer  for 

proper heat setting adjustments. You will have to run your unit on lower settings when burning 
smaller size fuel. 

SAFETY STEPS


 UNPACKING YOUR MAGNUM  CORN/PELLET/ BIOMASS FUEL FURNACE


Summary of Contents for 6500

Page 1: ...ficials about restrictions and installation requirements in your area Read the operations and fuel section of this manual before plugging in your unit Always unplug the unit before attempting any service work Do not connect the unit to a chimney flue already serving another appliance When installing the chimney pipe to the unit it is important to remember that the unit operates on a negative press...

Page 2: ...SS MAINTENANCE ADJUSTMENT REMOVAL AND REPLACEMENT 21 STOVE CONTROLS 22 LIGHTING INSTRUCTIONS 7500 23 CIRCUIT BOARD FUNCTIONS 24 SETTING THE DRAFT 25 6500 LIGHTING INSTRUCTIONS CIRCUIT BOARD FUNCTIONS SETTING DRAFT 26 28 MAINTENANCE INSTRUCTIONS 29 32 AUTOMATIC SAFETY FEATURES 32 THERMOSTAT INSTALLATION 33 MAGNUM 7500 WIRING DIAGRAM 34 MAGNUM 6500 WIRING DIAGRAM 35 TROUBLE SHOOTING GUIDE 37 SETTING...

Page 3: ...fficient GOOD LUCK American Energy Systems Inc manufacturer of the Magnum 6500 7500 Corn Wood Pellet Appliances reserves the right to alter its products their specifications and or price without notice Safety tested by Warnock Hersey to UL 391 99 CAN CSA B366 1 M91 BTU input can vary from 10 60 percent depending on the brand of fuel size of fuel quality of fuel and moisture content Improper instal...

Page 4: ...ing the product This appliance must be installed and serviced by a trained licensed heating contractor to assure proper installation and warranty of this product The label located on the back of the appliance must be filled out by a Licensed HVAC contractor Warranty Labor parts shipping or any other costs will not be covered if a trained installer does not install the unit Consult your local heati...

Page 5: ... your installation so that service work can be performed on the appliance Leave ample space around the furnace to open cabinet doors Minimum clearances to combustibles must be maintained Your Magnum reseller is required to go over in detail with the owner operator as to the correct operation of the furnace and its components Never block or obstruct any air intake ports including the vents on the f...

Page 6: ... 7500 Corn Wood Pellet furnace should only be installed on a furnace duct system and venting that is in good operating condition It is recommended and sometimes necessary to install separate ductwork because the existing ductwork might not support the proper air flow or temperature The installation of the Magnum 6500 7500 Corn Wood Pellet furnace must comply with requirements of CAN CSA B365 and c...

Page 7: ...e your corn supply in a dry place and keep the bags or container sealed to prevent your corn from absorbing excess moisture Test the moisture content periodically to maintain the proper dryness Check your Corn for foreign objects Your furnace warranty will not cover damage done to your furnace and or auger system due to foreign objects in the fuel supply Do not carry your corn supply over into the...

Page 8: ...aracteristics from supplier to supplier A consistent supply of pellets will require fewer adjustments to the draft of the furnace Mixing Corn with the Wood Pellets can be done and will provide a little less heat in the spring and fall Also if the Corn is a little wet mixing pellets in will help the fire maintain especially on the lower settings Check your pellets for foreign objects Your furnace w...

Page 9: ...tting on a cement floor no protection is needed Consult your local dealer for possible sources for non combustible materials acceptable to be used Do not hook into a chimney servicing another appliance You must make sure that when using an old chimney as a chase way access that the chimney is in proper condition Have a certified chimney sweep inspect the chimney before using This installation is a...

Page 10: ...highly recommended that you have 2 feet clearance around the unit for servicing and maintenance Both the left and right sides of the unit have panels that are hinged and will need to be opened periodically to clean inspect or replace motors and parts If there is not room to have this much clearance you must leave 2 3 feet of clearance on the back of the unit If the back panel is taken off the moto...

Page 11: ...ot apply if the Windows are non opening or have been fixed so they cannot open Distance from bottom of termination and grade 1 ft 305 mm minimum This is conditional upon the plants and nature of grade surface The exhaust gases are not hot enough to ignite grass plants or shrubs located in the vicinity of the termination The grade surface must not be a lawn Distance from bottom of termination and p...

Page 12: ... Tee 5 0 feet 90 Degree Tee 2 x 5 10 ft 450 Elbow 3 0 feet 45 Degree Tee 1 x 3 3 ft TOTAL 20 ft NOTE These are guidelines only Proper venting is accomplished by design and common sense In most installations 4 inch diameter venting is required It is the responsibility of the installer to determine proper venting operation of the furnace If the proper venting and combustion air balancing is not achi...

Page 13: ... 4 LINER MUST BE USED IN MASONRY CHIMNEYS Your new furnace is so efficient an unlined chimney could remain cold and cause a downward pressure creating poor burning incomplete combustion or back draft A L Vent venting 4 B L Vent elbow 90 adj 4 Tee NEW VERTICAL INSTALLATIONS Install 4 Class L venting and accessories according to manufacturers instructions and local codes 3 clearance to combustibles ...

Page 14: ...0 feet long 4 When air inlet is connected to the outside it MUST be terminated with a vertical 90 degree bend down or with a wind hood Failure to do so could result in a burn back during high winds blowing directly up the air inlet during a simultaneous power failure see diagram above 5 It is important not to terminate the inlet of the fresh air intake too close to the venting outlet for the smoke...

Page 15: ...ner pushes up against the bead of RTV sealer or attach the pipe adaptor with a 4 hose clamp and lock the PL vent clean out tee or elbow onto the pipe adaptor Don t seal the entire 4 diameter pipe as you will not be able to disassemble the pipe at a later date The bead of silicone will act as a gasket right on the end of the 3 pipe D Alternate Method An approved type PL connector pipe adaptor may b...

Page 16: ...in an insulated chase way Storm Collar 36 on a flat roof 3 clearance or venting mfg listing around vent 24 24 NOTE It is not recommended to install vertical venting on the outside of the wall without enclosing the venting in an insulated chase way Whenever possible run the venting on the interior Required ...

Page 17: ...17 Storm Collar Design system to accommodate the cold air return app 24 of room needed ...

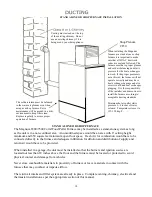
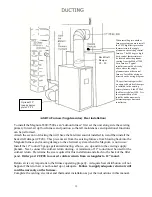
Page 18: ...e venting chimney electrical and thermostat installation as per the appropriate section of this manual Venting must extend out the top of the existing chimney Do not use an existing chimney if it is being used by another appliance When installing the Magnum furnace as a stand alone or shop furnace it is important to make sure that all HVAC ductwork codes are met and followed The furnace must have ...

Page 19: ...om rectangular to 12 round Return air is very important to the furnace operating properly Adequate heat distribution will not happen if the return air is not hooked up or adequate Failure to supply adequate return air will void the warranty on the furnace Complete the venting electrical and thermostat installation as per the instructions in this manual Back Draft Damper CF 20 Optional 12 round ada...

Page 20: ...ration of the unit can be performed Hopper lid minimum 16 clearance to bottom of warm air plenum Filter Box Installation configuration when using the Magnum 6500 7500 furnace as an independent ductwork installation separate from the existing primary furnace The Magnum Furnace is not intended to be installed as the sole source of heat and is not allowed to be the sole source of heat in most states ...

Page 21: ...ting binding or hitting any corners If the glass touches any of the casting when tightening it will break CLEANING THE GLASS When the fire is first started it will produce some smoke The smoke might accumulate on the glass surface Before the fire gets hot open the door and wipe the glass surface off with a damp rag Do not touch the surface with your hands If after constant use the glass is dirty y...

Page 22: ... lower fuel stirrer knob does not operate but must be left on Manual Draft Adjustment control knob Turn horizontal to decrease or Vertical to increase draft NOTE The manual draft adjustment control on the 6500 is on the rear of the unit right side Slide Heat Exchanger Tube cleaning rod in and out to clean tubes shown pulled out NOTE Always push in to operate unit Ash Cleanouts located on the left ...

Page 23: ...established itself usually 10 to 15 minutes adjust the manual draft lever so that there is approximately inch of fuel in the bottom of the firepot Do not let the fuel build up any higher than that or it will cause the fire to burn dirty and you will get excessive ash If the fuel level is too low below the fire may go out Once you have achieved this the fuel feed and air mixture should sustain the ...

Page 24: ...bottom of the firepot The number 3 heat setting is best for corn and the number 4 heat setting is best for wood pellets for a high fire burn The high heat setting should only be used if the home is over 2500 square feet or the weather is extremely cold The high heat setting is intended for use with wood pellets and the highest heat setting for corn would be the number 4 setting The unit is not des...

Page 25: ... the fire more draft turn the lever counter clockwise 1 8 and check the flame again If the status of the flame has not changed move the lever another 1 8 until you get a clean dancing flame If moving the damper does not change the fire you might have negative pressure in the home Consult with your Magnum 7500 installer The base of the flame should be blue in color and the top of the flame should b...

Page 26: ... lever so that the fuel does not build up in the firepot The fuel load will change and cycle so do not make adjustments until you are sure that they are needed The system automatically adjusts itself to compensate for the fire Damper Control Function The damper control lever is located on the back right side of the unit You will turn the lever according to the air required The knob serves as an in...

Page 27: ...is extremely cold The high heat setting is intended for use with wood pellets and the highest heat setting for corn would be the number 4 setting The unit is not designed to be operated for long periods of time on the highest setting Optimum efficiency is achieved by using lower settings It is also recommended that the unit not be run for extended periods of time on the number 1 setting The draft ...

Page 28: ...ore draft To give the fire more draft turn the lever counter clockwise 1 8 and check the flame again If the status of the flame has not changed move the lever another 1 8 until you get a clean dancing flame If moving the damper does not change the fire you might have negative pressure in the home Consult with your Magnum installer The base of the flame should be blue in color and the top of the fl...

Page 29: ...o this once or twice a day depending on the moisture content of the corn If this is not cleaned out it could cause the fuel stirrer to jam Clinker balls are a direct result of excessive corn moisture and they do not indicate a problem with the stove AES highly recommends our additive called Clean Burn be added to your corn to eliminate these clinkers Contact your local Magnum reseller for availabi...

Page 30: ...s are in the closed position Push the front 2 clean out slides all the way in and make sure that you have replaced the left right clean out plates that are located on the inside of the unit These plates are located inside the firebox to the left and right of the firepot in the lower corners of the firebox If these plates are not in the closed position the unit will burn dirty The ash pan door need...

Page 31: ...sh improper air flow will occur and cause the furnace to burn dirty or shut it down Cleaning of the exhaust system will depend upon the ash and debris content of your fuel If your fuel has a high ash content and or significant debris in it your exhaust system will require weekly cleaning Cleaner fuels will allow for monthly cleaning of the exhaust system Remove the exhaust pipe from the back of yo...

Page 32: ...when the power returns unless the exhaust is still up to temperature see Lighting Instructions Overheating A high temperature fan limit switch will automatically shut down the furnace if it overheats The furnace will need to be manually re lit Allow 45 minutes before re lighting The circuit board is equipped with a 5 amp Fast acting fuse If the unit does not operate and there is power coming into ...

Page 33: ...Remove the hex head screw and pull circuit board towards you Lift the circuit board out of the housing Do not crimp or stretch the wires leading from circuit board pigtail Unplug the power cord before working on unit Reinstall in reverse procedure Operating the furnace with a wall thermostat takes a little experience to get used to Heat levels from 2 3 work very well with the wall thermostat but t...

Page 34: ...hite Green Ground Fuel Stirrer Gear motor AES MF3540 Exhaust Motor AES MF3650 Auger Gear Motor AES CF26 Blower 1240 cfm AES CF33 2 speed motor w capacitor white Fan heat sensor Gray Green High Limit sensor Blue Auger Safety Sensor White neutral Brown Red Black Green Orange AES MF3537 White Power Cord Receptacle showing back of plug Black white Orange MF3650 2 speed exhaust blower to be wired using...

Page 35: ...ltage thermostat Power Cord Receptacle showing back of plug Green Ground Exhaust Motor AES MF3650 Auger Gear Motor AES MF3573 on 6500 unit Blower 1240 cfm AES CF24 white Black from blower fan to power receptacle Fan Gray High Limit sensor Fan limit sensor power Blue Proof of fire sensor 110 deg White neutral White neutral Red Black Green Orange AES MF3537 white Black Vacuum pressure switch Gray Bl...

Page 36: ...Magnetic o Room Fan Sensor double white wire to bottom terminal green wire to top terminal o High Limit Sensor blue wire to bottom terminal double grey to top terminal o Room Air Fan white wire to yellow wire black wire to double black wire o Exhaust Fan black wire to white wire red wire to black wire Figure 17 N O N C COM Attach one grey wire to Com and one grey wire to NO Attached hose to back c...

Page 37: ...Check that damper control knob is adjusted properly Turn the manual air knob open until desired burn is achieved Check gasket seal around the door If the door is loose adjust the handle latch A small adjustment can be made to the door seal by adjusting the door latch rod and or the door hinges Replace the door gasket if necessary Check for blockage in the air inlet tube or exhaust pipe Clean out a...

Page 38: ... shuts down Exhaust gas is not up to temperature Started on too low of Setting Low limit snap switch not operating correctly may be defective Wires to either the low limit snap switch mounted on the side of the firebox or exhaust manifold are loose or disconnected Relight the furnace Start on higher setting Have your Magnum reseller replace the low limit switch Contact your local Magnum reseller f...

Page 39: ...licone sealer Use an approved ash vacuum system Have the home checked for negative pressure and proper installation of ductwork etc Buildup of soot on glass venting and heat exchangers Dirty fuel Wet Corn above 15 moisture Inadequate air supply Negative pressure in home Make sure you have clean fuel Dry the corn down to 11 12 moisture if possible or mix with wood pellets Turn manual draft control ...

Page 40: ...an combustion air Dirty or plugged stove or venting Poor exhaust vent configuration Negative pressure present in the home Combustion motor going out Use combustion enhancement system Adequately screen corn Dirty wet fuel will produce excessive ash Take proper steps to check corn for proper moisture and to adequately protect from the elements to not take on moisture Check damper control and check c...

Page 41: ... are on There are 10 settings that are available with 1 blink being the lowest and 10 blinks being the highest When you turn the adjustment screw to the next setting the light will blink the number that you are on and then the light will stay on Example If the setting is turned to 9 the light will blink 9 times and then stay on Note Number 1 on the draft adjustment setting is the lowest setting an...

Page 42: ...t 7500 MF3518 Sprocket Fuel Stirrer 11 tooth sprocket on shaft Diameter shaft 7500 MF3521 Scraper Assembly Firepot 7500 all product models except 6500 MF3523 Door Handle Assembly 7500 6500 all Countryside models MF3526 Shoulder Bolt with nut 20 Door Latch MF3527 Hinge Door each takes two 2 per unit MF3530 Auger 1 Corn Wood Pellet Biomass 7500 3500P 3500L 3502 models MF3531 Glass Door all models of...

Page 43: ...ident AES shall have no warranty obligation for damage caused by improper handling freight damage must be reported to freight provider over firing unapproved fuel variance in feed rates variances in BTU output or the unauthorized disassembly or modification of the product AES shall have no warranty obligation if this warranty is not timely registered for claims which are not submitted through the ...

Page 44: ...44 SERVICE RECORD DATE SERVICE OR CLEANING PERFORMED This record must be sent in when any warranty claims are made ...

Reviews: