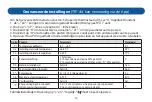
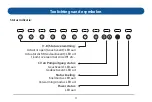
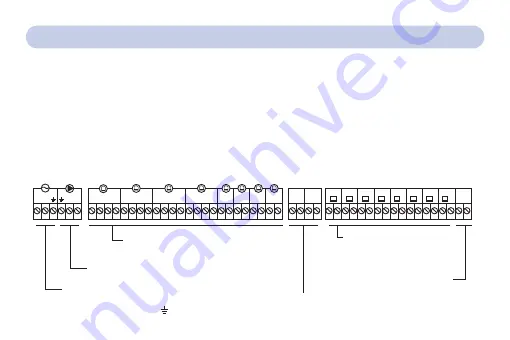
background image

6

7

L N

L

N

L N L N L N L N L N L N L N L N L N L N
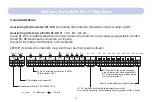
 L N L N

Power Pump

R1

R2

R3

R4

R5 R6

R7

R8

G1 G2

W1 W2 W3 W4 W5 W6 W7 W8 Cooling

COM NOCOM NO

°

C

°

C

°

C

°

C

°

C

°

C

°

C

°

C

COM NO

AC

Cooling changeover port

W1-W8:connect to thermostat

low

voltage, regardless of null

line

and

fire


line

.

W1 must 

connect with master thermostat 

Water pump(Current<5A)

Power supply(100-240VAC  10A)

L:Fire Line


N

:

Null line

       :

Earth line

R1-R8:Connected electric heating actuator

(the


total


current<5A)

G1

G2

:

Passive linkage 

(can be linked to boiler, heat pump host, mixed water device)

(Current<5A)

Wiring diagram

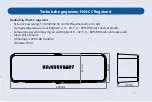
Wiring control centre H64-CC

Precautions

W1-W8: Connected to the thermostat, low voltage, regardless of null line and fire line, 

W1 must be connected to the master thermostat, W1 corresponds to an area. 

② 

R1-R8: Connected electric heating actuator, R1 corresponds to W1, R2 corresponds to W2, and so on, 

R1-R4 can be connected to two electric heating actuators respectively, the total current does not exceed 5A.

15

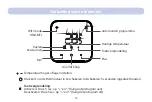
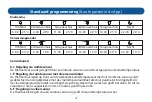
R1-R8: Aansluiting actuatoren (230VA)

(Totale stroom <5A)

Circulatiepomp stroom<5A

Stroomvoorziening (100-240VAC 10A)

L = Line        N = Neutraal

 = Aarde 

W1-W8: aansluiten op de laagspan-

ningsthermostaat, zonder polariteit. 

W1 moet worden aangesloten op de 

masterthermostaat.

Poort overschakelen naar koelmodus

G1, G2: passieve verbinding (potenciaalvrij contact)

Aansluiting voor ketel, warmtepomp of mengsysteem (Max. 5Amp.)

5. Aansluitschema

Aansluiting thermostaten W1-W8: 

Aansluiting thermostaten (Masterthermostaat altijd op W1).

Aansluiting Actatoren (230VA) R1-R8: 

R1 = W1, R2 = W2 etc.... 

Groep R1-R4: Zijn dubbel uitgevoerd en daar kunnen 8 actuatoren (4 per ingang) aangesloten worden. 

Groep R5- R8: Maximaal 4 actuatoren per ingang.  

Totaal: R1-R4 (4x8) en R5-R8 (4x4) = 48 actuatoren. 

LET OP:

 De totale stroomsterkte mag nooit meer dan 5 Ampère bedragen.

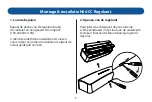
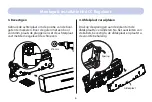
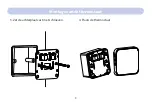
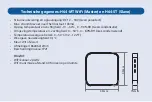
Montage & installatie H64-CC Regelunit

Summary of Contents for H64

Page 1: ...1 H64 wired control system INSTALLATIEVOORSCHRIFTEN GEBRUIKERSHANDLEIDING INSTALLATION INSTRUCTIONS USER MANUAL Page 30 ...

Page 2: ...2 ...

Page 3: ... Montage thermostaten H64MT H64ST 08 Systeemtest 10 Toelichting van de symbolen 11 Geavanceerde instellingen 15 Standaard programma 16 Technische gegevens 16 App installeren en registreren 18 Thermostaten toevoegen in de App 20 Uitleg symbolen en Programmeren 24 Spraakassistenten 26 ...

Page 4: ...pen is om watergedragen vloerverwarmingssyste men te regelen Een App is beschikbaar in de Apple App Store en op Google Play Binnen de App kunt u instellingen programmeren en aanpassen Om verschillende kamers groepen te bedienen kunnen eenvoudig extra H64 ST slave thermostaten worden toegevoegd Belangrijkste kenmerken Tot 8 thermostaten 1 master 7 slave Tot 48 groepen actuators 230VA max 4 actuator...

Page 5: ...lease pay attention to distinguis thermostat during the installation The master thermostat is packaged with the wiring control centre and named 1 There is a slit above the wiring control centre Use a small flat blade screw it out and remove the back plate Unplug The buckle Pry off the back plate 06 Product installation and testing 1 Locatie bepalen Bepaal de postie van de regelunit nabij de verdeler...

Page 6: ...plaats de pluggen en zet de achterplaat vast met de meegeleverde schroeven Ø 6mm 3 Press the buckle to remove the anti electrical board and then connect the wires refe port and the marked wiring on the anti electrical board Buckle Anti electrical board 08 Sparing Afdekplaat 4 Afdekplaat verwijderen Druk op de sparingen aan de zijkant om de afdekplaat te verwijderen Na het aansluiten van de kabels ...

Page 7: ...tor R1 corresponds to W1 R2 corresponds to W2 and so on R1 R4 can be connected to two electric heating actuators respectively the total current does not exceed 5A R1 R8 Aansluiting actuatoren 230VA Totale stroom 5A Circulatiepomp stroom 5A Stroomvoorziening 100 240VAC 10A L Line N Neutraal Aarde W1 W8 aansluiten op de laagspan ningsthermostaat zonder polariteit W1 moet worden aangesloten op de mas...

Page 8: ...tverbinding te garanderen moet de masterthermostaat worden geïnstalleerd in een ruimte met een goede WiFi ontvangst Let erop dat u de masterthermostaat van de slavethermostaat onderscheidt De masterthermostaat wordt bij de regelunit geleverd en heet H64 MT WiFi 2 Wiring It is recommended to use 0 75 1 5mm wire Press the snap gauge snap gauge Insert the wires into slots 11 Connect NTC10K Power 12V ...

Page 9: ...9 Montage van de thermostaat 3 Fix the back plate with screws 12 3 Zet de achterplaat vast met schroeven 4 Cover the face shell 13 4 Plaats de thermostaat ...

Page 10: ...ve thermostaten zijn verwisseld zoek de thermostaat die FX aangeeft in andere ruimtes en veplaats deze naar aansluiting W1 X staat voor nummers 2 8 Als u tijdens de installatie vaststelt dat de aansluiting van de thermostaat niet overeenkomt met de juiste ruimte drukt u bij het inschakelen kort op de en toets van de thermostaat om de aansluiting te identificeren 02 komt overeen met W2 etc vervolge...

Page 11: ...us Cooling mode activate keep bright Heating mode no bright Power status light keep bright Wiring control centre interface introduction 02 1 8 Status verwarming Actuator open Geactiveerd LED aan Actuator dicht Gedeactiveerd LED uit 1 komt overeen met zone W1 etc CV en Pomp uitgang status Geactiveerd LED aan Gedeactiveerd LED uit Status koeling Koelmodus LED aan Verwarmingsmodus LED uit Power statu...

Page 12: ...onds could enter key lock mode and show lock icon Press and unlock in lock status Up button Down button Power button 04 WiFi mode H64 MT Koelen Verwarmen Min Temperatuur hoger of lager instellen Druk kort om de thermostaat in te schakelen Uitschakelen 5 seconden ingedrukt houden Toetsvergrendeling Activeren Druk 5 sec op en hangslot pictogram aan Deactiveren Druk 5 sec op en hangslot pictogram uit...

Page 13: ...ratuur te wijzigen WiFi modus Druk gedurende 5 seconden tegelijkertijd op en O WiFi symbool knippert Klaar om verbinding te maken WiFi symbool Aan Verbinding geslaagd Vorstbeveiliging De thermostaat schakelt in wanneer de temperatuur lager is dan 5 C en schakelt uit wanneer deze 8 C bereikt Hij wordt alleen geactiveerd in de verwarmingsmodus Pomp Actuatorbeveiliging Pomp en Actuatoren worden ieder...

Page 14: ...uit te schakelen Fabrieksinstellingen Druk lang op en tegelijk dEf f moet 3 keer knipperen Optie Functie Parameters Standaard 0 1 Temperatuur kalibratie 6 C 6 C 0 C 02 Instelling maximale temperatuur 25 50 C 35 C 03 Instelling minimale temperatuur 5 20 C 10 C 04 Schermverlichting 1 Altijd aan 2 10 seconden aan daarna 50 gedimd 3 10 seconden aan daarna display uit en O 50 gedimd 2 05 Waterbestendig...

Page 15: ...imtesensor met vloersensorlimiet De thermostaat regelt op basis van de werkelijke kamertemperatuur die door de interne sensor wordt gedetecteerd en vergelijkt deze met de vloertemperatuurlimiet die door parameter 8 is ingesteld Als de vloertemperatuur de limiet overschrijdt stopt het systeem met werken en geeft het alarm E4 Als de vloersensor niet is aangesloten in de r F modus geeft hij alarm E2 ...

Page 16: ...g Color White Size 298 X 88 X 64mm IP rating IP40 Technical Parameters 88mm 298mm 93 1mm 64mm 01 1 2 3 4 5 6 7 8 Technische gegevens H64 CC Regelunit Bedrading H64 CC regelunit Stroomvoorziening 100 240VAC 50 60Hz Maximale stroom 10A Opslagtemperatuur en vochtigheid 10 60 C 0 90 RH niet condenserend Temperatuur werkomgeving en vochtigheid 0 50 C 0 80 RH niet condenserend Kleur Wit of Zwart Afmetin...

Page 17: ...n vochtigheid 10 60 C 0 90 RH Geen condensatie Omgevingstemperatuur en vochtigheid 0 50 C 0 80 RH niet condenserend Temperatuurweergave bereik 0 50 C 32 122 F Weergave nauwkeurigheid 0 1 C Kleur Wit of Zwart Afmetingen 86x86x12mm Beschermingsniveau IP21 H64 MT WiFi kanaal 2 4GHz WiFi transmissie afstand 60M in een open ruimte Power supply and signal input DC12 18V carrier non polarity input power ...

Page 18: ... al geregistreerde Tuya App gebruiken LET OP Dit systeem werkt al leen op een 2 4 Ghz frequentie Mocht uw modem op 5 Ghz staan dan dient u eerst een extra 2 4 Ghz kanaal aan te maken Na de installatie logt u in met een bestaand account of maakt u een nieuw account Selecteer uw land en vul uw e mailadres in Klik vervolgens op verificatiecode ophalen ...

Page 19: ...eck uw e mail incl spam en vul vervolgens de code in Daarna kunt u een wacht woord instellen Voor een goede werking van het systeem Sta locatiegegevens toe en zet Meldingen aan App installeren en registreren ...

Page 20: ...20 Thermostaat toevoegen Zorg dat alle thermostaten aangesloten zijn Druk op om een thermostaat toe te voegen Klik op WiFiThermostat Voer uw WiFi netwerk en wacht woord in en druk op volgende WiFiThuis ...

Page 21: ...t Knippert snel Pag 13 Vink ja aan en druk op volgende Wacht totdat de Hub verbin ding heeft gemaakt Dit duurt maximaal 2 minuten Zodra hij is toegevoegd kunt u voor het systeem een andere naam invoeren bv Thuis Thermostaat toevoegen ...

Page 22: ...22 Druk op Subapparaat toevoegen Druk op LED knippert al 1ste thermostaat Master is nu toegevoegd Druk op Doorgaan Thermostaat toevoegen ...

Page 23: ...aat Slave is nu toegevoegd Druk op Doorgaan Alle thermostaten zijn toege voegd Wijzig eventueel de namen en druk op Doorgaan In het Home scherm ziet u nu alle thermostaten ruimtes in 1 overzicht Thermostaat toevoegen ...

Page 24: ...ergy saving mode and icon turn to green If heating mode temperature remain at 16 cooling mode temperature remain at 28 After you arrive home click the button again to recover the previous temperature setting Click to set the parameters 25 Uitleg van de symbolen App Gevraagde temperatuur Huidige temperatuur Geselecteerd programma Geel In koelmodus Blauw Aan het koelen Energiebesparingsmodus activer...

Page 25: ...tellen Kies vervolgens eerst een scha kelmoment en stel daarvan de starttijd en temperatuur in Herhaal dit tot alle schakelmo menten ingevoerd zijn en druk op Submit revision Koelen of verwarmen Bevestigen Selecteer een periode om in te stellen Selecteer begintijd en gewenste temperatuur ...

Page 26: ...steem werkt ook met de spraakassistenten van Amazon en Google Om te activeren Druk op het potloodje rechts bovenin het scherm Kies het desbetreffende sys teem en volg de aanwijzingen in de App Spraakassistenten ...

Page 27: ...hermostaat en de luidspreker moet dezelfde zijn Amazon Alexa Alexa open naam apparaat Alexa sluit naam apparaat Alexa zet naam apparaat op 16 graden Alexa wat is de temperatuur van naam apparaat Google Assistant Ok google zet naam apparaat aan Ok google zet naam apparaat uit Ok google zet naam apparaat op 16 graden Ok google wat is de temperatuur van naam apparaat ...

Page 28: ...28 ...

Page 29: ...29 H64 wired control system INSTALLATION INSTRUCTIONS USER MANUAL ...

Page 30: ...30 ...

Page 31: ...tion diagram 35 Mounting thermostats H64MT H64ST 36 System test 38 Explanation of the symbols 39 Advanced Settings 42 Default program 43 Technical details 44 Install and register app 46 Adding Thermostats in the App 48 Explanation of Symbols and Programming 52 Voice Assistants 54 ...

Page 32: ...able thermostat designed to control water based floor heating systems An App is available in the Apple App Store and on Google Play Within the App you can program and adjust settings To control dif ferent rooms groups additional H64 ST slave thermostats can easily be added Key features Up to 8 thermostats 1 master 7 slave Up to 48 groups actuators 230VA max 4 actuators per port 1 4 dual and 5 8 si...

Page 33: ...ention to distinguis thermostat during the installation The master thermostat is packaged with the wiring control centre and named 1 There is a slit above the wiring control centre Use a small flat blade screw it out and remove the back plate Unplug The buckle Pry off the back plate 06 Product installation and testing 1 Determine location Determine the position of the control unit near the distribut...

Page 34: ...ill bit insert the dowels and secure the back plate with the screws provided Ø 6mm 3 Press the buckle to remove the anti electrical board and then connect the wires refe port and the marked wiring on the anti electrical board Buckle Anti electrical board 08 Sparing Afdekplaat 4 Remove cover plate Press the notches on the side to remove the cover plate After connecting the cables attach the cover p...

Page 35: ...nnected electric heating actuator R1 corresponds to W1 R2 corresponds to W2 and so on R1 R4 can be connected to two electric heating actuators respectively the total current does not exceed 5A R1 R8 Aansluiting actuatoren 230VA Totale stroom 5A Circulation pump current 5A Power supply 100 240VAC 10A L Line N Neutral Earth W1 W8 connect to the low voltage thermostat without polarity W1 must be conn...

Page 36: ...y of the Internet connection the master thermostat should be installed in an area with good WiFi reception Be sure to distinguish the master thermostat from the slave thermostat The master thermostat is supplied with the control unit and is called H64 MT WiFi 2 Wiring It is recommended to use 0 75 1 5mm wire Press the snap gauge snap gauge Insert the wires into slots 11 Connect NTC10K Power 12V wi...

Page 37: ...37 Mounting thermostats 3 Fix the back plate with screws 12 3 Secure the back plate with screws 4 Cover the face shell 13 4 Place the thermostat ...

Page 38: ...FX The master and slave thermostats have been swapped find the thermostat that indicates FX in other rooms and swap it to connection W1 X stands for numbers 2 8 If during installation you find that the thermostat connection does not correspond to the correct room briefly press the and button on the thermostat at power up to identify the connection 02 corresponds to W2 etc then if required you can ...

Page 39: ...over status Cooling mode activate keep bright Heating mode no bright Power status light keep bright Wiring control centre interface introduction 02 1 8 Heating status Actuator open Activated LED on Actuator closed Deactivated LED off 1 corresponds to zone W1 etc CV and Pump output status Activated LED on Deactivated LED off Cooling status Cooling mode LED on Heating mode LED off Power status LED o...

Page 40: ...s and button over 5 seconds could enter key lock mode and show lock icon Press and unlock in lock status Up button Down button Power button 04 WiFi mode H64 MT Cooling Heating Minus Set temperature higher or lower Press briefly to turn on the thermostat To turn off press and hold for 5 seconds Key lock Activate Press and for 5 sec padlock icon on Deactivate Press and for 5 sec padlock icon off On ...

Page 41: ...emperature WiFi mode Press and O simultaneously for 5 seconds WiFi symbol flashing Ready to connect WiFi symbol On Connection successful Frost protection The thermostat turns on when the temperature is below 5 C and turns off when it reaches 8 C It is activated only in heating mode Pump Actuator Protection Pump and Actuators are turned on for 5 minutes every week to prevent them from getting stuck...

Page 42: ... again Factory settings Long press and at the same time dEf should flash 3 times Option Function Parameters Default 0 1 Temperature calibration 6 C 6 C 0 C 02 Maximum temperature setting 25 50 C 35 C 03 Minimum temperature setting 5 20 C 10 C 04 Screen illumination 1 Always on 2 10 seconds on then 50 dimmed 3 10 seconds on then display off and O 50 dimmed 2 05 Water resistance On Off On 06 Allow k...

Page 43: ...ed as room temperature r F Control via room sensor with floor sensor limit The thermostat controls based on the actual room temperature detected by the internal sensor and compares it to the floor temperature limit set by parameter 8 If the floor temperature exceeds the limit the system stops working and alarms E4 If the floor sensor is not connected in r F mode it gives alarm E2 S F Control via f...

Page 44: ...sing Color White Size 298 X 88 X 64mm IP rating IP40 Technical Parameters 88mm 298mm 93 1mm 64mm 01 1 2 3 4 5 6 7 8 Technical data H64 CC Control Unit Bedrading H64 CC regelunit Power supply 100 240VAC 50 60Hz Maximum current 10A Storage temperature and humidity 10 60 C 0 90 RH non condensing Temperature working environment and humidity 0 50 C 0 80 RH non condensing Color White or Black Dimensions...

Page 45: ...and humidity 10 60 C 0 90 RH No condensation Ambient temperature and humidity 0 50 C 0 80 RH non condensing Temperature display range 0 50 C 32 122 F Display accuracy 0 1 C Color White or Black Dimensions 86x86x12mm Protection level IP21 H64 MT WiFi channel 2 4GHz WiFi transmission distance 60M in an open space Power supply and signal input DC12 18V carrier non polarity input power supply wiring c...

Page 46: ...n another already registered Tuya App NOTE This system only works on a 2 4 Ghz frequency Should your modem be on 5 Ghz you must first create an additional 2 4 Ghz channel After installation log in with an existing account or create a new account Select your country and enter your email address Then click on get verification code ...

Page 47: ...47 Check your email including spam and then enter the code After that you can set a password For proper system operation Allow location data and turn on Notifications App install and register ...

Page 48: ...48 Adding Thermostat Make sure all thermostats are connected Press to add a thermostat Click on WiFi Thermostat Enter your WiFi network and password and press next WiFiThuis ...

Page 49: ... symbol on thermostat Flashing fast Page 39 Check yes and press next Wait for the Hub to connect This takes up to 2 minutes Once it is added you can enter another name for the system e g Home Adding Thermostat ...

Page 50: ...50 Press Add subdevice Press LED is already flashing 1st thermostat Master is now added Press Continue Adding Thermostat ...

Page 51: ...hermostat Slave is now added Press Continue All thermostats have been added Change the names if necessary and press Continue In the Home screen you now see all thermostats rooms in 1 overview Adding Thermostat ...

Page 52: ...aving mode and icon turn to green If heating mode temperature remain at 16 cooling mode temperature remain at 28 After you arrive home click the button again to recover the previous temperature setting Click to set the parameters 25 Explanation of the App symbols Demanded temperature Current temperature Selected program Yellow In cooling mode Blue In cooling mode Activate energy saving mode when y...

Page 53: ...o set the same program Then first choose a switching time and set the start time and temperature from it Repeat until all switch times are entered and press Submit revision Cooling or heating Confirm Select a peri od to set Select start time and desired tem perature ...

Page 54: ...s system also works with Amazon and Google s voice assistants To activate Press the pencil at the top right of the screen Choose the appropriate system and follow the instructions in the App Voice Assistants ...

Page 55: ...the thermostat and the speaker must be the same Amazon Alexa Alexa turn on name device Alexa turn off name device Alexa set name device to 16 degrees Alexa what is the temperature of name device Google Assistant Ok google turn on name device Ok google turn off name device Ok google set name device to 16 degrees Ok google what is the temperature of name device ...

Page 56: ...56 MAGNUM Heating Group B V Stevinweg 8 NL 4691 SM Tholen info magnumheating nl www magnumheating nl ...

Reviews: