background image

28 

5.8.1 Progressive increase 

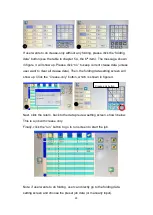
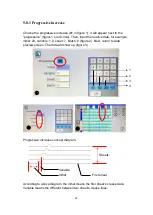
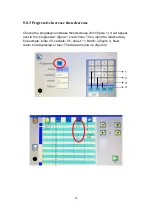
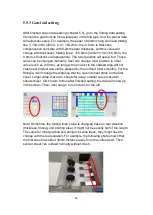
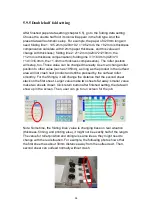
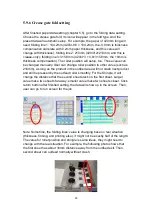
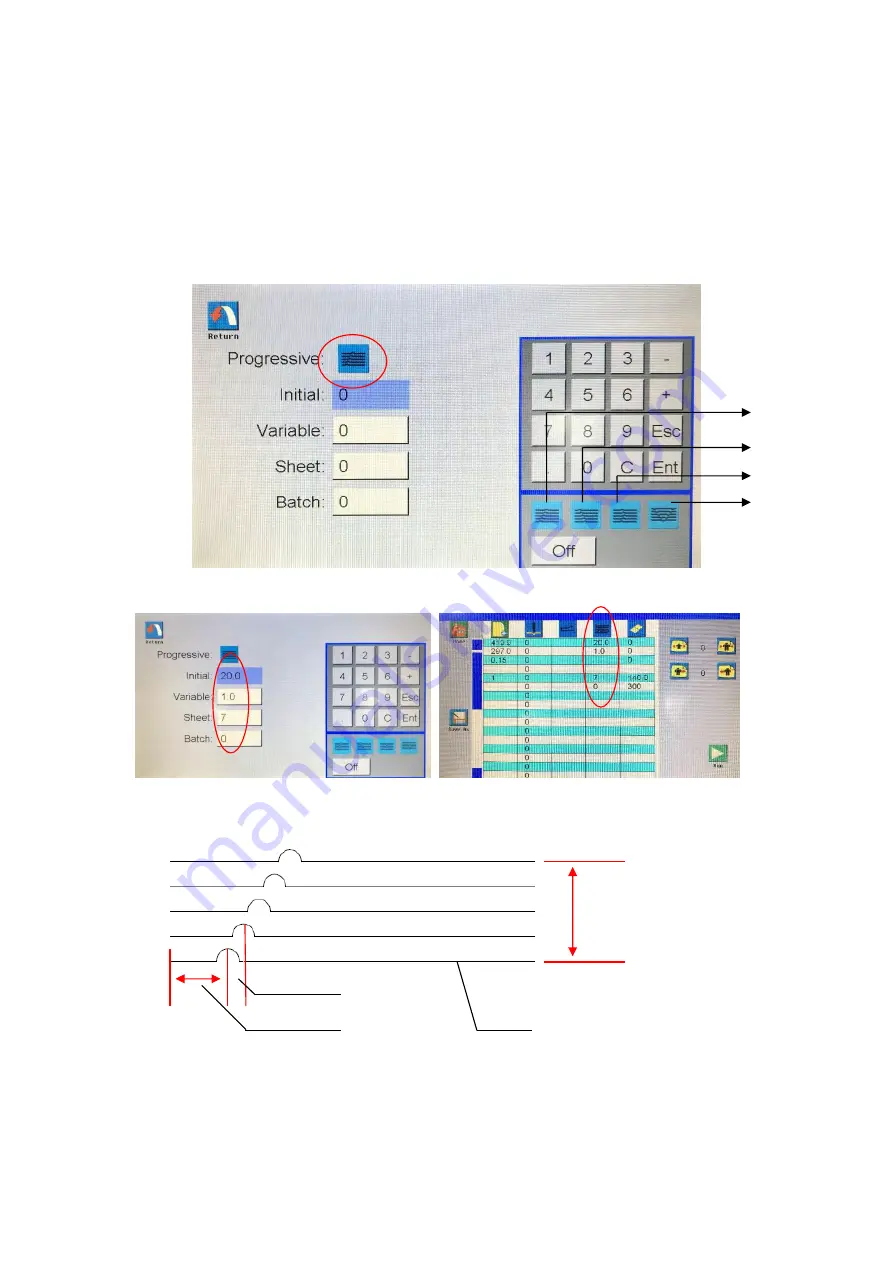
Choose the progressive increase (#1 in figure 1), it will appear next to the 

“progressive” (figure 1’s red circle). Then, input the relative data, for example, 

initial: 20, variable: 1.0, sheet: 7, Batch: 0 (figure 2). Next, return to data 

preview screen. The data will show up (figure 3). 

Progressive increase concept diagram


According to above diagram, the initial means the first sheet’s crease data. 

Variable means the different between two sheet’s crease lines. 

Sheets 

Initial 

Variable 

First sheet 


Summary of Contents for MCPF-35

Page 1: ...anual Magnum MCPF 35 The Magnum has been designed to be user friendly however we strongly recommend you take a few minutes to read through this manual to ensure correct operation Keep this manual safe...

Page 2: ...Top paper folding guide 15 4 4 Feeding table extension plate installation 16 4 5 Paper deflector and Paper guide pillar 16 4 6 power plug and switch 18 Chapter 5 19 5 1 Welcome screen 19 5 2 Touch scr...

Page 3: ...it display 46 5 15 Setting screen 47 5 16 Hardware setting 48 5 16 1 Sheet separator adjustment 48 5 16 2 Blowing air vent s gate adjustment 48 5 16 3 Suction fan power adjustment 49 5 16 4 Folding ro...

Page 4: ...manual near by the machine in order to check information if needed If there is any problem during operation please contact the seller 1 2 Machine Specification Package size length x width x height 15...

Page 5: ...lines 70mm Minimum distance between the first folding line and the lead edge 70mm Minimum distance between the second folding line and the tail edge 70mm Folding types 7 Folding accuracy 0 5mm Maximu...

Page 6: ...ay not operate properly Note make sure there are no combustibility corrosive gas or oil mist around the machine 2 2 Warning Be aware of that if any metal or flammable thing inside machine it may cause...

Page 7: ...you have to move the machine Do Disconnect the power before clean the inner side AC input Voltage Frequency is AC110 220V 50 60Hz If the voltage or frequency are not in the range the machine may not b...

Page 8: ...h any liquid on any surface of machine Don t Put tiny things pieces in the machine especially the loading table Don t Alter or uninstall the machine unless by Dumor authorized engineer Don t Touch any...

Page 9: ...Paper collector Collect paper without folding 3 Automatic conveyer Collect paper after folding 4 Folding top paper guide Guide paper during folding 5 Touch screen Digital control 6 Loading table or f...

Page 10: ...onnect the cable Steps as follow Step 1 Uninstall the 2 screws fixing the screen cover picture 1 as well as 4 screws fixing the screen rear cover picture 2 3 to take off the rear cover Remove the 2 sc...

Page 11: ...11 Step 2 Plug the cable into socket picture 1 Reinstall the rear cover back and fix the screen in a proper angle picture 2 Fix the whole part onto machine with two screws picture 3 4 1 2 3 4...

Page 12: ...lowing photos first unbox the Auto Conveyer figure 4 And then hang the Auto Conveyer into the machine outfeed area shown in figure 1 to 4 4 2 2 Automatic Conveyer Extension As the below photos install...

Page 13: ...d twice Make sure the wheel set can smoothly moving Next connect the communication cable shown in figure 2 4 2 4 Adjustable paper collector assembly As the following photo hang the adjustable paper co...

Page 14: ...er deflectors from the package Install the outfeed paper deflectors on the folding unit s outfeed area There is a shaft which expose 4 areas for install those deflectors shown in below photo in red ci...

Page 15: ...wo side Then make sure the two side locks of the guide are released move up is released and move down is locked Next following the figure 2 to rotate the guide toward to the feeding tray direction whi...

Page 16: ...ated on an area where they can guide the paper feeding straightly without skewing And they will not press the paper too much or too loose In order to make a suitable gap between pillar paper guides an...

Page 17: ...e skewing adjustment wall smoothly It avoids to make the skewing product which caused by the unstable infeed 3 The function of paper deflector A is same as paper deflector B They are suggested to be u...

Page 18: ...re operating please connect the power with power cable then turn on the machine Warning before turn on the machine please make sure the feed table feed tray does not have any unacceptable or non expec...

Page 19: ...follow 1 Software version 2 Total sheet count 3 Number of Crease which is the total creased line of the machine 4 Number of K1 which is the total folded number of lower folding knife of the machine 5...

Page 20: ...screen will enter welcome screen Calibration is finished This should be done while the touch screen could not be touched properly 5 3 Home Screen After click the OK button of the welcome screen the m...

Page 21: ...5 Progressive func This button will go to progressive function setting screen 6 Folding data This button will go to folding setting screen 7 Stretch Crease fold position stretch 8 Shrink Crease fold...

Page 22: ...22 5 5 Paper data setting In the data preview screen click the paper data button The following warning message show up Yes button clear all current data No button keep all current data...

Page 23: ...the paper width and click Ent Or Click the 4 preset data in area 8 5 Thickness Manual setting Click the white area it will turn to blue then input the paper thickness and click Ent 6 CR Depth Manual...

Page 24: ...0 3g 1 2mm 0 3 0 35g 1 4mm 0 35 0 4g 5 6 Crease data setting In the data preview screen click the crease data button The screen of crease data figure 1 will show up Input the crease value 1 by 1 for...

Page 25: ...ll crease data Then the folding data setting screen will show up Click the Crease only button which is shown in figure 4 Next click the return back to the data preview setting screen shown below This...

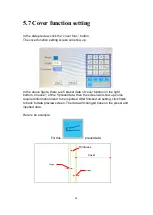
Page 26: ...5 preset data of cover function in the right bottom Choose 1 of the 5 preset data then the screen will show up some required information need to be inputted After finished all setting click finish to...

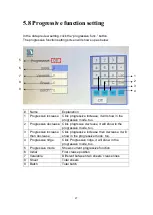
Page 27: ...e decrease Click progrssive decrease it will show in the progressive mode too 3 Progressive increase then decrease Click progressive increase then decrease it will show in the progressive mode too 4 P...

Page 28: ...ative data for example initial 20 variable 1 0 sheet 7 Batch 0 figure 2 Next return to data preview screen The data will show up figure 3 Progressive increase concept diagram According to above diagra...

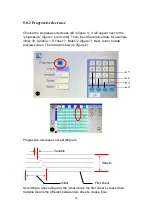
Page 29: ...ative data for example initial 30 variable 1 0 sheet 7 Batch 2 figure 1 Next return to data preview screen The data will show up figure 2 Progressive decrease concept diagram According to above diagra...

Page 30: ...e increase then decrease 3 in figure 1 it will appear next to the progressive figure 1 s red circle Then input the relative data for example initial 20 variable 0 5 sheet 11 Batch 2 figure 1 Next retu...

Page 31: ...different between two sheet s crease lines For example sheets number is 11 1st to 6th are progressive increase by 0 5mm then 7th to 11th are progressive decrease by 0 5mm The book after this function...

Page 32: ...decrease 4 in figure 1 it will appear next to the progressive figure 1 s red circle Then input the relative data for example initial 210 variable 0 3 sheet 7 Batch 2 figure 1 Next return to data prev...

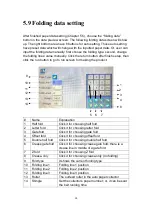
Page 33: ...Click it for choosing half fold 2 Letter fold Click it for choosing letter fold 3 Gate fold Click it for choosing gate fold 4 Offset fold Click it for choosing offset fold 5 Double half fold Click it...

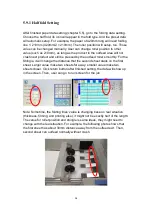
Page 34: ...roller smoothly For the Shingle it will change the distance that the second sheet stack on the first sheet Larger value make two sheets far away smaller value make two sheets closer Click return butto...

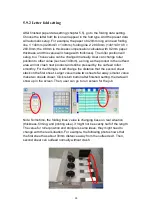
Page 35: ...the outfeed area will not crash next product and still be pressed by the outfeed roller smoothly For the Shingle it will change the distance that the second sheet stack on the first sheet Larger value...

Page 36: ...as the product in the outfeed area will not crash next product and still be pressed by the outfeed roller smoothly For the Shingle it will change the distance that the second sheet stack on the first...

Page 37: ...ed by the outfeed roller smoothly For the Shingle it will change the distance that the second sheet stack on the first sheet Larger value make two sheets far away smaller value make two sheets closer...

Page 38: ...sition to other value such as 105mm as long as the product in the outfeed area will not crash next product and still be pressed by the outfeed roller smoothly For the Shingle it will change the distan...

Page 39: ...o other value such as 210mm as long as the product in the outfeed area will not crash next product and still be pressed by the outfeed roller smoothly For the Shingle it will change the distance that...

Page 40: ...the outfeed roller smoothly For the Shingle it will change the distance that the second sheet stack on the first sheet Larger value make two sheets far away smaller value make two sheets closer Click...

Page 41: ...After that user can recall this job by clicking the open icon in the home screen ch5 3 4 The figure 3 screen of saved job will show up Choose any one of the jobs the job data will appear in the data...

Page 42: ...etch shrink forward and backward When user needs to adjust the whole crease fold data with similar rate there 4 buttons can useful The detail function of the 4 buttons is shown in below photo The red...

Page 43: ...after finish this number of batch 6 Crease line It shows what color green is the crease line in the diagram 7 Folding line It shows what color yellow is the folding line in the diagram 8 Down The fee...

Page 44: ...e will run remain unprocessed sheets For example if paper jam happen on the 3rd sheets the sheet number will show 2 5 After user clean the paper jam and click run again the machine will run 3 more she...

Page 45: ...it to confirm 6 Numbers Input data 7 Scroll up Turn the page up 8 Scroll down Turn the page down 9 Mode Change the modes 10 Forward Increase When paper jams press them to move rollers so that the pap...

Page 46: ...will show Ready In the below diagram the 0 5 means sheets number for each batch 0 means the number of processed sheets means the current folding type 420 means the paper length In the ready mode user...

Page 47: ...follow photo There are user mode service mode and recalibrate Click the user mode the follow screen will show up User can change the machine s unit mm or inch and LCD light power The Fan 1 or 2 are fo...

Page 48: ...trol the blowing air vent s gate or the holes It will affect the blowing air s power by changing the blow air s area That means this switch does not directly control the fans power For some cases user...

Page 49: ...ckwise to unlock it Turning the switch clockwise will make the suction fan stronger turning the switch counter clockwise will make the suction fan weaker When using thicker or larger size paper please...

Page 50: ...suggested gap adjustment tables next to the diagram Remark The roller gap need to be adjusted when the stack thickness or fold type is changed We must adjust it by insetting strips on the positions o...

Page 51: ...0 30 0 35mm 0 1 0 2mm 0 1 0 2mm Offset fold 128 157g 0 12 0 16mm 157 200g 0 16 0 20mm 200 250g 0 20 0 25mm 250 300g 0 25 0 30mm 0 1 0 2mm 300 350g 0 30 0 35mm 0 1 0 2mm 0 2 0 3mm Double half dold 128...

Page 52: ...in the product is skewed or it is not perpendicular to the side of paper user can adjust the skewing adjustment switch to change the infeed angle for better result In the figure 2 when turn the skewin...

Page 53: ...how error message Note For perforation bar please make sure the white plastic paper deflector faces the feeding table Then the crease depth setting in paper data setting screen might need to change de...

Page 54: ...54 Below photo shows a zoom in view of the mark...

Page 55: ...ean the parts in a period The period will be vary by usage environment or weather There are two mainly cleaning 1st clean the roller with wet cloth 2nd clean the sensors with air gun or cotton swab Me...

Page 56: ...the red circled sensor when needed 6 2 Clean the rollers Dust or ink from paper might stick on rollers that reduce the friction of the rollers and make error for example crease line is out of toleranc...

Page 57: ...and tear this does not cover film jams misfeeds or other operator related errors which would be chargeable Your MCPF 35 is covered against manufacturing defects it does not cover against any damages...

Reviews: